
通过 Adf.Service 嵌入,可简单实现一个 .Net 项目的 windows 服务
下载:
Adf.Service http://www.aooshi.org/adf/download/Adf.Service.1.3.zip
源码:
应用:
1. 创建控制台应用程序, 版本2.0或以上
2. 引用: adf.dll, adf.service
3. 修改: Program为共公public访问符
4. Program 继承Adf.Service.IService, Main 函数调用 Adf.Service.ServiceHelper.Entry(args);
5. 建立: app.config 文件,并配置 ServiceMonitorPort
6. 复制 Tool*.bat 并修改Adf.Service.Test为你的应用程序
Program.cs 参考:
using System;
using System.Collections.Specialized;

namespace Adf.Service.Test
{
    /// <summary>
    /// 程序入口
    /// </summary>
    public class Program : IService
    {
        /// <summary>
        /// 应用程序的主入口点。
        /// </summary>
        /// <param name="args"></param>
        static void Main(string[] args)
        {
            Adf.Service.ServiceHelper.Entry(args);
        }

        public void Initialize(ServiceContext serviceContext)
        {
            //注册当前服务至注册中心
            //serviceContext.MonitorToRegistry();
        }

        public void Start(ServiceContext serviceContext)
        {
            serviceContext.Logger.Message.WriteLine("My Service Start");
        }

        public void Stop(ServiceContext serviceContext)
        {
            serviceContext.Logger.Message.WriteLine("My Service Stop");
        }

        public System.Net.HttpStatusCode HttpAction(string action, ServiceContext serviceContext, HttpServerContext httpServerContext)
        {
            serviceContext.Logger.Message.WriteLine("httpaction:" + httpServerContext.Url);
            return System.Net.HttpStatusCode.OK;
        }


        public string Status(ServiceContext serviceContext, NameValueCollection queryString)
        {
            return string.Empty;
        }

        public void Dispose()
        {

        }
    }
}
配置参考:
<?xml version="1.0"?>
<configuration>
  <configSections>
    <section name="cluster" type="Adf.Config.IpGroupSection,Adf"/>
    <section name="Registry" type="Adf.Config.IpGroupSection,Adf"/>
    <section name="Authorization" type="System.Configuration.DictionarySectionHandler" />
  </configSections>
  <appSettings>

    <!-- 服务监控IP,不配置则仅本机可浏览 -->
    <!--<add key="ServiceMonitorIp" value="*"/>-->

    <!-- 服务监控端口 -->
    <add key="ServiceMonitorPort" value="8456"/>
     <!--日志刷新值-->
    <add key="Log:FlushInterval" value="10"/>
    <!-- 日志路径 -->
    <add key="Log:Path" value="c:\log\adf.service"/>

    <!-- 禁止安装完成后自动启动 -->
    <!--<add key="ServiceInstalledStart" value="false"/>-->

    <!-- 服务使用的帐户,默认: LocalSystem, 还可系统帐户 LocalService,NetworkService 系统帐户时不配置密码, 自建帐户需配置密码 -->
    <!--<add key="ServiceUsername" value=""/>-->
    <!--<add key="ServicePassword" value=""/>-->

    <!-- 本服务依赖的服务清单,多个以半角分号隔开 -->
    <!--<add key="ServiceDepended" value="server1;server2;server3"/>-->
  </appSettings>

  <!-- Cluster Check Interval, seconds,default 10 -->
  <!--<cluster check="1">
    <add ip="127.0.0.1" port="8456" level="1" />
    <add ip="127.0.0.2" port="8456" />
    <add ip="127.0.0.3" port="8456" />
  </cluster>-->

  <!-- Registry Server List, check is register period,  suggest: ip use dns name  -->
  <!--<Registry check="60">
    <add ip="127.0.0.1" port="200" />
  </Registry>-->

  <!-- 允许访问的用户名及密码 -->
  <!--<Authorization>
    <add key="username1" value="password" />
    <add key="username2" value="password" />
  </Authorization>-->

  <startup>
    <supportedRuntime version="v2.0.50727"/>
  </startup>
</configuration>
调试:
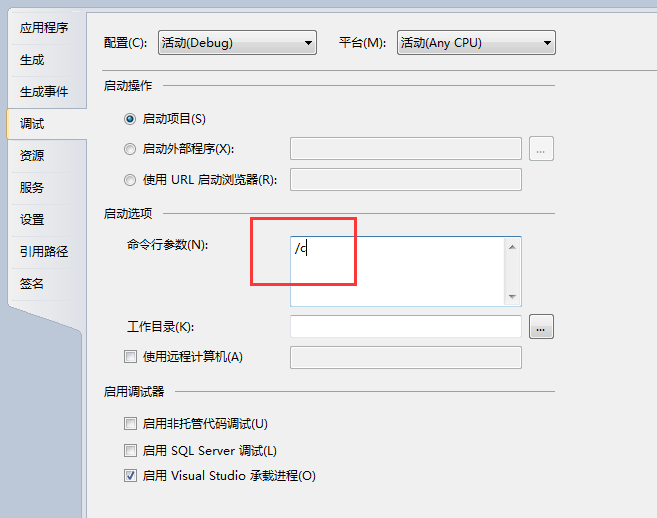
调试配置
1、 右键项目->属性->调试->命令行参数->输入 /c
如图:
配置完成后按 F5 启动应用
监控面板:
此服务自带监控面板
http://ServiceMonitorIp:ServiceMonitorPort /
其它:
服务应用成功后, 在Start 方法中初始化一个Adf.Cs.ServerListen 可以搭建一个Cs项目
CS 应用参考 :http://www.xiaobo.li/adf/513.html
参考:
Adf.Cs.ServerListen listen;
public void Start(Adf.Service.ServiceContext serviceContext)
{
    this.listen = new Adf.Cs.ServerListen(serviceContext.Logger);
    //是否自动注册到注册中心
    if (serviceContext.Registry.Enable)
    {
        var node = new Dictionary<string, object>();
        node.Add("group", serviceContext.Setting.ServiceName);
        node.Add("port", this.listen.Port);

        serviceContext.Registry.RegisterNode(node);
    }
}
public void Stop(Adf.Service.ServiceContext serviceContext)
{
    this.listen.Dispose();
}