js oauth_v1.0

/* ***** BEGIN LICENSE BLOCK *****
* Version: MPL 1.1/GPL 2.0/LGPL 2.1
*
* The contents of this file are subject to the Mozilla Public License Version
* 1.1 (the "License"); you may not use this file except in compliance with
* the License. You may obtain a copy of the License at
* http://www.mozilla.org/MPL/
*
* Software distributed under the License is distributed on an "AS IS" basis,
* WITHOUT WARRANTY OF ANY KIND, either express or implied. See the License
* for the specific language governing rights and limitations under the
* License.
*
* The Original Code is FireUploader
*
* The Initial Developer of the Original Code is Rahul Jonna.
*
* Portions created by the Initial Developer are Copyright (C) 2007-2009
* the Initial Developer. All Rights Reserved.
*
* Alternatively, the contents of this file may be used under the terms of
* either the GNU General Public License Version 2 or later (the "GPL"), or
* the GNU Lesser General Public License Version 2.1 or later (the "LGPL"),
* in which case the provisions of the GPL or the LGPL are applicable instead
* of those above. If you wish to allow use of your version of this file only
* under the terms of either the GPL or the LGPL, and not to allow others to
* use your version of this file under the terms of the MPL, indicate your
* decision by deleting the provisions above and replace them with the notice
* and other provisions required by the GPL or the LGPL. If you do not delete
* the provisions above, a recipient may use your version of this file under
* the terms of any one of the MPL, the GPL or the LGPL.
*
* ***** END LICENSE BLOCK ***** */

var SoundCloud = {};

(function()
{
    /**
    * USAGE:
    * 
    * @param {Object} loginUrl - The webpage url for login
    * @param {Object} apiUrl - The api end point
    * @param {Object} apiKey
    * @param {Object} secretKey
    * @param {Object} additionalParams - Additional parameters to send if any, like version number etc
    * @param {Object} afterAuthorizeCallback - callback function that is called after authentication
    *
    * var oAuth = new SoundCloud.OAuth("http://api.soundcloud.com/oauth/authorize", "http://api.soundcloud.com/", 
    *	"your_api_key", "your_api_secret", {"version": "1.0"}, function(oauthObj) {});
    * oAuth.startAuthentication(); 
    *	
    * At the end, oauthObj.accessToken and oauthObj.accessTokenSecret will have the access token and token secret respectively
    *
    */
    function x_OAuth(loginUrl, apiUrl, apiKey, secretKey, additionalParams, afterAuthorizeCallback)
    {
        this.loginUrl = loginUrl;
        this.apiUrl = apiUrl;
        this.apiKey = apiKey;
        this.secretKey = secretKey;

        this.requestToken;
        this.accessToken;

        this.requestTokenSecret;
        this.accessTokenSecret;

        this.afterAuthorizeCallback = afterAuthorizeCallback;
        this.userName;

        for (var key in additionalParams)
            this[key] = additionalParams[key];
    }

    x_OAuth.prototype = {

        //starts the authentication process	
        startAuthentication: function()
        {
            this.getRequestToken();
        },

        getParamString: function(params)
        {
            var arr = [], i = 0;
            for (var key in params)
            {
                arr[i++] = key + "=" + params[key];
            }
            return arr.join("&");
        },

        //encodes the special characters according to the RFC standard
        rfcEncoding: function(str)
        {
            var tmp = encodeURIComponent(str);
            tmp = tmp.replace('!', '%21');
            tmp = tmp.replace('*', '%2A');
            tmp = tmp.replace('(', '%28');
            tmp = tmp.replace(')', '%29');
            tmp = tmp.replace("'", '%27');
            return tmp;
        },

        //assigns the common parameters for all requests
        getCommonParams: function(params)
        {
            params = params || [];
            params["oauth_consumer_key"] = this.apiKey;
            params["oauth_timestamp"] = Math.ceil((new Date()).getTime() / 1000);
            params["oauth_nonce"] = (new Date()).getTime();
            params["oauth_version"] = this.version;
            if (this.format)
                params["format"] = this.format;
            params["oauth_signature_method"] = "HMAC-SHA1";

            return params;
        },

        getSecretKey: function(tokenType)
        {
            return this.secretKey +
			"&" +
			((tokenType == "beforeAuthentication") ? "" : ((tokenType == "request") ? this.requestTokenSecret : this.accessTokenSecret));
        },

        //makes the signature using SHA1 algorithm
        getSignature: function(method, url, paramString, tokenType)
        {
            var stringToSign = [this.rfcEncoding(method), this.rfcEncoding(url), this.rfcEncoding(paramString)].join("&");
            return Soundcloud.SHA1.b64_hmac_sha1(this.getSecretKey(tokenType), stringToSign);
        },

        //gets the request token
        getRequestToken: function()
        {
            var params = this.getCommonParams();

            var url = this.apiUrl + "oauth/request_token";
            var paramString = this.normalizeParams(params);
            var method = "POST";
            var signature = this.getSignature(method, url, paramString, "beforeAuthentication");
            paramString += "&oauth_signature=" + this.rfcEncoding(signature);

            Soundcloud.xhttp.doRequest(method, url, paramString, "", false, null, this, function(objResponse)
            {
                if (!objResponse.hasErrors)
                {
                    objResponse.responseText = Soundcloud.utils.trimWhitespace(objResponse.responseText) + "&";
                    var reg1 = /oauth_token=(.*?)&/gi;
                    var reg2 = /oauth_token_secret=(.*?)&/gi;
                    var arrToken = reg1.exec(objResponse.responseText);
                    if (arrToken)
                    {
                        this.requestToken = arrToken[1];
                        this.showLoginPage(arrToken[1]);
                    }
                    else
                        throw new Error("Failed to get request token");

                    var arrTokenSecret = reg2.exec(objResponse.responseText);
                    if (arrTokenSecret)
                        this.requestTokenSecret = arrTokenSecret[1];
                    else
                        throw new Error("Failed to get request token");
                }
                else
                    throw new Error("Failed to get request token");
            });
        },

        //get access token
        getAccessToken: function(token)
        {
            var params = this.getCommonParams();
            params["oauth_token"] = token;
            var url = this.apiUrl + "oauth/access_token";
            var paramString = this.normalizeParams(params);
            var method = "POST";
            var signature = this.getSignature(method, url, paramString, "request");
            paramString += "&oauth_signature=" + this.rfcEncoding(signature);

            Soundcloud.xhttp.doRequest(method, url, "", paramString, false, null, this, function(objResponse)
            {
                if (!objResponse.hasErrors)
                {
                    var tokenList = objResponse.responseText.split("&");

                    var reg1 = /oauth_token=(.*)/gi;
                    var reg2 = /oauth_token_secret=(.*)/gi;

                    var accessToken, tokenSecret;
                    var arrToken = reg1.exec(tokenList[0]);
                    if (arrToken)
                    {
                        this.accessToken = arrToken[1];
                    }
                    else
                    {
                        throw new Error("Failed to get access token. Check if your username and password is valid.");
                    }
                    var arrTokenSecret = reg2.exec(tokenList[1]);
                    if (arrTokenSecret)
                    {
                        this.accessTokenSecret = arrTokenSecret[1];
                    }
                    else
                    {
                        throw new Error("Failed to get access token. Check if your username and password is valid.");
                    }
                    if (this.afterAuthorizeCallback)
                    {
                        this.afterAuthorizeCallback.call(null, this);
                    }
                }
                else
                    throw new Error("Failed to get access token. Check if your username and password is valid.");
            });
        },

        //sorts the parameters and creats a GET string to be sent to the server
        normalizeParams: function(params)
        {
            for (var key in params)
                params[key] = this.rfcEncoding(params[key]);

            return Soundcloud.utils.join("&", "=", params, true);
        },

        //show the login page
        showLoginPage: function(token)
        {
            var doneAuthorizing = false;
            var callbackFunc = function(isDone)
            {
                doneAuthorizing = isDone;
            };

            var url = this.loginUrl + "?oauth_token=" + token;
            window.openDialog("chrome://fireuploader/content/loginPanel.xul", "Login/Authorization Panel", "chrome,centerscreen,modal,width=350,height=400", url, callbackFunc);
            if (doneAuthorizing)
            {
                this.getAccessToken(token);
            }
        }
    };

    this.OAuth = x_OAuth;

    this.utils = {
        join: function(separator1, separator2, arr, sort)
        {
            var arrKeys = [];
            for (var key in arr)
            {
                arrKeys.push(key);
            }
            if (sort)
                arrKeys.sort();

            var newArr = [];
            for (var i = 0; i < arrKeys.length; i++)
            {
                if (separator2 != "")
                {
                    newArr.push(arrKeys[i] + separator2 + arr[arrKeys[i]]);
                }
                else
                {
                    newArr.push(arrKeys[i]);
                    newArr.push(arr[arrKeys[i]]);
                }
            }

            return newArr.join(separator1);
        },

        // Remove leading and trailing whitespace from a string
        trimWhitespace: function(str)
        {
            return str.replace(/^\s*(\S*(\s+\S+)*)\s*$/, "$1");
        }
    }

    this.xhttp = {
        //a wrapper to XMLHttpRequest object

        /**
        * @param {string} verb - GET, POST, PUT, DELETE
        * @param {string} resLoc - Url of the resource
        * @param {string} getData - Data that's sent in the url
        * @param {string} objData - Data that's sent during POST, PUT
        * @param {bool} isSync - whether to make a syncronous or asynchronous request
        * @param {Object} arrHeaders - array of headers(name, value pairs) that's sent in the request 
        * @param {Object} callbackObject - scope of the callback function
        * @param {Object} callbackFunc - callback function that's called after asyncronous response
        */
        doRequest: function(verb, resLoc, getData, objData, isSync, arrHeaders, callbackObject, callbackFunc)
        {
            try
            {
                var xmlhttp = new XMLHttpRequest();
                if (getData != "")
                    getData = "?" + getData;

                resLoc = encodeURI(resLoc);
                var aUrl = (resLoc.indexOf("http") == -1) ? this.host + resLoc + getData : resLoc + getData;
                xmlhttp.open(verb, aUrl, !isSync);

                if (verb == "POST")
                    xmlhttp.setRequestHeader('Content-Type', 'application/x-www-form-urlencoded; charset=utf-8');

                if (arrHeaders instanceof Array)
                {
                    for (var i = 0; i < arrHeaders.length; i++)
                    {
                        xmlhttp.setRequestHeader(arrHeaders[i].name, arrHeaders[i].value);
                    }
                }

                xmlhttp.send(objData);

                var domParser = new DOMParser(); //Components.classes["@mozilla.org/xmlextras/domparser;1"].createInstance(Components.interfaces.nsIDOMParser);
                if (isSync)
                {
                    if (xmlhttp.status >= 200 && xmlhttp.status < 300)
                    {
                        try
                        {
                            var xmlDoc1 = domParser.parseFromString(xmlhttp.responseText, "text/xml");
                        }
                        catch (ex)
								{ }

                        var responseObject = {
                            responseText: xmlhttp.responseText,
                            xmlDoc: xmlDoc1,
                            strHeaders: xmlhttp.getAllResponseHeaders()
                        };
                        callbackFunc.call(callbackObject, responseObject);
                        return responseObject;
                    }
                    else
                    {

                        try
                        {
                            var xmlDoc1 = domParser.parseFromString(xmlhttp.responseText, "text/xml");
                        }
                        catch (ex2)
                        {
                            alert(ex2);
                        }
                        var errorMessage = "Error connecting! Try again - " + xmlhttp.status + " " + xmlhttp.statusText;

                        if (xmlDoc1 != null && xmlDoc1.getElementsByTagName("Message")[0])
                            errorMessage = xmlDoc1.getElementsByTagName("Message")[0].firstChild.nodeValue;

                        var responseObject = {
                            responseText: xmlhttp.responseText,
                            xmlDoc: xmlDoc1,
                            strHeaders: xmlhttp.getAllResponseHeaders(),
                            errorMessage: errorMessage,
                            hasErrors: true
                        };

                        callbackFunc.call(callbackObject, responseObject);

                        return false;
                    }
                }
                else
                {
                    xmlhttp.onreadystatechange = function()
                    {
                        if (xmlhttp.readyState != 4)
                            return;
                        else
                        {
                            if (xmlhttp.status >= 200 && xmlhttp.status < 300)
                            {
                                try
                                {
                                    var xmlDoc1 = domParser.parseFromString(xmlhttp.responseText, "text/xml");
                                }
                                catch (ex)
								{ }
                                var responseObject = {
                                    responseText: xmlhttp.responseText,
                                    xmlDoc: xmlDoc1,
                                    strHeaders: xmlhttp.getAllResponseHeaders()
                                };
                                callbackFunc.call(callbackObject, responseObject);
                            }
                            else
                            {
                                try
                                {
                                    var xmlDoc1 = domParser.parseFromString(xmlhttp.responseText, "text/xml");
                                }
                                catch (ex)
								{ }
                                var errorMessage = "Error connecting! Try again - " + xmlhttp.status + " " + xmlhttp.statusText;
                                if (xmlDoc1 != null && xmlDoc1.getElementsByTagName("Message")[0])
                                    errorMessage = xmlDoc1.getElementsByTagName("Message")[0].firstChild.nodeValue;

                                var responseObject = {
                                    responseText: xmlhttp.responseText,
                                    xmlDoc: xmlDoc1,
                                    strHeaders: xmlhttp.getAllResponseHeaders(),
                                    errorMessage: errorMessage,
                                    hasErrors: true
                                };
                                callbackFunc.call(callbackObject, responseObject);
                            }
                        }
                    }
                }
            }
            catch (ex)
            {
                alert(ex);
            }
        }
    }

    this.SHA1 =
    {
        /*
        * A JavaScript implementation of the Secure Hash Algorithm, SHA-1, as defined
        * in FIPS PUB 180-1
        * Version 2.1a Copyright Paul Johnston 2000 - 2002.
        * Other contributors: Greg Holt, Andrew Kepert, Ydnar, Lostinet
        * Distributed under the BSD License
        * See http://pajhome.org.uk/crypt/md5 for details.  
        */

        /*
        * Configurable variables. You may need to tweak these to be compatible with
        * the server-side, but the defaults work in most cases.
        */
        hexcase: 0,  /* hex output format. 0 - lowercase; 1 - uppercase        */
        b64pad: "=", /* base-64 pad character. "=" for strict RFC compliance   */
        chrsz: 8,  /* bits per input character. 8 - ASCII; 16 - Unicode      */

        /*
        * These are the functions you'll usually want to call
        * They take string arguments and return either hex or base-64 encoded strings
        */
        hex_sha1: function(s) { return this.binb2hex(this.core_sha1(this.str2binb(s), s.length * this.chrsz)); },
        b64_sha1: function(s) { return this.binb2b64(this.core_sha1(this.str2binb(s), s.length * this.chrsz)); },
        str_sha1: function(s) { return this.binb2str(this.core_sha1(this.str2binb(s), s.length * this.chrsz)); },
        hex_hmac_sha1: function(key, data) { return this.binb2hex(this.core_hmac_sha1(key, data)); },
        b64_hmac_sha1: function(key, data) { return this.binb2b64(this.core_hmac_sha1(key, data)); },
        str_hmac_sha1: function(key, data) { return this.binb2str(this.core_hmac_sha1(key, data)); },

        /*
        * Perform a simple self-test to see if the VM is working
        */
        sha1_vm_test: function()
        {
            return hex_sha1("abc") == "a9993e364706816aba3e25717850c26c9cd0d89d";
        },

        /*
        * Calculate the SHA-1 of an array of big-endian words, and a bit length
        */
        core_sha1: function(x, len)
        {
            /* append padding */
            x[len >> 5] |= 0x80 << (24 - len % 32);
            x[((len + 64 >> 9) << 4) + 15] = len;

            var w = Array(80);
            var a = 1732584193;
            var b = -271733879;
            var c = -1732584194;
            var d = 271733878;
            var e = -1009589776;

            for (var i = 0; i < x.length; i += 16)
            {
                var olda = a;
                var oldb = b;
                var oldc = c;
                var oldd = d;
                var olde = e;

                for (var j = 0; j < 80; j++)
                {
                    if (j < 16) w[j] = x[i + j];
                    else w[j] = this.rol(w[j - 3] ^ w[j - 8] ^ w[j - 14] ^ w[j - 16], 1);
                    var t = this.safe_add(this.safe_add(this.rol(a, 5), this.sha1_ft(j, b, c, d)),
						    this.safe_add(this.safe_add(e, w[j]), this.sha1_kt(j)));
                    e = d;
                    d = c;
                    c = this.rol(b, 30);
                    b = a;
                    a = t;
                }

                a = this.safe_add(a, olda);
                b = this.safe_add(b, oldb);
                c = this.safe_add(c, oldc);
                d = this.safe_add(d, oldd);
                e = this.safe_add(e, olde);
            }
            return Array(a, b, c, d, e);
        },

        /*
        * Perform the appropriate triplet combination function for the current
        * iteration
        */
        sha1_ft: function(t, b, c, d)
        {
            if (t < 20) return (b & c) | ((~b) & d);
            if (t < 40) return b ^ c ^ d;
            if (t < 60) return (b & c) | (b & d) | (c & d);
            return b ^ c ^ d;
        },

        /*
        * Determine the appropriate additive constant for the current iteration
        */
        sha1_kt: function(t)
        {
            return (t < 20) ? 1518500249 : (t < 40) ? 1859775393 :
			    (t < 60) ? -1894007588 : -899497514;
        },

        /*
        * Calculate the HMAC-SHA1 of a key and some data
        */
        core_hmac_sha1: function(key, data)
        {
            var bkey = this.str2binb(key);
            if (bkey.length > 16) bkey = this.core_sha1(bkey, key.length * this.chrsz);

            var ipad = Array(16), opad = Array(16);
            for (var i = 0; i < 16; i++)
            {
                ipad[i] = bkey[i] ^ 0x36363636;
                opad[i] = bkey[i] ^ 0x5C5C5C5C;
            }

            var hash = this.core_sha1(ipad.concat(this.str2binb(data)), 512 + data.length * this.chrsz);
            return this.core_sha1(opad.concat(hash), 512 + 160);
        },

        /*
        * Add integers, wrapping at 2^32. This uses 16-bit operations internally
        * to work around bugs in some JS interpreters.
        */
        safe_add: function(x, y)
        {
            var lsw = (x & 0xFFFF) + (y & 0xFFFF);
            var msw = (x >> 16) + (y >> 16) + (lsw >> 16);
            return (msw << 16) | (lsw & 0xFFFF);
        },

        /*
        * Bitwise rotate a 32-bit number to the left.
        */
        rol: function(num, cnt)
        {
            return (num << cnt) | (num >>> (32 - cnt));
        },

        /*
        * Convert an 8-bit or 16-bit string to an array of big-endian words
        * In 8-bit function, characters >255 have their hi-byte silently ignored.
        */
        str2binb: function(str)
        {
            var bin = Array();
            var mask = (1 << this.chrsz) - 1;
            for (var i = 0; i < str.length * this.chrsz; i += this.chrsz)
                bin[i >> 5] |= (str.charCodeAt(i / this.chrsz) & mask) << (32 - this.chrsz - i % 32);
            return bin;
        },

        /*
        * Convert an array of big-endian words to a string
        */
        binb2str: function(bin)
        {
            var str = "";
            var mask = (1 << this.chrsz) - 1;
            for (var i = 0; i < bin.length * 32; i += this.chrsz)
                str += String.fromCharCode((bin[i >> 5] >>> (32 - this.chrsz - i % 32)) & mask);
            return str;
        },

        /*
        * Convert an array of big-endian words to a hex string.
        */
        binb2hex: function(binarray)
        {
            var hex_tab = this.hexcase ? "0123456789ABCDEF" : "0123456789abcdef";
            var str = "";
            for (var i = 0; i < binarray.length * 4; i++)
            {
                str += hex_tab.charAt((binarray[i >> 2] >> ((3 - i % 4) * 8 + 4)) & 0xF) +
			    hex_tab.charAt((binarray[i >> 2] >> ((3 - i % 4) * 8)) & 0xF);
            }
            return str;
        },

        /*
        * Convert an array of big-endian words to a base-64 string
        */
        binb2b64: function(binarray)
        {
            var tab = "ABCDEFGHIJKLMNOPQRSTUVWXYZabcdefghijklmnopqrstuvwxyz0123456789+/";
            var str = "";
            for (var i = 0; i < binarray.length * 4; i += 3)
            {
                var triplet = (((binarray[i >> 2] >> 8 * (3 - i % 4)) & 0xFF) << 16)
					    | (((binarray[i + 1 >> 2] >> 8 * (3 - (i + 1) % 4)) & 0xFF) << 8)
					    | ((binarray[i + 2 >> 2] >> 8 * (3 - (i + 2) % 4)) & 0xFF);
                for (var j = 0; j < 4; j++)
                {
                    if (i * 8 + j * 6 > binarray.length * 32) str += this.b64pad;
                    else str += tab.charAt((triplet >> 6 * (3 - j)) & 0x3F);
                }
            }
            return str;
        }
    }
}).call(SoundCloud);
发表在 javascript | 标签为 , | js oauth_v1.0已关闭评论

PNG transparency in Win IE 5.5 & 6

function correctPNG() // correctly handle PNG transparency in Win IE 5.5 & 6.
{
    var arVersion = navigator.appVersion.split("MSIE")
    var version = parseFloat(arVersion[1])
    if ((version >= 5.5) && (document.body.filters))
    {
       for(var j=0; j<document.images.length; j++)
       {
          var img = document.images[j]
          var imgName = img.src.toUpperCase()
          if (imgName.substring(imgName.length-3, imgName.length) == "PNG")
          {
             var imgID = (img.id) ? "id='" + img.id + "' " : ""
             var imgClass = (img.className) ? "class='" + img.className + "' " : ""
             var imgTitle = (img.title) ? "title='" + img.title + "' " : "title='" + img.alt + "' "
             var imgStyle = "float:left;margin:0 10px;" + img.style.cssText 
             if (img.align == "left") imgStyle = "float:left;" + imgStyle
             if (img.align == "right") imgStyle = "float:right;" + imgStyle
             if (img.parentElement.href) imgStyle = "cursor:hand;" + imgStyle
             var strNewHTML = "<span " + imgID + imgClass + imgTitle
             + " style=\"" + "width:" + img.width + "px; height:" + img.height + "px;" + imgStyle + ";"
             + "filter:progid:DXImageTransform.Microsoft.AlphaImageLoader"
             + "(src=\'" + img.src + "\', sizingMethod='scale');\"></span>"
             img.outerHTML = strNewHTML
             j = j-1
          }
       }
    }    
}
if(!window.XMLHttpRequest){
window.attachEvent("onload", correctPNG);
}
发表在 javascript | PNG transparency in Win IE 5.5 & 6已关闭评论

Windows8 各种版本区别对比

功能特性 Windows RT Windows 8

(标准版)
Windows8 Pro

(专业版)
Windows 8 Enterprise

(企业版)
与现有Windows 兼容
购买渠道 在设备上预装 大多数渠道 大多数渠道 经过认证的客户
架构 ARM (32-bit) IA-32 (32-bit) or x86-64 (64-bit) IA-32 (32-bit) or x86-64 (64-bit) IA-32 (32-bit) or x86-64 (64-bit)
安全启动
图片密码
开始界面、动态磁帖以及相关效果
触摸键盘、拇指键盘
语言包
更新的资源管理器
标准程序
文件历史
系统的重置功能
Play To “播放至”功能
Connected standby保持网络连接的待机
Windows Update
Windows Defender
增强的多显示屏支持
新的任务管理器
ISO 镜像 and VHD 挂载
移动通信功能
Microsoft 账户
Internet Explorer 10
SmartScreen
Windows 商店
Xbox Live 程序 (包括 Xbox Live Arcade)
Exchange ActiveSync
快速睡眠(snap)
VPN连接
Device encryption
随系统预装的Microsoft Office
桌面 部分
储存空间管理(storage space)
Windows Media Player
Windows Media Center 需另行添加
远程桌面 只作客户端 只作客户端 客户端和服务端 客户端和服务端
从VHD启动
BitLocker and BitLocker To Go
文件系统加密
加入Windows 域
组策略
AppLocker
Hyper-V 仅64bit支持
Windows To Go
DirectAccess
分支缓存(BranchCache)
以RemoteFX提供视觉特效
Metro风格程序的部署

表中最后几行是企业版独有的几个功能(仅供参考):

  • Windows To Go:允许 Windows 8 从 U 盘或者外置硬盘启动,这里有视频教程
  • DirectAccess:远程直接登入,这是类似于 VPN 的一种连接方式,不同的是只要客户机一开机它就会连接上,而不需要初始化。
  • 分支缓存(BranchCache):分支缓存使分支办公室中的客户端能够安全地检索缓存在本地的文件,而无需从主办公室服务器检索文件。
  • 以RemoteFX提供视觉特效:这是远程桌面协议(RDP)功能的增强,使用服务器端的图形显卡来处理然后将高分辨率位图发送到客户端桌面。
发表在 windows | 标签为 | Windows8 各种版本区别对比已关闭评论

innerHTML script

function parseScript(html)
{
	var result = { html:'',scripts:[] };
	if (html)
	{
		//脚本
		//var re = /(?:<script([^>]*)?>)((\n|\r|.)*?)(?:<\/script>)/ig;
		var re = /(?:<script([^>]*text\/javascript[^>]*)?>)((\n|\r|.)*?)(?:<\/script>)/ig;
		//外部脚本
		var srcRe = /\ssrc=([\'\"])(.*?)\1/i;
		var match;
		//
		while(match = re.exec(html))
		{
			var item = { src:'', text:''};
			//
			var attrs = match[1];
			var srcMatch = attrs ? attrs.match(srcRe) : false;
		    //外部
		    if(srcMatch && srcMatch[2]){
				item.src = srcMatch[2];
		    //内部
		    }else if(match[2] && match[2].length > 0){
				item.text = match[2];
		    }
			//
			result.scripts.push(item);	
		}
		result.html = html.replace(re, "");	
	}
	return result;
}


if (data = parseScript(data))
			{	
				if (data.html != '')
					main.innerHTML = data.html;
				for(var i=0;i<data.scripts.length;i++)
				{
					var item = data.scripts[i];
					if (item.text != '')
					{
						eval(item.text);
					}
					else if (item.src != '')
					{
						var tag = document.createElement('script');
						tag.setAttribute('type','text/javascript');
						tag.setAttribute('src', item.src);
						main.appendChild(tag);
					}					
				}
			}
发表在 javascript | 标签为 , | innerHTML script已关闭评论

Adf

Aooshi DotNet Framework (Adf)

PS:原名 Aooshi.dll  自3.7版本起更名为 Adf


Source(源代码授权):

User(帐户): readonly
Pass(密码): readonly

Aooshi(源代码):

https://svn.aooshi.org:8080/svn/adf/tags/aooshi/3.7


Adf(源代码):

https://svn.aooshi.org:8080/svn/adf/tags/adf/4.2

https://svn.aooshi.org:8080/svn/adf/tags/adf.cs/1.2

https://svn.aooshi.org:8080/svn/adf/tags/adf.cs/1.3

https://svn.aooshi.org:8080/svn/adf/tags/adf.scheduler/1.0

https://svn.aooshi.org:8080/svn/adf/tags/adf.service/1.0

https://svn.aooshi.org:8080/svn/adf/tags/db/2.2

https://svn.aooshi.org:8080/svn/adf/tags/IdGenerate/1.0

https://svn.aooshi.org:8080/svn/adf/tags/adf.registryserver/1.0/

https://svn.aooshi.org:8080/svn/adf/tags/TaskScheduler/1.0

https://svn.aooshi.org:8080/svn/adf/bin


Download(下载):

http://www.aooshi.org/adf/download

http://www.aooshi.org/adf/download/Adf.4.5.2.zip

http://www.aooshi.org/adf/download/Adf.Web.4.5.2.zip

http://www.aooshi.org/adf/download/Adf.Service.1.3.zip

http://www.aooshi.org/adf/download/Adf.Scheduler.2.0.zip

http://www.aooshi.org/adf/db/

http://www.aooshi.org/adf/download/Adf.Cs.1.4.zip

http://www.aooshi.org/adf/download/Adf.CacheServer-1.0.zip

http://www.aooshi.org/adf/download/Adf.SessionServer-1.0.zip


SVN Download:

svn checkout https://svn.aooshi.org:8080/svn/adf/bin c:\develop\bin\adf4

Help(在线帮助文档):

http://www.aooshi.org/adf/help

Help(离线帮助文档):

http://www.aooshi.org/adf/help/Adf.Documentation.chm

Adf Db Help:

http://www.aooshi.org/adf/db/

http://www.xiaobo.li/adf/417.html

Adf Db :

http://www.aooshi.org/adf/db/demo

Adf.Cs :

http://www.xiaobo.li/adf/513.html

Adf.Service :

http://www.xiaobo.li/adf/517.html

Adf.RegistryServer :

http://www.xiaobo.li/adf/516.html

AdwEngine:

http://wiki.aooshi.org/doku.php?id=adwengine


一些示例:

SVN:  https://svn.aooshi.org:8080/svn/adf/tags/examples/

Adf 开发项目结构建议: http://www.xiaobo.li/adf/417.html


发表在 adf | 标签为 , , , , , | Adf已关闭评论

ie 10, .net 4, __doPostBack

程序包:

-----------------------------------------------------------

知识库文章编号:2600088

语言:All (Global)

平台:x64

位置:http://hotfixv4.microsoft.com/.NET%20Framework%204.0%20-%20Windows%20XP,%20Windows%202003,%20Windows%20Vista,%20Windows%20Server%202008,%20Win7,%20Windows%20Server%202008%20R2%20(MSI)/nosp/DevDiv953277/30319.504/free/436907_intl_x64_zip.exe

发表在 .net | 标签为 | ie 10, .net 4, __doPostBack已关闭评论

mongod

#!/bin/bash

# mongod - Startup script for mongod

# chkconfig: 35 85 15
# description: Mongo is a scalable, document-oriented database.
# processname: mongod
# config: /etc/mongod.conf
# pidfile: /var/run/mongo/mongod.pid

. /etc/rc.d/init.d/functions

# things from mongod.conf get there by mongod reading it


# NOTE: if you change any OPTIONS here, you get what you pay for:
# this script assumes all options are in the config file.
CONFIGFILE="/etc/mongod.conf"
OPTIONS=" -f $CONFIGFILE"
SYSCONFIG="/etc/sysconfig/mongod"

# FIXME: 1.9.x has a --shutdown flag that parses the config file and
# shuts down the correct running pid, but that's unavailable in 1.8
# for now.  This can go away when this script stops supporting 1.8.
DBPATH=`awk -F= '/^dbpath=/{print $2}' "$CONFIGFILE"`
PIDFILE=`awk -F= '/^dbpath\s=\s/{print $2}' "$CONFIGFILE"`
mongod=${MONGOD-/usr/bin/mongod}

MONGO_USER=mongod
MONGO_GROUP=mongod

if [ -f "$SYSCONFIG" ]; then
    . "$SYSCONFIG"
fi

# Handle NUMA access to CPUs (SERVER-3574)
# This verifies the existence of numactl as well as testing that the command works
NUMACTL_ARGS="--interleave=all"
if which numactl >/dev/null 2>/dev/null && numactl $NUMACTL_ARGS ls / >/dev/null 2>/dev/null
then
    NUMACTL="numactl $NUMACTL_ARGS"
else
    NUMACTL=""
fi

start()
{
  echo -n $"Starting mongod: "
  daemon --user "$MONGO_USER" $NUMACTL $mongod $OPTIONS
  RETVAL=$?
  echo
  [ $RETVAL -eq 0 ] && touch /var/lock/subsys/mongod
}

stop()
{
  echo -n $"Stopping mongod: "
  killproc -p "$PIDFILE" -d 300 /usr/bin/mongod
  RETVAL=$?
  echo
  [ $RETVAL -eq 0 ] && rm -f /var/lock/subsys/mongod
}

restart () {
	stop
	start
}

ulimit -n 12000
RETVAL=0

case "$1" in
  start)
    start
    ;;
  stop)
    stop
    ;;
  restart|reload|force-reload)
    restart
    ;;
  condrestart)
    [ -f /var/lock/subsys/mongod ] && restart || :
    ;;
  status)
    status $mongod
    RETVAL=$?
    ;;
  *)
    echo "Usage: $0 {start|stop|status|restart|reload|force-reload|condrestart}"
    RETVAL=1
esac

exit $RETVAL
发表在 db | 标签为 | mongod已关闭评论

BAT切换IIS目录

cscript %SystemDrive%\inetpub\adminscripts\adsutil.vbs SET /W3SVC/1/ROOT/path “D:\wwwroot”

发表在 windows | BAT切换IIS目录已关闭评论

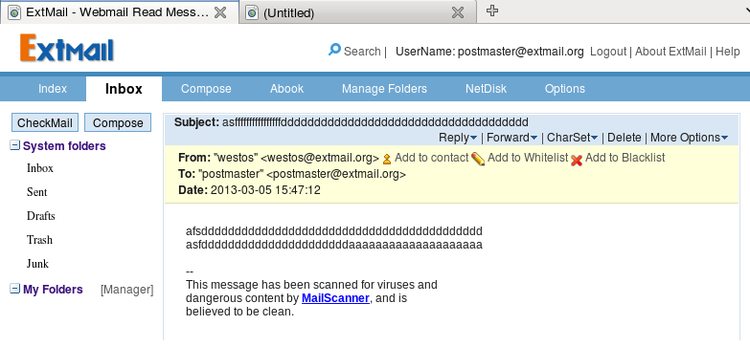
postfix+dovecot+extmail

系统环境:rhel6 | centos

点击查看原图 

1.使用extmail自带模板在mysql中创建数据库

    yum install mysql mysql-server mailx -y

    /etc/init.d/mysqld start


    mkdir /var/www/extsuite; cd /var/www/extsuite/

    tar zxf extmail-1.2.tar.gz 

    tar zxf extman-1.1.tar.gz 

    mv extmail-1.2 extmail

    mv extman-1.1 extman

    cd extman/docs/

    vi init.sql 修改root@extmail.org的密码

    mysql < extmail.sql  导入extmail自带数据库

    mysql < init.sql     导入extmail的测试账户


2.配置postfix支持虚拟域

    cd /var/www/extsuite/extman/docs/

    拷贝模板文件:

    cp mysql_virtual_alias_maps.cf mysql_virtual_domains_maps.cf  mysql_virtual_mailbox_maps.cf /etc/postfix/


    useradd -u 600 vmail

    postconf -e inet_interfaces=all

    postconf -e virtual_mailbox_base=/home/vmail

    postconf -e virtual_uid_maps=static:600

    postconf -e virtual_gid_maps=static:600

    postfix读取模板文件:

     postconf -e virtual_alias_maps=mysql:/etc/postfix/mysql_virtual_alias_maps.cf

     postconf -e virtual_mailbox_domains=mysql:/etc/postfix/mysql_virtual_domains_maps.cf

     postconf -e virtual_mailbox_maps=mysql:/etc/postfix/mysql_virtual_mailbox_maps.cf

    重启postfix,查看是否成功!

     /etc/init.d/postfix restart

     echo "hello world" | mail -s test support@exmail.org

     [root@desktop19 dovecot]# cd /home/vmail/

     [root@desktop19 vmail]# ls

      extmail.org  目录存在则postfix配置成功


3.配置MDA(dovecot)

     yum install dovecot dovecot-mysql -y

     cd /etc/dovecot/conf.d/

       vi 10-mail.conf 

          mail_location = maildir:/home/vmail/%d/%n/Maildir  邮件收取配置,这里采用mairdir形式

          first_valid_uid = 600

       vim 10-auth.conf

          !include auth-sql.conf.ext  去掉注释

     cd ../

       vi dovecot-sql.conf.ext

          driver =mysql

          connect =  host=localhost dbname=extmail user=extmail password=extmail

          default_pass_scheme = MD5

          password_query = \

              SELECT username, domain, password \

              FROM mailbox WHERE username = '%u' and domain = '%d'

          user_query = SELECT maildir, 600 AS uid, 600 AS gid FROM mailbox WHERE username = '%u'

     启动dovecot,测试

       /etc/init.d/dovecot start

***************************************************

[root@desktop19 Maildir]# telnet localhost 110

Trying ::1...

Connected to localhost.

Escape character is '^]'.

+OK Dovecot ready. <1832.1.513560b4.LftMXp8dtjujF/reBTodLw==@desktop19.example.com>

user postmaster@extmail.org

+OK

pass extmail

+OK Logged in.

list

+OK 2 messages:

1 568

2 568

***************************************************


4.配置web界面:

   vi /etc/httpd/conf/httpd.conf

*************************************************************

<VirtualHost *:80>

      ServerName www.example.com

      DocumentRoot /var/www/html

</VirtualHost>


<VirtualHost *:80>

      ServerName mail.extmail.org

      DocumentRoot /var/www/extsuite/extmail/html/

      ScriptAlias /extmail/cgi /var/www/extsuite/extmail/cgi

      Alias /extmail /var/www/extsuite/extmail/html

      ScriptAlias /extman/cgi /var/www/extsuite/extman/cgi

      Alias /extman /var/www/extsuite/extman/html

      SuexecUserGroup vmail vmail

</VirtualHost>

*************************************************************

   cd /var/www/extsuite/extmail

   chown vmail.vmail cgi/ -R 

   cp webmail.cf.default webmail.cf

   vi webmail.cf

     SYS_MAILDIR_BASE = /home/vmail

     SYS_MYSQL_USER = extmail

     SYS_MYSQL_PASS = extmail

     SYS_CRYPT_TYPE = plain

   cd /var/www/extsuite/extman

   chown vmail.vmail cgi/ -R

   cp webman.cf.default webman.cf

   vi webman.cf

     SYS_MAILDIR_BASE = /home/vmail

     SYS_SESS_DIR = /tmp/

     SYS_CAPTCHA_LEN = 4

     SYS_CRYPT_TYPE = plain


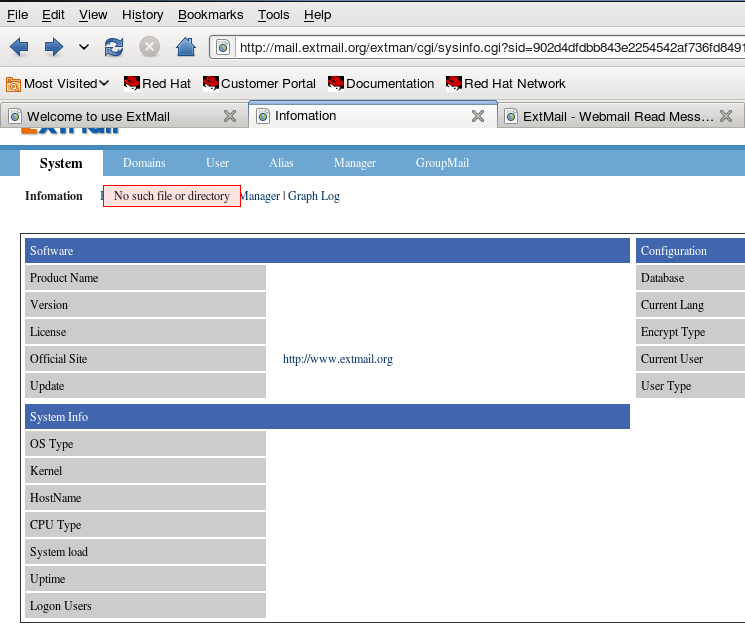
   启动httpd,测试界面:

     如图2,

点击查看原图   则安装CGI:

     yum install *CGI -y

     如图3


点击查看原图 

   则安装perl-ExtUtils-MakeMaker,gcc

     tar zxf Unix-Syslog-1.1.tar.gz 

     cd Unix-Syslog-1.1

     perl Makefile.PL

     make test

     make install 

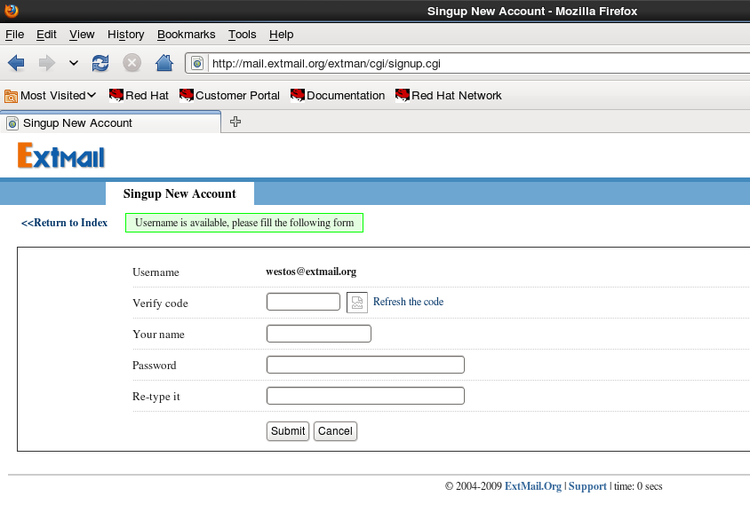
   在新用户注册时,出现验证码显示不正常则:

    如图4,

    点击查看原图安装:

     yum install -y perl-GD


    如图5

点击查看原图 

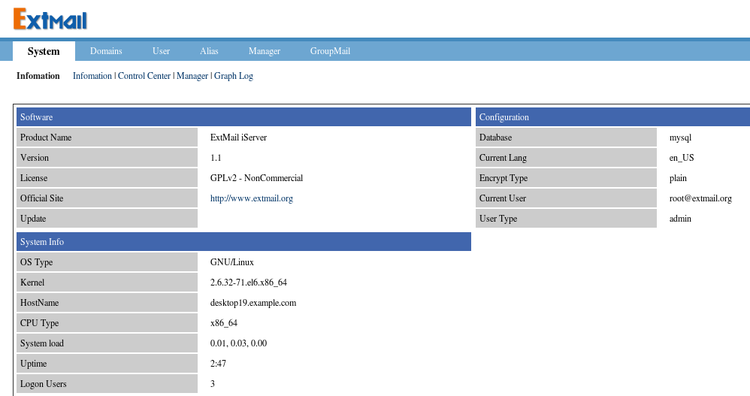
     支持监控:

    yum install rrdtool-perl -y


     tar zxf File-Tail-0.99.3.tar.gz

     cd File-Tail-0.99.3

     perl Makefile.PL

     make

     make install


   cp -r  /var/www/extsuite/extman/addon/mailgraph_ext/ /usr/local/


   /var/www/extsuite/extman/daemon/cmdserver -d


   /usr/local/mailgraph_ext/mailgraph-init restart

点击查看原图

5.反病毒配置:


    yum install -y spamassassin -y

    /etc/init.d/spamassassin start


    下载病毒库管理软件:

       clamav-0.97.6-1.el6.rf.x86_64.rpm     clamav-milter-0.97.6-1.el6.rf.x86_64.rpm

       clamav-db-0.97.6-1.el6.rf.x86_64.rpm  clamd-0.97.6-1.el6.rf.x86_64.rpm


    更新病毒库:

[root@desktop19 mnt]# freshclam 

ClamAV update process started at Tue Mar  5 15:35:12 2013

main.cvd is up to date (version: 54, sigs: 1044387, f-level: 60, builder: sven)

daily.cvd is up to date (version: 16784, sigs: 871048, f-level: 63, builder: neo)

bytecode.cvd is up to date (version: 214, sigs: 41, f-level: 63, builder: neo)


   tar zxf MailScanner-4.84.5-3.rpm.tar.gz 

   cd MailScanner-4.84.5-3

   ./install.sh 


     配置MailScanner和postfix

     vi /etc/MailScanner/MailScanner.conf

         Run As User = postfix

         Run As Group = postfix

         Incoming Queue Dir = /var/spool/postfix/hold

         Outgoing Queue Dir = /var/spool/postfix/incoming

         MTA = postfix

         Virus Scanners = clamav

         Always Include Spamassassin report = yes

         Use Spamassassin = yes

         SpamAssassin User State Dir = /var/spool/MailScanner/spamassassin


     mkdir /var/spool/MailScanner/spamassassin

     chown -R postfix.postfix /var/spool/MailScanner/*


     postconf -e header_checks=regexp:/etc/postfix/header_checks

     echo /^Received:/ HOLD >> /etc/postfix/header_checks


    测试:

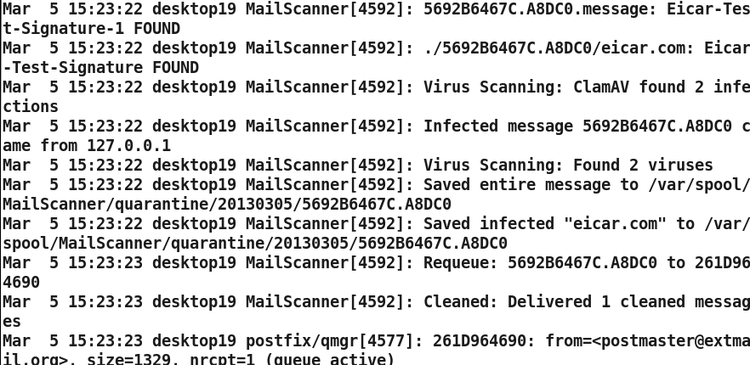
信件携带病毒时,查看日志:tail -f /var/log/maillog


点击查看原图


若信件正常,则显示已信任


点击查看原图 

POSTFIX升级:

   postfix更新:

 1.版本

   yum install make gcc db4-devel -y

   tar zxf postfix-2.10.0.tar.gz

   cd postfix-2.10.0

   make -f Makefile.init makefiles

   make upgrade


 2.数据库支持

   make -f Makefile.init makefiles 'CCARGS=-DHAS_MYSQL -I/usr/include/mysql' 'AUXLIBS=-L/usr/lib64/mysql  -lmysqlclient -lz -lm'

   make upgrade  


 3.加密支持

   make -f Makefile.init makefiles 'CCARGS=-DHAS_MYSQL -I/usr/include/mysql -DUSE_SASL_AUTH -DUSE_CYRUS_SASL -I/usr/include/sasl'  'AUXLIBS=-L/usr/lib64/mysql -lmysqlclient -lz -lm -R/usr/lib64 -lsasl2'

   make upgrade

发表在 mail | 标签为 | postfix+dovecot+extmail已关闭评论

varnish vcl

# This is a basic VCL configuration file for varnish.  See the vcl(7)
# man page for details on VCL syntax and semantics.
# 
# Default backend definition.  Set this to point to your content
# server.
# 

probe healthcheck {
   .url = "/";
   .interval = 60s;
   .timeout = 0.3s;
   .window = 8;
   .threshold = 3;
   .initial = 3;
}

#backend local {
#	.host = "127.0.0.1";
#	.port = "80";
#}

backend web244 {
	.host = "192.168.2.244";
	.port = "80";
	.probe = healthcheck;
}
backend web243 {
	.host = "192.168.2.243";
	.port = "80";
	.probe = healthcheck;
}
backend web232 {
	.host = "192.168.2.232";
	.port = "80";
	.probe = healthcheck;
}

director default round-robin {
	{ .backend = web244; }
	{ .backend = web243; }
}

director image fallback{
	{ .backend = web232; }
	{ .backend = web243; }
}

# 
# Below is a commented-out copy of the default VCL logic.  If you
# redefine any of these subroutines, the built-in logic will be
# appended to your code.
sub vcl_recv {
#     if (req.restarts == 0) {}
 
	if (req.http.x-forwarded-for) {
 	    set req.http.X-Forwarded-For =
 		req.http.X-Forwarded-For + ", " + client.ip;
 	} else {
 	    set req.http.X-Forwarded-For = client.ip;
 	}

	if (req.http.host == "static.aooshi.org"
	|| req.http.host == "image.aooshi.org"
	) {
		set req.backend = image;
	}
     
#     if (req.request != "GET" &&
#       req.request != "HEAD" &&
#       req.request != "PUT" &&
#       req.request != "POST" &&
#       req.request != "TRACE" &&
#       req.request != "OPTIONS" &&
#       req.request != "DELETE") {
#         /* Non-RFC2616 or CONNECT which is weird. */
#         return (pipe);
#     }

     if (req.request != "GET" && req.request != "HEAD") {
         /* We only deal with GET and HEAD by default */
         return (pass);
     }

#     if (req.http.Authorization || req.http.Cookie) {
     if (req.http.Authorization) {
#         /* Not cacheable by default */
         return (pass);
     }
     return (lookup);
}
# 
# sub vcl_pipe {
#     # Note that only the first request to the backend will have
#     # X-Forwarded-For set.  If you use X-Forwarded-For and want to
#     # have it set for all requests, make sure to have:
#     # set bereq.http.connection = "close";
#     # here.  It is not set by default as it might break some broken web
#     # applications, like IIS with NTLM authentication.
#     return (pipe);
# }
# 
# sub vcl_pass {
#     return (pass);
# }
# 
# sub vcl_hash {
#     hash_data(req.url);
#     if (req.http.host) {
#         hash_data(req.http.host);
#     } else {
#         hash_data(server.ip);
#     }
#     return (hash);
# }
# 
sub vcl_hit {
     return (deliver);
}
# 
# sub vcl_miss {
#     return (fetch);
# }
# 
sub vcl_fetch {
     if (beresp.ttl <= 0s ||
         beresp.http.Set-Cookie ||
         beresp.http.Vary == "*" ||
         beresp.http.Pragma == "no-cache" ||
         beresp.http.Cache-Control == "no-cache" ||
         beresp.http.Cache-Control == "private" ||
         beresp.status != 200
        ) {
#               /*
#                * Mark as "Hit-For-Pass" for the next 2 minutes
#                */
#               set beresp.ttl = 120 s;
                return (hit_for_pass);
     }
     return (deliver);
}
# 
sub vcl_deliver {
	remove resp.http.X-Varnish; 
#	remove resp.http.Via; 
     if (obj.hits > 0) {
        set resp.http.X-Cache = "HIT from " + server.hostname;
     }
	return (deliver);
}
# 
# sub vcl_error {
#     set obj.http.Content-Type = "text/html; charset=utf-8";
#     set obj.http.Retry-After = "5";
#     synthetic {"
# <?xml version="1.0" encoding="utf-8"?>
# <!DOCTYPE html PUBLIC "-//W3C//DTD XHTML 1.0 Strict//EN"
#  "http://www.w3.org/TR/xhtml1/DTD/xhtml1-strict.dtd">
# <html>
#   <head>
#     <title>"} + obj.status + " " + obj.response + {"</title>
#   </head>
#   <body>
#     <h1>Error "} + obj.status + " " + obj.response + {"</h1>
#     <p>"} + obj.response + {"</p>
#     <h3>Guru Meditation:</h3>
#     <p>XID: "} + req.xid + {"</p>
#     <hr>
#     <p>Varnish cache server</p>
#   </body>
# </html>
# "};
#     return (deliver);
# }
# 
# sub vcl_init {
# 	return (ok);
# }
# 
# sub vcl_fini {
# 	return (ok);
# }

其它:

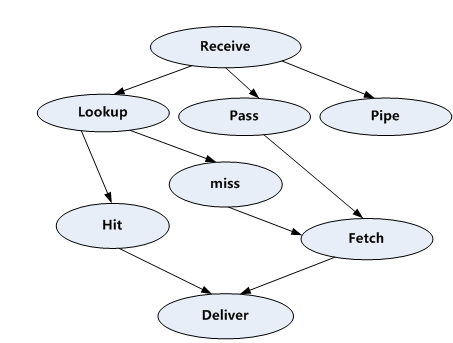
(1) Receive状态,也就是请求处理的入口状态,根据VCL规则判断该请求应该是Pass或Pipe,或者进入Lookup(本地查询)。
(2) Lookup状态,进入此状态后,会在hash表中查找数据,若找到,则进入Hit状态,否则进入miss状态。
(3) Pass状态,在此状态下,会进入后端请求,即进入fetch状态。
(4) Fetch状态,在Fetch状态下,对请求进行后端的获取,发送请求,获得数据,并进行本地的存储。
(5) Deliver状态, 将获取到的数据发送给客户端,然后完成本次请求。

点击查看原图


实例解析:

#
# This is an example VCL file for Varnish.
#
# It does not do anything by default, delegating control to the
# builtin VCL. The builtin VCL is called when there is no explicit
# return statement.
#
# See the VCL chapters in the Users Guide at https://www.varnish-cache.org/docs/
# and http://varnish-cache.org/trac/wiki/VCLExamples for more examples.
# Marker to tell the VCL compiler that this VCL has been adapted to the
# new 4.0 format.
vcl 4.0;
import directors;
probe backend_healthcheck { # 创建健康监测
.url = /health.html;
.window = 5;
.threshold = 2;
.interval = 3s;
}
backend web1 { # 创建后端主机
.host = "static1.lnmmp.com";
.port = "80";
.probe = backend_healthcheck;
}
backend web2 {
.host = "static2.lnmmp.com";
.port = "80";
.probe = backend_healthcheck;
}
backend img1 {
.host = "img1.lnmmp.com";
.port = "80";
.probe = backend_healthcheck;
}
backend img2 {
.host = "img2.lnmmp.com";
.port = "80";
.probe = backend_healthcheck;
}
vcl_init { # 创建后端主机组,即directors
new web_cluster = directors.random();
web_cluster.add_backend(web1);
web_cluster.add_backend(web2);
new img_cluster = directors.random();
img_cluster.add_backend(img1);
img_cluster.add_backend(img2);
}
acl purgers { # 定义可访问来源IP
"127.0.0.1";
"192.168.0.0"/24;
}
sub vcl_recv {
if (req.request == "GET" && req.http.cookie) { # 带cookie首部的GET请求也缓存
return(hash);
}
if (req.url ~ "test.html") { # test.html文件禁止缓存
return(pass);
}
if (req.request == "PURGE") { # PURGE请求的处理
if (!client.ip ~ purgers) {
return(synth(405,"Method not allowed"));
}
return(hash);
}
if (req.http.X-Forward-For) { # 为发往后端主机的请求添加X-Forward-For首部
set req.http.X-Forward-For = req.http.X-Forward-For + "," + client.ip;
} else {
set req.http.X-Forward-For = client.ip;
}
if (req.http.host ~ "(?i)^(www.)?lnmmp.com$") { # 根据不同的访问域名,分发至不同的后端主机组
set req.http.host = "www.lnmmp.com";
set req.backend_hint = web_cluster.backend();
} elsif (req.http.host ~ "(?i)^images.lnmmp.com$") {
set req.backend_hint = img_cluster.backend();
}
return(hash);
}
sub vcl_hit { # PURGE请求的处理
if (req.request == "PURGE") {
purge;
return(synth(200,"Purged"));
}
}
sub vcl_miss { # PURGE请求的处理
if (req.request == "PURGE") {
purge;
return(synth(404,"Not in cache"));
}
}
sub vcl_pass { # PURGE请求的处理
if (req.request == "PURGE") {
return(synth(502,"PURGE on a passed object"));
}
}
sub vcl_backend_response { # 自定义缓存文件的缓存时长,即TTL值
if (req.url ~ "\.(jpg|jpeg|gif|png)$") {
set beresp.ttl = 7200s;
}
if (req.url ~ "\.(html|css|js)$") {
set beresp.ttl = 1200s;
}
if (beresp.http.Set-Cookie) { # 定义带Set-Cookie首部的后端响应不缓存,直接返回给客户端
return(deliver);
}
}
sub vcl_deliver {
if (obj.hits > 0) { # 为响应添加X-Cache首部,显示缓存是否命中
set resp.http.X-Cache = "HIT from " + server.ip;
} else {
set resp.http.X-Cache = "MISS";
}
}


发表在 web server | 标签为 | varnish vcl已关闭评论

linux TIME_WAIT

现象:

1、外部机器不能正常连接SSH

2、内向外不能够正常的ping通过,域名也不能正常解析。

问题排查:

通过 netstat  -anp | grep TIME_WAIT | wc -l 命令查看数量,发现TIME_WAIT的连接数量超过了18000太夸张了。

1、初步怀疑是程序没有关闭连接,codereview了两遍,发现,已经正常关闭。

2、网上看TIME_WAIT产生的原因,可能是因为服务器主动关闭连接导致TIME_WAIT产生。

3、查找TIME_WAIT解决方案:

发现系统存在大量TIME_WAIT状态的连接,通过调整内核参数解决,
vi /etc/sysctl.conf

编辑文件,加入以下内容:
net.ipv4.tcp_syncookies = 1
net.ipv4.tcp_tw_reuse = 1
net.ipv4.tcp_tw_recycle = 1
net.ipv4.tcp_fin_timeout = 30

然后执行 /sbin/sysctl -p 让参数生效。

经过配置后,暂时的问题是解决了,再查看TIME_WAIT数量快速下降。

关键命令:

1、netstat -n | awk '/^tcp/ {++state[$NF]} END {for(key in state) print key,"\t",state[key]}'

会得到类似下面的结果,具体数字会有所不同:

LAST_ACK 1

SYN_RECV 14

ESTABLISHED 79

FIN_WAIT1 28

FIN_WAIT2 3

CLOSING 5

TIME_WAIT 1669

状态:描述

CLOSED:无连接是活动的或正在进行

LISTEN:服务器在等待进入呼叫

SYN_RECV:一个连接请求已经到达,等待确认

SYN_SENT:应用已经开始,打开一个连接

ESTABLISHED:正常数据传输状态

FIN_WAIT1:应用说它已经完成

FIN_WAIT2:另一边已同意释放

ITMED_WAIT:等待所有分组死掉

CLOSING:两边同时尝试关闭

TIME_WAIT:另一边已初始化一个释放

LAST_ACK:等待所有分组死掉


2、sysctl -a | grep time | grep wait

net.ipv4.netfilter.ip_conntrack_tcp_timeout_time_wait = 120

net.ipv4.netfilter.ip_conntrack_tcp_timeout_close_wait = 60

net.ipv4.netfilter.ip_conntrack_tcp_timeout_fin_wait = 120


字段说明:
  net.ipv4.tcp_syncookies = 1 表示开启SYN Cookies。当出现SYN等待队列溢出时,启用cookies来处理,可防范少量SYN攻击,默认为0,表示关闭;
  net.ipv4.tcp_tw_reuse = 1 表示开启重用。允许将TIME-WAIT sockets重新用于新的TCP连接,默认为0,表示关闭;
  net.ipv4.tcp_tw_recycle = 1 表示开启TCP连接中TIME-WAIT sockets的快速回收,默认为0,表示关闭。
  net.ipv4.tcp_fin_timeout = 30 表示如果套接字由本端要求关闭,这个参数决定了它保持在FIN-WAIT-2状态的时间。
  net.ipv4.tcp_keepalive_time = 1200 表示当keepalive起用的时候,TCP发送keepalive消息的频度。缺省是2小时,改为20分钟。
  net.ipv4.ip_local_port_range = 1024 65000 表示用于向外连接的端口范围。缺省情况下很小:32768到61000,改为1024到65000。
  net.ipv4.tcp_max_syn_backlog = 8192 表示SYN队列的长度,默认为1024,加大队列长度为8192,可以容纳更多等待连接的网络连接数。 
  net.ipv4.tcp_max_tw_buckets = 5000 表示系统同时保持TIME_WAIT套接字的最大数量,如果超过这个数字,TIME_WAIT套接字将立刻被清除并打印警告信息。默认为180000,改为5000。对于Apache、Nginx等服务器,上几行的参数可以很好地减少TIME_WAIT套接字数量,但是对于Squid,效果却不大。此项参数可以控制TIME_WAIT套接字的最大数量,避免Squid服务器被大量的TIME_WAIT套接字拖死。
发表在 linux | 标签为 | linux TIME_WAIT已关闭评论

mysql 误删除ibdata1之后如何恢复

删除了在线服务器中mysql innodb相关的数据文件ibdata1以及日志文件 ib_logfile*,
应该怎样恢复呢?

观察网站,发现一切都很正常,数据的读取与写入操作都完全正常。
这是怎么个情况?

其实,mysqld在运行状态中,会保持这些文件为打开状态,
即使把它们删除了,它们仍旧存在于文件系统中,mysqld仍然可以对其进行读写。

root@localhost:/var/lib/mysql# ls -la /proc/14101/fd/ | grep -e ibdata -e ib_
lrwx------ 1 root  root  64 Aug  7 23:29 3 -> /var/lib/mysql/ibdata1 (deleted) 
lrwx------ 1 root  root  64 Aug  7 23:29 8 -> /var/lib/mysql/ib_logfile0 (deleted) 
lrwx------ 1 root  root  64 Aug  7 23:29 9 -> /var/lib/mysql/ib_logfile1 (deleted)

14101是mysqld的pid(进程ID)
只要mysqld不结束,就可以通过proc文件系统找到这几个被删除的文件(已经被Mark为deleted状态)。

这时候应该松了一口气吧。只要把这几个文件复制回 /var/lib/mysql就行了吗?

事情绝对没有这么简单。

因为,在innodb的buffer pool中,有许多dirty page(就是内存中的数据已经被修改,但是没有写回文件中),
如果直接把文件复制回去,轻则数据丢失,重则ibdata1文件损坏。

备份mysql数据的时候,也不能直接备份这几个文件,是同样的道理。

我们必须保证所有buffer pool中的数据修改都保存到了硬盘文件上面,
为此,首先要停止更多的写入/更新/删除操作,然后等待innodb flush pages to disk.
停止写入的话,可以把网站应用关闭,或者lock tables:

mysql> FLUSH TABLES WITH READ LOCK;
Query OK, 0 ROWS affected (0.37 sec)

这时就要等它flush结束,怎样知道有没有结束呢?观察checkpoint age就可以了。

mysql> SHOW engine innodb STATUS   
--- 
LOG 
--- 
Log SEQUENCE NUMBER 363096003 
Log flushed up TO 363096003 
LAST checkpoint at 363096003

checkpoint age 就是 Log sequence number的值减去 Last checkpoint at的值,
如果为0,那么表示所有的page都flush到硬盘文件中了。

为了加速这个flush的过程,可以这样设置一下:

mysql> SET global innodb_max_dirty_pages_pct=0;
Query OK, 0 ROWS affected (0.01 sec)

此外,还必须保证一些后台的线程完成了它们的工作,
比如insert buffer thread. ibuf的大小应该=1

------------------------------------- 
INSERT BUFFER AND ADAPTIVE HASH INDEX 
------------------------------------- 
Ibuf: SIZE 1, free list len 398, seg SIZE 400,

还有purge thread,它应该purge了全部的transactions:

------------ 
TRANSACTIONS 
------------ 
Trx id counter 0 16644 
Purge done FOR trx's n:o < 0 16644 undo n:o < 0 0

还要确保innodb不再进行写操作了:

FILE I/
-------- 
I/O thread 0 state: waiting FOR i/o request (INSERT buffer thread) 
I/O thread 1 state: waiting FOR i/o request (log thread) 
I/O thread 2 state: waiting FOR i/o request (READ thread)
 I/O thread 3 state: waiting FOR i/o request (WRITE thread) 
Pending normal aio reads: 0, aio writes: 0, 
ibuf aio reads: 0, log i/o's: 0, sync i/o's: 0
Pending flushes (fsync) log: 0buffer pool: 0
332 OS file reads, 47 OS file writes, 32 OS fsyncs
0.00 reads/s, 0 avg bytes/READ, 0.00 writes/s, 0.00 fsyncs/s

然后把文件复制回去:

root@localhost:/var/lib/mysql# cp /proc/14101/fd/3 /var/lib/mysql/ibdata1
root@localhost:/var/lib/mysql# cp /proc/14101/fd/8 /var/lib/mysql/ib_logfile0
root@localhost:/var/lib/mysql# cp /proc/14101/fd/9 /var/lib/mysql/ib_logfile1
修改权限
root@localhost:/var/lib/mysql# chown -R mysql ib* 重启mysqld
root@localhost:/var/lib/mysql# /etc/init.d/mysql restart
结束~~~

结论:
1) 出现意外时,千万不能慌张,抽根烟先冷静一下。
2) 在解决方案不明确的时候,不要进行操作,比如重启mysqld,重启服务器。
3) 有必要监控mysql的ibdata等文件是否存在

发表在 db | 标签为 | mysql 误删除ibdata1之后如何恢复已关闭评论

mooseFS

mfs文件系统(一)

MFS文件系统结构:
包含4种角色: 
        管理服务器managing server (master)
        元数据日志服务器Metalogger server(Metalogger)
        数据存储服务器data servers (chunkservers) 
        客户机挂载使用client computers 

4种角色作用:
        管理服务器:负责各个数据存储服务器的管理,文件读写调度,文件空间回收以及恢复.多节点拷贝
        元数据日志服务器: 负责备份master服务器的变化日志文件,文件类型为changelog_ml.*.mfs,以便于在master server出问题的时候接替其进行工作
        数据存储服务器:负责连接管理服务器,听从管理服务器调度,提供存储空间,并为客户提供数据传输.
        客户端: 通过fuse内核接口挂接远程管理服务器上所管理的数据存储服务器,.看起来共享的文件系统和本地unix文件系统使用一样的效果.

 单线程是个硬伤

Master的单线程机制不能够发挥多核CPU的优势,导致其性能有很大的瓶颈。在相同集群上测试过MooseFS和HDFS小文件的读写性能,其中MooseFS的写TPS只能达到100,读TPS只能达到1000,而HDFS的写TPS能达到1000以上,读TPS能达到10000以上,两者相差10倍。

可想而知,MooseFS单线程是一个硬伤,并不适合高并发的业务。


一个具体的实例
(一)、安装和配置元数据服务(master server)
1、下载源代码
http://ncu.dl.sourceforge.net/pr ... 1/mfs-1.6.11.tar.gz
2、tar zxvf mfs-1.6.11.tar.gz
3、创建用户 useradd mfs –s /sbin/nologin
4、./configure –prefix=/usr/local/mfs –with-default-user=mfs –with-default-group=mfs
5、make ; make install
6、配置
配置文件位于安装目录/usr/local/mfs/etc,需要的配置文件有两个:mfsmaster.cfg和 mfsexports.cfg,
mfsmaster.cfg是主配置文件,mfsexports.cfg是被挂接目录及权限设置。
(1)、mfsmaster.cfg的配置
[root@nas etc]# cp mfsmaster.cfg.dist mfsmaster.cfg
[root@nas etc]# vi mfsmaster.cfg
# WORKING_USER = mfs
# WORKING_GROUP = mfs
# SYSLOG_IDENT = mfsmaster
# LOCK_MEMORY = 0
# NICE_LEVEL = -19
# EXPORTS_FILENAME = /usr/local/mfs/etc/mfsexports.cfg
# DATA_PATH = /usr/local/mfs/var/mfs
# BACK_LOGS = 50
# REPLICATIONS_DELAY_INIT = 300
# REPLICATIONS_DELAY_DISCONNECT = 3600
# MATOML_LISTEN_HOST = *
# MATOML_LISTEN_PORT = 9419
# MATOCS_LISTEN_HOST = *
# MATOCS_LISTEN_PORT = 9420
# MATOCU_LISTEN_HOST = *
# MATOCU_LISTEN_PORT = 9421
# CHUNKS_LOOP_TIME = 300
# CHUNKS_DEL_LIMIT = 100
# CHUNKS_WRITE_REP_LIMIT = 1
# CHUNKS_READ_REP_LIMIT = 5
# REJECT_OLD_CLIENTS = 0


需要注意的是,凡是用#注释掉的变量均使用其默认值,这里我解释一下这些变量:

#WORKING_USER和WORKING_GROUP:是运行master server的用户和组;
#SYSLOG_IDENT:是master server在syslog中的标识,也就是说明这是由master serve产生的;
#LOCK_MEMORY:是否执行mlockall()以避免mfsmaster 进程溢出(默认为0);
#NICE_LEVE:运行的优先级(如果可以默认是 -19; 注意: 进程必须是用root启动);
#EXPORTS_FILENAME:被挂接目录及其权限控制文件的存放位置
#DATA_PATH:数据存放路径,此目录下大致有三类文件,changelog,sessions和stats;
#BACK_LOGS:metadata的改变log文件数目(默认是 50);
#REPLICATIONS_DELAY_INIT:延迟复制的时间(默认是300s);
#REPLICATIONS_DELAY_DISCONNECT:chunkserver断开的复制延迟(默认是3600);
# MATOML_LISTEN_HOST:metalogger监听的IP地址(默认是*,代表任何IP);
# MATOML_LISTEN_PORT:metalogger监听的端口地址(默认是9419);
# MATOCS_LISTEN_HOST:用于chunkserver连接的IP地址(默认是*,代表任何IP);
# MATOCS_LISTEN_PORT:用于chunkserver连接的端口地址(默认是9420);
# MATOCU_LISTEN_HOST:用于客户端挂接连接的IP地址(默认是*,代表任何IP);
# MATOCU_LISTEN_PORT:用于客户端挂接连接的端口地址(默认是9421);
# CHUNKS_LOOP_TIME :chunks的回环频率(默认是:300秒);
   注:原文为Chunks loop frequency in seconds (default is 300)
# CHUNKS_DEL_LIMIT :在一个loop设备中可以删除chunks的最大数 (默认:100)
#REPLICATIONS_DELAY_DISCONNECT chunkserver断开后的复制延时(默认:3600秒)
# CHUNKS_WRITE_REP_LIMIT:在一个循环里复制到一个chunkserver的最大chunk数目(默认是1)
# CHUNKS_READ_REP_LIMIT :在一个循环里从一个chunkserver复制的最大chunk数目(默认是5)
# REJECT_OLD_CLIENTS:弹出低于1.6.0的客户端挂接(0或1,默认是0)
注意mfsexports访问控制对于那些老客户是没用的

以上是对master server的mfsmaster.cfg配置文件的解释,对于这个文件不需要做任何修改就可以工作。


(2)、mfsexports.cfg的配置
[root@nas etc]# vi mfsexports.cfg 

#*                      /       ro
#192.168.1.0/24         /       rw
#192.168.1.0/24         /       rw,alldirs,maproot=0,password=passcode
#10.0.0.0-10.0.0.5      /test   rw,maproot=nobody,password=test
*                       .       rw
#*                      /       rw,alldirs,maproot=0

192.168.3.98            /tt     rw,alldirs,maproot=0
192.168.3.139           /       rw,alldirs,maproot=0
192.168.3.138           /       rw,alldirs,maproot=0,password=111111

该文件每一个条目分为三部分:
第一部分:客户端的ip地址
第二部分:被挂接的目录
第三部分:客户端拥有的权限

地址可以指定的几种表现形式:
       *                  所有的ip地址
       n.n.n.n             单个ip地址
       n.n.n.n/b           IP网络地址/位数掩码
       n.n.n.n/m.m.m.m     IP网络地址/子网掩码
       f.f.f.f-t.t.t.t     IP段

目录部分需要注意两点:
/ 标识MooseFS 根;
. 表示MFSMETA 文件系统

权限部分:
       ro  只读模式共享
       rw  的方式共享
       alldirs  许挂载任何指定的子目录
       maproot   映射为root,还是指定的用户
        password  指定客户端密码

7、启动master server
master server可以单独启动(所谓单独启动就是在没有数据存储服务器(chunkserver)的时候也可以启动,但是不能存储,chunkserver启动后会自动的加入)。安装配置完MFS后,即可启动它。
执行命令 /usr/local/mfs/sbin/mfsmaster start ,可通过检查如下:
[root@nas etc]# ps -ef|grep mfs
mfs      12327     1  0 08:38 ?        00:00:00 /usr/local/mfs/sbin/mfsmaster start
8、停止master server
安全停止master server是非常必要的,最好不要用kill。利用mfsmaster –s来安全停止master serve,一旦是用了kill也是有解决方法的,后文有说明。
9、要经常性的查看系统日志(tail -f /var/log/messages)
(二)、安装和配置元数据日志服务器(metalogger)
1、下载源码
http://ncu.dl.sourceforge.net/pr ... 1/mfs-1.6.11.tar.gz
2、tar zxvf mfs-1.6.11.tar.gz
3、创建用户 useradd mfs –s /sbin/nologin
4、./configure –prefix=/usr/local/mfs –with-default-user=mfs –with-default-group=mfs
5、make ; make install
6、配置
该服务只有一个配置文件,那就是mfsmetalogger.cfg。
[root@mail etc]# vi mfsmetalogger.cfg
# WORKING_USER = mfs
# WORKING_GROUP = mfs
# SYSLOG_IDENT = mfsmetalogger
# LOCK_MEMORY = 0
# NICE_LEVEL = -19
# DATA_PATH = /usr/local/mfs/var/mfs
# BACK_LOGS = 50
# META_DOWNLOAD_FREQ = 24
# MASTER_RECONNECTION_DELAY = 5
MASTER_HOST = 192.168.3.34
# MASTER_PORT = 9419
# MASTER_TIMEOUT = 60
# deprecated, to be removed in MooseFS 1.7
# LOCK_FILE = /var/run/mfs/mfsmetalogger.lock

文中的大多数变量不难理解,类似于mfsmaster.cfg中的变量,其中:
META_DOWNLOAD_FREQ需要说明一下:
元数据备份文件下载请求频率。默认为24小时,即每隔一天从元数据服务器(MASTER)下载一个metadata.mfs.back文件。当元数据服务器关闭或者出故障时,matedata.mfs.back文件将消失,那么要恢复整个mfs,则需从metalogger服务器取得该文件。请特别注意这个文件,它与日志文件一起,才能够恢复整个被损坏的分布式文件系统。
这个文件中需要修改的是MASTER_HOST变量,这个变量的值是master server的IP地址。
7、启动metalogger服务
[root@mail sbin]# ./mfsmetalogger start
working directory: /usr/local/mfs/var/mfs
lockfile created and locked
initializing mfsmetalogger modules ...
mfsmetalogger daemon initialized properly
这说明metalogger服务正常启动了。利用命令检查:
通过进程:
[root@mail sbin]# ps -ef |grep mfs
mfs      12254     1  0 15:25 ?        00:00:00 ./mfschunkserver start
通过检查端口:
[root@mail sbin]# lsof -i:9419
COMMAND     PID USER   FD   TYPE  DEVICE SIZE NODE NAME
mfsmetalo 12292  mfs    7u  IPv4 1395372       TCP mail.tt.com:52456->192.168.3.34:9419 (ESTABLISHED)
查看日志服务器的工作目录
[root@mail mfs]# pwd
/usr/local/mfs/var/mfs
[root@mail mfs]# ll
total 8
-rw-r----- 1 mfs mfs 249 Jan 13 15:39 changelog_ml.1.mfs
-rw-r----- 1 mfs mfs 519 Jan 13 15:40 sessions_ml.mfs

这是运行18小时后:
[root@mail mfs]# ll
total 1808
-rw-r----- 1 mfs mfs      0 Jan 14 08:40 changelog_ml.0.mfs
-rw-r----- 1 mfs mfs   4692 Jan 13 23:39 changelog_ml.10.mfs
-rw-r----- 1 mfs mfs   4692 Jan 13 22:39 changelog_ml.11.mfs
-rw-r----- 1 mfs mfs   4692 Jan 13 21:39 changelog_ml.12.mfs
-rw-r----- 1 mfs mfs   4692 Jan 13 20:39 changelog_ml.13.mfs
-rw-r----- 1 mfs mfs   4692 Jan 13 19:39 changelog_ml.14.mfs
-rw-r----- 1 mfs mfs   4692 Jan 13 18:39 changelog_ml.15.mfs
-rw-r----- 1 mfs mfs   4692 Jan 13 17:39 changelog_ml.16.mfs
-rw-r----- 1 mfs mfs   4722 Jan 13 16:39 changelog_ml.17.mfs
-rw-r----- 1 mfs mfs    249 Jan 13 15:39 changelog_ml.18.mfs
-rw-r----- 1 mfs mfs   4692 Jan 14 08:39 changelog_ml.1.mfs
-rw-r----- 1 mfs mfs   4692 Jan 14 07:39 changelog_ml.2.mfs
-rw-r----- 1 mfs mfs   4692 Jan 14 06:39 changelog_ml.3.mfs
-rw-r----- 1 mfs mfs   4692 Jan 14 05:39 changelog_ml.4.mfs
-rw-r----- 1 mfs mfs   4692 Jan 14 04:39 changelog_ml.5.mfs
-rw-r----- 1 mfs mfs   4692 Jan 14 03:39 changelog_ml.6.mfs
-rw-r----- 1 mfs mfs   4692 Jan 14 02:39 changelog_ml.7.mfs
-rw-r----- 1 mfs mfs   4692 Jan 14 01:39 changelog_ml.8.mfs
-rw-r----- 1 mfs mfs   4692 Jan 14 00:39 changelog_ml.9.mfs
-rw-r----- 1 mfs mfs 915016 Jan 14 09:00 csstats.mfs
-rw-r----- 1 mfs mfs 777640 Jan 14 08:10 metadata_ml.mfs.back
-rw-r----- 1 mfs mfs    519 Jan 14 09:16 sessions_ml.mfs

8、停止metalogger服务
[root@mail sbin]# ./mfsmetalogger -s
working directory: /usr/local/mfs/var/mfs
sending SIGTERM to lock owner (pid:12284)
waiting for termination ... terminated

9、如果没有启动metalogger服务
    在master server则会有如下提示信息产生:
   
    tail -f /var/log/messages
    Dec 30 16:53:00 nas mfsmaster[14291]: no meta loggers connected !!!

(三)、安装配置数据存储服务器(chunkserver)
1、下载源代码
http://ncu.dl.sourceforge.net/pr ... 1/mfs-1.6.11.tar.gz
2、tar zxvf mfs-1.6.11.tar.gz
3、创建用户 useradd mfs –s /sbin/nologin
4、./configure –prefix=/usr/local/mfs –with-default-user=mfs –with-default-group=mfs
5、make ; make install
6、配置
配置文件位于安装目录/usr/local/mfs/etc,需要的配置文件有两个:mfschunkserver.cfg和 mfshdd.cfg,
mfschunkserver.cf是主配置文件,mfshdd.cfg是服务器用来分配给 MFS使用的空间,最好是一个单独的硬盘或者一个raid卷,最低要求是一个分区。
(1)、mfschunkserver.cfg的配置
[root@mail etc]# vi mfschunkserver.cfg

# WORKING_USER = mfs
# WORKING_GROUP = mfs

# DATA_PATH = /usr/local/mfs/var/mfs
# LOCK_FILE = /var/run/mfs/mfschunkserver.pid
# SYSLOG_IDENT = mfschunkserver

# BACK_LOGS = 50

# MASTER_RECONNECTION_DELAY = 30

MASTER_HOST = 192.168.3.34
MASTER_PORT = 9420

# MASTER_TIMEOUT = 60

# CSSERV_LISTEN_HOST = *
# CSSERV_LISTEN_PORT = 9422

# CSSERV_TIMEOUT = 60

# CSTOCS_TIMEOUT = 60

# HDD_CONF_FILENAME = /usr/local/mfs/etc/mfshdd.cfg

文中的大多数变量不难理解,类似于mfsmaster.cfg中的变量,
其中: 
MASTER_HOST: 元数据服务器的名称或地址,可以是主机名,也可以是ip地址
        CSSERV_LISTEN_PORT :这个监听端口用于与其它数据存储服务器间的连接,通常是数据复制。
HDD_CONF_FILENAME: 分配给MFS使用的磁盘空间配置文件的位置。

(2)、mfshdd.cfg的配置

[root@mail etc]# more mfshdd.cfg
/data

在这里/data是一个给mfs的分区,但在本机上是一个独立的磁盘的挂载目录,用 chown –R mfs:mfs /data 把属主改变为mfs。

7、启动mfschunkserver 
执行命令 /usr/local/mfs/sbin/mfschunkserver start ,如果没有意外,mfschunkserver 就应该作为一个守护进程运行起来。是否启动,检查如下:
[root@nas etc]# ps -ef|grep mfs
mfs      12327     1  0 08:38 ?        00:00:00 /usr/local/mfs/sbin/ mfschunkserver start
8、停止mfschunkserver
停止mfschunkserver,利用mfschunkserver–s来安全停止mfschunkserver。

(四)、MFS客户端的安装及配置
由于MFS客户端依赖于fuse,所以要先安装fuse。
1、        fuse的安装
(1)、解包 tar zxvf fuse-2.8.1.tar.gz
(2)、./configure
(3)、make;make install
如果所在的系统已经安装了fuse,则跳过这个步骤,高版本的Linux内核已经支持了。
2、        安装MFS客户端
(1)、下载源代码
http://ncu.dl.sourceforge.net/pr ... 1/mfs-1.6.11.tar.gz
(2)、tar zxvf mfs-1.6.11.tar.gz
(3)、创建用户 useradd mfs –s /sbin/nologin
(4)、./configure –prefix=/usr/local/mfs –with-default-user=mfs –with-default-group=mfs –enable-mfsmount
       说明:在这个过程中,当执行到–enable-mfsmount时可能出现”checking for FUSE… no  configure: error: mfsmount build was forced, but fuse development package is not installed”这样的错误,

........
checking for FUSE... no
******************************** mfsmount disabled ********************************
* fuse library is too old or not installed - mfsmount needs version 2.6 or higher *
***********************************************************************************
......

而不能正确安装MFS客户端程序,这是因为环境变量没有设置,先编辑/etc/profile在此文件中加入如下条目:
export  PKG_CONFIG_PATH=/usr/local/lib/pkgconfig:$PKG_CONFIG_PATH
然后再利用source命令 /etc/profile使修改生效:source /etc/profile即可,也可直接在命令行中直接执行:
       export  PKG_CONFIG_PATH=/usr/local/lib/pkgconfig:$PKG_CONFIG_PATH
(5)、make ; make install
3、挂接MFS文件系统
(1)、创建挂接点 mkdir /mnt/mfs
(2)、加载fuse模块到内核:modprobe fuse
(3)、挂接MFS
/usr/local/mfs/bin/mfsmount  /mnt/mfs –H 192.168.3.34 –p
然后在输入密码就可以了
特别需要注意的是,所有的MFS都是挂接同一个元数据服务器master的IP,而不是其他数据存储服务器chunkserver的IP。
4、挂接MFSMETA文件系统
(1)、创建挂接点 mkdir /mnt/mfsmeta
(2)、挂接MFSMETA
/usr/local/mfs-old/bin/mfsmount -m /mnt/mfsmeta/  -H 192.168.3.34
(3)、查看目录内容
[root@www ~]# ls -R /mnt/mfsmeta
/mnt/mfsmeta:
reserved  trash

/mnt/mfsmeta/reserved:

/mnt/mfsmeta/trash:
0000015E|f181  undel

/mnt/mfsmeta/trash/undel:
5、查看挂载情况
通过df命令查看磁盘使用情况来检查是否被挂接成功
root@bzd mfs]# df -h
Filesystem            Size  Used Avail Use% Mounted on
/dev/mapper/VolGroup00-LogVol00
                       73G   25G    45G      36%          /
/dev/sda1             99M   13M    82M      13%          /boot
none                  247M     0    247M     0%           /dev/shm
MFS                   45G   204M   45G      1%                   /mnt/mfs
MFSMETA              72K    72K     0        100%         /mnt/mfsmeta

利用mount命令查看:
[root@www ~]# mount
mfsmeta#192.168.3.34:9421 on /mnt/mfsmeta type fuse (rw,nosuid,nodev,allow_other,default_permissions)
mfs#192.168.3.34:9421 on /mnt/mfs type fuse (rw,nosuid,nodev,allow_other,default_permissions

(5)、卸载已挂接的文件系统
利用Linux系统的umount命令就可以了,例如:
[root@www ~]# umount /mnt/mfs

如果出现下列情况:
[root@www ~]# umount /mnt/mfs
umount: /mnt/mfs: device is busy
则说明客户端本机有正在使用此文件系统,可以查明是什么命令正在使用,然后推出就可以了,最好不要强制退出。

(五)、对mfscgiserv的使用
Mfscgiserv是用python编写的一个web服务器,它的监听端口是9425,
可以利用:
       /usr/local/mfs/sbin/mfscgiserv来启动,用户利用浏览器就可全面监控所有客户挂接,chunkserver及master server,客户端的各种操作等等,绝对是个好工具。
     在任何一台装有浏览器的机器上都可以查看:
                          http://192.168.3.34:9425


mfs文件系统(二)
编译和安装

MooseFS部署的首选方法是从源代码安装
源代码包安装支持标准./configure && make && make install的步骤,重要的配置选项有:
--disable-mfsmaster –不创建成管理服务器(用于纯节点的安装)
--disable-mfschunkserver –不创建成数据存储chunkserver服务器
--disable-mfsmount –不创建mfsmount和mfstools(如果用开发包安装,他们会被默认创建的)
--enable-mfsmount –确定安装mfsmount和mfstools(如果
--prefix=DIRECTORY –锁定安装目录(默认是/usr/local)
--sysconfdir=DIRECTORY –选择配置文件目录(默认是${prefix}/etc))
--localstatedir=DIRECTORY –选择变量数据目录(默认是${prefix}/var,MFS元数据被存储在mfs的子目录下,默认是${prefix}/var/mfs )
--with-default-user  -运行守护进程的用户,如果配置文件中没有设定用户,默认为nobody用户
--with-default-group=GROUP  运行守护进程的用户组,如果配置文件中没有设定用户组,默认为nogroup用户组
例如用FHS(文件系统层次标准)的兼容路径在Linux上的安装:
   ./configure --prefix=/usr --sysconfdir=/etc --localstatedir=/var/lib

编译安装遵守标准的DESTDIR= variable,允许安装包在临时目录(例如以创造二进制包)。已经存在的配置或这是元数据文件将会被覆盖掉。

一、管理服务器(master)
作为管理服务器(master)是MooseFS部署中重要的一个元素,在硬件方面,应该被安装在一台能够保证高可靠性和能胜任的整个系统存取的要求的机器上。一个明智的做法是用一个配有冗余电源、ECC内存、磁盘阵列,如RAID1/RAID5/RAID10。在操作系统方面,管理服务器的操作系统应该是具有POSIX兼容的系统(到目前支持Linux, FreeBSD, Mac OS X and OpenSolaris)。
安装管理服务器(master server)的过程:
1、安装mfs-master
2、如果是从源码安装的话,在configure时不要加--disable-mfsmaster选项。
3、创建运行master的用户(如果这样的用户不存在的话)
4、确定存放元数据文件的目录存在,而且能够被运行master的用户可写(通过configure的选项来设置运行master server的用户和元数据存储的路径,make install命令的执行要用root用户)
5、配置master server服务器是通过配置文件mfsmaster.cfg来做的,要特别注意的是TCP端口的使用
6、添加或创建(依赖于操作系统和发布版本)一组启动mfsmaster进程的脚本
安装完管理服务器后,便可以用mfsmaster命令来启动master server,如果用root用户执行mfsmaster命令,则在启动后转为mfsmaster.cfg中指定的用户来运行,否则将以执行mfsmaster命令的用户来运行master server。

二、元数据日志服务器

元数据日志守护进程是在安装master server时一同安装的,最小的要求并不比master本身大,可以被运行在任何机器上(例如任一台chunkserver),但是最好是放置在MooseFS master的备份机上,备份master服务器的变化日志文件,文件类型为changelog_ml.*.mfs。因为主要的master server一旦失效,可能就会将这台metalogger机器取代而作为master server。
安装管理进程:
1、从源代码安装mfs-master,在执行configure时不要带有--disable-mfsmaste选项
2、创建有运行mfsmetalogger服务权限运行的用户(如果这样的用户不存在的话)
3、确定存放元数据文件的目录存在,而且能够被运行mfsmetalogger服务的用户可写(通过configure的选项来设置运行mfsmetalogger服务的用户和元数据存储的路径,make install命令的执行要用root用户)
4、通过mfsmetalogger.cfg配置mfsmetalogger服务,要特别注意的是TCP端口,这里要使用MASTER_PORT要必须和mfsmaster.cfg文件中的MATOML_LISTEN_PORT一致。
5、添加或创建(依赖于操作系统和发布版本)一组启动mfsmetalogger进程的脚本
安装完管理服务器后,便可以用mfsmetalogger命令来启动mfsmetalogger server,如果用root用户执行mfsmetalogger命令,则在启动后转为mfsmetalogger.cfg中指定的用户来运行,否则将以执行mfsmetalogger命令的用户来运行mfsmetalogger server。
三、数据服务器
安装完管理服务器后,将安装数据服务器(chunkservers),这些机器的磁盘上要有适当的剩余空间,而且操作系统要遵循POSIX标准(验证了的有这些:Linux, FreeBSD, Mac OS X and OpenSolaris)。Chunkserver在一个普通的文件系统上储存数据块/碎片(chunks/fragments)作为文件。
Linux:
creating:
dd if=/dev/zero of=file bs=100m seek=400 count=0
mkfs -t ext3 file
mounting:
mount -o loop file mount-point
FreeBSD:
creating and mounting:
dd if=/dev/zero of=file bs=100m count=400
mdconfig -a -t vnode -f file -u X
newfs -m0 -O2 /dev/mdX
mount /dev/mdX mount-point
mounting a previously created file system:
mdconfig -a -t vnode -f file -u X
mount /dev/mdX mount-point
Mac OS X:
Start "Disk Utility" from "/Applications/Utilities"
Select from menu "Images->New->Blank Image ..."
注: 每一个chunkserver的磁盘都要为增长中的chunks保留些磁盘空间,从而达到创建新的chunk。只有磁盘都超过256M并且chunkservers报告自由空间超过1GB总量才可以被新的数据访问。最小的配置,应该从几个G字节的存储。
安装数据服务器 (chunkserver):
1、 把预先隔离的磁盘空间作为一个单独的文件系统,挂接在一个本地的目录下(如:/mnt/hd1, /mnt/hd2等等);
2、安装mfs-chunkserver
在执行configure时要不带--disable-mfschunkserver选项,
3、创建有运行chunkserver服务权限运行的用户(如果这样的用户不存在的话)
4、并给予这个户对整个MooseFS文件系统写的权限
5、利用mfschunkserver.cfg文件配置mfschunkserver服务,特别要注意的是TCP端口(MASTER_PORT变量要和mfsmaster.cfg中MATOCS_LISTEN_PORT的值一样)。
6、在mfshdd.conf文件中列出要用于MooseFS的挂载点
7、添加或创建(依赖于操作系统和发布版本)一组启动mfschunkserver进程的脚本
注:
Mfschunkserver的本地ip很重要,Mfschunkserver用此ip和mfsmaster进行连接,mfsmaster通过此ip和MFS客户端连接(mfsmount),而且其它chunkservers之间的通讯也是通过这个ip,因此这个ip必须是远程可访问的。因此mfsmaster的本地ip地址(MASTER_HOST)设置必须和chunkserver一样,以便于正确的连接,通常的做法是mfsmaster,chunkservers和MFS客户端在同一网段。一般的回环地址(localhost, 127.0.0.1)不能用于MASTER_HOST,它将使chunkserver无法被其她主机访问(这样的配置只会是单机器的机器mfsmaster,mfschunkserver和mfsmount运行)。
安装完mfschunkserver后,便可以用mfschunkserver命令来启动mfschunkserver服务器,如果用root用户执行mfschunkserver命令,则在启动后转为mfschunkserver.cfg中指定的用户来运行,否则将以执行mfschunkserver命令的用户来运行mfschunkserver服务。


四、客户端(mfsmount)
mfsmount需要FUSE才可以正常工作,FUSE支持多种操作系统:Linux, FreeBSD, OpenSolaris and MacOS X。
Linux一个内核模块的API版本至少必需是7.8的,这个可以用dmesg命令来检测,当载入内核模块后,应该能看到有一行fuse init (API version 7.8)。一些可用的fuse版本是2.6.0以上,Linux kernel 2.6.20(Linux内核从2.6.20后加入了fuse)以上。由于一些小bug,因此比较新模块被荐使用,如fuse 2.7.2 及 Linux 2.6.24(尽管fuse 2.7.x单独没有包含getattr/write race condition fix)。在FreeBSD系统上fusefs-kmod版本要0.3.9以上的才可以,在MacOS X Mac上 FUSE要10.5版本。
安装MooseFS客户端:
1、安装mfs-client,从源代码安装,在进行configure时不要加--disable-mfsmount选项就可以了
2、建立被MooseFS挂接的目录,例如/mnt/mfs。
3、MooseFS用一下的命令挂接:
mfsmount [-h master] [-p port] [-l path] [-w mount-point]
-H MASTER:是管理服务器(master server)的ip地址
-P PORT: 是管理服务器(master server)的端口号,要按照mfsmaster.cfg 配置文件中的变量MATOCU_LISTEN_POR的之填写。如果master serve使用的是默认端口号则不用指出。
-S PATH:指出被挂接mfs目录的子目录,默认是/目录,就是挂载整个mfs目录。
Mountpoint:是指先前创建的用来挂接mfs的目录。  


mfs文件系统(三)

使用  MooseFS
一、挂载文件系统
启动管理服务器(master server)和数据服务器(chunkservers) (chunkservers一个是必需的,但至少两个推荐) 后,客户机便可以利用mfsmount挂接mfs文件系统。
MooseFS文件系统利用下面的命令:
mfsmount mountpoint [-d] [-f] [-s] [-m] [-n] [-p] [-H MASTER] [-P PORT] [-S PATH] [-o OPT[,OPT...]]
-H MASTER:是管理服务器(master server)的ip地址
-P PORT: 是管理服务器(master server)的端口号,要按照mfsmaster.cfg 配置文件中的变量MATOCU_LISTEN_POR的之填写。如果master serve使用的是默认端口号则不用指出。
-S PATH:指出被挂接mfs目录的子目录,默认是/目录,就是挂载整个mfs目录。
Mountpoint:是指先前创建的用来挂接mfs的目录。
在开始mfsmount进程时,用一个-m或-o mfsmeta的选项,这样可以挂接一个辅助的文件系统MFSMETA,这么做的目的是对于意外的从MooseFS卷上删除文件或者是为了释放磁盘空间而移动的文件而又此文件又过去了垃圾文件存放期的恢复,例如:
mfsmount -m /mnt/mfsmeta
需要注意的是,如果要决定挂载mfsmeta,那么一定要在mfsmaster的mfsexports.cfg文件中加入如下条目:
*                       .       rw

原文件中有此条目,只要将其前的#去掉就可以了。
基本操作
挂载文件系统后就可以执行所有的标准的文件操作了(如创建,拷贝,删除,重命名文件,等等)。MooseFS是一个网络文件系统,因此操作进度可能比本地系统要慢。
MooseFS卷的剩余空间检查可以用和本地文件系统同样的方法,例如df命令:
$ df -h | grep mfs
mfsmaster:9421         85T   80T  4.9T  95% /mnt/mfs
mfsmaster:9321        394G  244G  151G  62% /mnt/mfs-test
重要的是每一个文件可以被储存多个副本,在这种情况下,每一个文件所占用的空间要比其文件本身大多了。此外,被删除且在有效期内(trashtime)的文件都放在一个“垃圾箱”,所以他们也占用的空间,其大小也依赖文件的份数。就像其他Unix的文件系统一样,以防删除一个被其它进程打开文件,数据将被一直存储,至少直到文件被关闭。
二、MooseFS的特定的操作
1、设定的目标
目标(goal),是指文件被拷贝的份数,设定了拷贝的份数后是可以通过可以mfsgetgoal命令来证实的,也可以通过mfssetgoal来改变设定。例如:
$ mfsgetgoal /mnt/mfs-test/test1
/mnt/mfs-test/test1: 2
$ mfssetgoal 3 /mnt/mfs-test/test1
/mnt/mfs-test/test1: 3
$ mfsgetgoal /mnt/mfs-test/test1
/mnt/mfs-test/test1: 3
用mfsgetgoal –r和mfssetgoal –r同样的操作可以对整个树形目录递归操作。
$ mfsgetgoal -r /mnt/mfs-test/test2
/mnt/mfs-test/test2:
files with goal        2 :                   36
directories with goal  2 :                    1
$ mfssetgoal -r 3 /mnt/mfs-test/test2
/mnt/mfs-test/test2:
inodes with goal changed:                        37
inodes with goal not changed:                     0
inodes with permission denied:                    0
$ mfsgetgoal -r /mnt/mfs-test/test2
/mnt/mfs-test/test2:
files with goal        3 :                   36
directories with goal  3 :                    1
实际的拷贝份数可以通过mfscheckfile 和 mfsfileinfo 命令来证实,例如:
$ mfscheckfile /mnt/mfs-test/test1
/mnt/mfs-test/test1:
3 copies: 1 chunks
$ mfsfileinfo /mnt/mfs-test/test1
/mnt/mfs-test/test1:
        chunk 0: 00000000000520DF_00000001 / (id:336095 ver:1)
                copy 1: 192.168.0.12:9622
                copy 2: 192.168.0.52:9622
                copy 3: 192.168.0.54:9622
注意:一个不包含数据的零长度的文件,尽管没有设置为非零的目标(the non-zero "goal"),但用命令查询将返回一个空的结果,例如:
[root@www bin]# touch    /mnt/mfs/mmm
[root@www bin]# ./mfsfileinfo  /mnt/mfs/mmm   
/mnt/mfs/mmm:
但是如果对此文件进行编辑,如:
[root@www bin]# echo "1234"> /mnt/mfs/mmm
然后看:
root@www bin]# ./mfsfileinfo  /mnt/mfs/mmm     
/mnt/mfs/mmm:
        chunk 0: 0000000000000040_00000001 / (id:64 ver:1)
                copy 1: 192.168.3.31:9422
                copy 2: 192.168.3.96:9422
                copy 3: 192.168.3.139:9422
此时在将文件清空:
[root@www bin]# echo ""> /mnt/mfs/mmm 
然后在看:
[root@www bin]# ./mfsfileinfo  /mnt/mfs/mmm         
/mnt/mfs/mmm:
        chunk 0: 0000000000000041_00000001 / (id:65 ver:1)
                copy 1: 192.168.3.31:9422
                copy 2: 192.168.3.96:9422
                copy 3: 192.168.3.139:9422
副本将任然存在。
假如改变一个已经存在的文件的拷贝个数,那么文件的拷贝份数将会被扩大或者被删除,这个过程会有延时。可以通过上面的命令来证实。
对一个目录设定“目标”,此目录下的新创建文件和子目录均会继承此目录的设定,但不会改变已经存在的文件及目录的拷贝份数。例如:
[root@bzd f]# touch 1
[root@bzd f]# echo “11” > 1
[root@bzd f]# /usr/local/mfs/bin/mfsfileinfo 1  
1:
        chunk 0: 0000000000000043_00000001 / (id:67 ver:1)
                copy 1: 192.168.3.31:9422
                copy 2: 192.168.3.96:9422
                copy 3: 192.168.3.139:9422
[root@bzd f]# cd ..
[root@bzd mfs]# /usr/local/mfs/bin/mfssetgoal 2 f
f: 2
[root@bzd mfs]# cd f/
[root@bzd f]# ls
1
[root@bzd f]# touch 2
[root@bzd f]# echo “222” > 2
[root@bzd f]# /usr/local/mfs/bin/mfsfileinfo 1
1:
        chunk 0: 0000000000000043_00000001 / (id:67 ver:1)
                copy 1: 192.168.3.31:9422
                copy 2: 192.168.3.96:9422
                copy 3: 192.168.3.139:9422
[root@bzd f]# /usr/local/mfs/bin/mfsfileinfo 2
2:
        chunk 0: 0000000000000044_00000001 / (id:68 ver:1)
                copy 1: 192.168.3.31:9422
                copy 2: 192.168.3.96:9422

整个目录树的内容摘要可以用一个功能增强的等同于du –s的命令mfsdirinfo,mfsdirinfo为MooseFS列出具体的信息。
例如:
$ mfsdirinfo /mnt/mfs-test/test/:
inodes:                         15
  directories:                    4
  files:                          8
chunks:                          6
length:                     270604
size:                       620544
realsize:                  1170432
上述内容摘要显示了目录、文件及chunks的数目,还有整个目录占用磁盘空间的情况。
length -文件大小的总和
size –块长度总和
realsize –磁盘空间的使用包括所有的拷贝

这是一个文件被分成了6个chunk例子:
[root@bzd mfs]# /usr/local/mfs/bin/mfsfileinfo fdsf.iso
1.img:
        chunk 0: 000000000000053A_00000001 / (id:1338 ver:1)
                copy 1: 192.168.3.31:9422
                copy 2: 192.168.3.96:9422
                copy 3: 192.168.3.139:9422
        chunk 1: 000000000000053B_00000001 / (id:1339 ver:1)
                copy 1: 192.168.3.31:9422
                copy 2: 192.168.3.96:9422
                copy 3: 192.168.3.139:9422
        chunk 2: 000000000000053C_00000001 / (id:1340 ver:1)
                copy 1: 192.168.3.31:9422
                copy 2: 192.168.3.96:9422
                copy 3: 192.168.3.139:9422
        chunk 3: 000000000000053D_00000001 / (id:1341 ver:1)
                copy 1: 192.168.3.31:9422
                copy 2: 192.168.3.96:9422
                copy 3: 192.168.3.139:9422
        chunk 4: 000000000000053E_00000001 / (id:1342 ver:1)
                copy 1: 192.168.3.31:9422
                copy 2: 192.168.3.96:9422
                copy 3: 192.168.3.139:9422
        chunk 5: 000000000000053F_00000001 / (id:1343 ver:1)
                copy 1: 192.168.3.31:9422
                copy 2: 192.168.3.96:9422
                copy 3: 192.168.3.139:9422

三、垃圾箱(trash bin)设定隔离的时间(quarantine time)
一个删除文件能够存放在一个“垃圾箱”的时间就是一个隔离时间,这个时间可以用mfsgettrashtime命令来验证,也可以用mfssettrashtime命令来设置,例如:
$ mfsgettrashtime /mnt/mfs-test/test1
/mnt/mfs-test/test1: 604800
$ mfssettrashtime 0 /mnt/mfs-test/test1
/mnt/mfs-test/test1: 0
$ mfsgettrashtime /mnt/mfs-test/test1
/mnt/mfs-test/test1: 0
这些工具也有个递归选项-r,可以对整个目录树操作,例如:
$ mfsgettrashtime -r /mnt/mfs-test/test2
/mnt/mfs-test/test2:
files with trashtime                 0 :                   36
directories with trashtime      604800 :                    1
$ mfssettrashtime -r 1209600 /mnt/mfs-test/test2
/mnt/mfs-test/test2:
inodes with trashtime changed:                       37
inodes with trashtime not changed:                    0
inodes with permission denied:                        0
$ mfsgettrashtime -r /mnt/mfs-test/test2
/mnt/mfs-test/test2:
files with trashtime           1209600 :                   36
directories with trashtime     1209600 :                    1
时间的单位是秒(有用的值有:1小时是3600秒,24 - 86400秒,1 - 604800秒)。就像文件被存储的份数一样, 为一个目录 设定存放时间是要被新创建的文件和目录所继承的。数字0意味着一个文件被删除后, 将立即被彻底删除,在想回收是不可能的
删除文件可以通过一个单独安装MFSMETA文件系统。特别是它包含目录 / trash (包含任然可以被还原的被删除文件的信息)和 / trash/undel (用于获取文件)。只有管理员有权限访问MFSMETA(用户的uid 0,通常是root)。
$ mfssettrashtime 3600 /mnt/mfs-test/test1
/mnt/mfs-test/test1: 3600
$ rm /mnt/mfs-test/test1
$ ls  /mnt/mfs-test/test1
ls: /mnt/mfs-test/test1: No such file or directory
# ls -l /mnt/mfs-test-meta/trash/*test1
-rw-r--r-- 1 user      users     1 2007-08-09 15:23 /mnt/mfs-test-meta/trash/00013BC7|test1
被删文件的文件名在 “垃圾箱”目录里还可见,文件名由一个八位十六进制的数i-node和被删文件的文件名组成,在文件名和i-node之间不是用“/”,而是用了“|”替代。如果一个文件名的长度超过操作系统的限制(通常是255个字符),那么部分将被删除。通过从挂载点起全路径的文件名被删除的文件任然可以被读写。需要注意的是被删除的文件在用全路径文件名(注意文件名是两部分)时一定要用单引号引起来。例如:
# cat '/mnt/mfs-test-meta/trash/00013BC7|test1'
test1
# echo 'test/test2' > '/mnt/mfs-test-meta/trash/00013BC7|test1'
# cat '/mnt/mfs-test-meta/trash/00013BC7|test1'
test/test2
移动这个文件到trash/undel子目录下,将会使原始的文件恢复到正确的MooseFS文件系统上 路径下(如果路径没有改变)。例如:
[root@www mfs]# ll dgg  
-rw-r--r--  1 root root 8 Jan 13 08:45 dgg
[root@www mfs]# rm -f dgg
[root@www mfs]# ll dgg  
ls: dgg: No such file or directory
[root@www trash]# ls
0000000B|dgg   00000047|f1    undel
[root@www trash]# mv '/mnt/mfsmeta/trash/0000000B|dgg' ./undel/
[root@www trash]# ls
undel 00000047|f1
[root@www mfs]# ll dgg
-rw-r--r--  1 root root 8 Jan 13 08:45 dgg
注意:如果在同一路径下有个新的同名文件,那么恢复不会成功
从“垃圾箱”中删除文件结果是释放之前被它站用的空间(删除有延迟,数据被异步删除)。在这种被从“垃圾箱”删除的情况下,该文件是不可能恢复了。
可以通过mfssetgoal工具来改变文件的拷贝数,也可以通过mfssettrashtime工具来改变存储在“垃圾箱”中的时间。
在 MFSMETA的目录里,除了trash和trash/undel两个目录外,还有第三个目录reserved,该目录内有已经删除的文件,但却有一直打开着。在用户关闭了这些被打开的文件后,reserved目录中的文件将被删除,文件的数据也将被立即删除。在reserved目录中文件的命名方法同trash目录中的一样,但是不能有其他功能的操作。
四、快照
MooseFS系统的另一个特征是利用mfsmakesnapshot工具给文件或者是目录树做快照,例如:
$ mfsmakesnapshot source ... destination

Mfsmakesnapshot是在一次执行中整合了一个或是一组文件的拷贝,而且任何修改这些文件的源文件都不会影响到源文件的快照, 就是说任何对源文件的操作,例如写入源文件,将不会修改副本(或反之亦然)。
文件快照可以用mfsappendchunks,就像MooseFS1.5中的mfssnapshot一样,,作为选择,二者都可以用。例如:
$ mfsappendchunks destination-file source-file ...
当有多个源文件时,它们的快照被加入到同一个目标文件中(每个chunk的最大量是chunk)。
五、额外的属性
文件或目录的额外的属性(noowner, noattrcache, noentrycache),可以被mfsgeteattr,mfsseteattr,mfsdeleattr工具检查,设置,删除,其行为类似mfsgetgoal/mfssetgoal or或者是mfsgettrashtime/mfssettrashtime,详细可见命令手册。


mfs文件系统(四)

MooseFS  维护
一、启动MooseFS集群
最安全的启动MooseFS集群(避免任何读或写的错误数据或类似的问题)的方式是按照以下命令步骤:
1.启动mfsmaster进程
2.启动所有的mfschunkserver进程
3.启动mfsmetalogger进程(如果配置了mfsmetalogger)
当所有的chunkservers连接到MooseFS master后,任何数目的客户端可以利用mfsmount去挂接被export的文件系统。(可以通过检查master的日志或是CGI监视器来查看是否所有的chunkserver被连接)。

二、停止MooseFS集群
安全的停止MooseFS集群:
1.在所有的客户端卸载MooseFS 文件系统(用umount命令或者是其它等效的命令)
2.用mfschunkserver –s命令停止chunkserver进程
3.用mfsmetalogger –s命令停止metalogger进程
4.用mfsmaster –s命令停止master进程

三、MooseFS chunkservers的维护
假如每个文件的goal(目标)都不小于2,并且没有under-goal文件(这些可以用mfsgetgoal –r和mfsdirinfo命令来检查),那么一个单一的chunkserver在任何时刻都可能做停止或者是重新启动。以后每当需要做停止或者是重新启动另一个chunkserver的时候,要确定之前的chunkserver被连接,而且要没有under-goal chunks。

四、MooseFS元数据的备份
通常元数据有两部分的数据
1.主要元数据文件metadata.mfs,当mfsmaster运行的时候会被命名为metadata.mfs.back
2.元数据改变日志changelog.*.mfs,存储了过去的N小时的文件改变(N的数值是由BACK_LOGS参数设置的,参数的设置在mfschunkserver.cfg配置文件中)。
主要的元数据文件需要定期备份,备份的频率取决于取决于多少小时changelogs储存。元数据changelogs应该实时的自动复制。自从MooseFS 1.6.5,这两项任务是由mfsmetalogger守护进程做的。

五、MooseFS master的恢复
一旦mfsmaster崩溃(例如因为主机或电源失败),需要最后一个元数据日志changelog并入主要的metadata中。这个操作时通过mfsmetarestore工具做的,最简单的方法是:
mfsmetarestore -a
如果master数据被存储在MooseFS编译指定地点外的路径,则要利用-d参数指定使用,如:
mfsmetarestore -a -d /storage/mfsmaster

六、从备份恢复MooseFS master
为了从备份中恢复一个master,需要做:
1、安装一个mfsmaster
2、利用同样的配置来配置这台mfsmaster(利用备份来找回mfsmaster.cfg),可见配置文件也是需要备份的。
3、找回metadata.mfs.back文件,可以从备份中找,也可以中metalogger主机中找(如果启动了metalogger服务),然后把metadata.mfs.back放入data目录,一般为${prefix}/var/mfs。
4、从在master宕掉之前的任何运行metalogger服务的服务器上拷贝最后metadata文件,然后放入mfsmaster的数据目录。
5、利用mfsmetarestore命令合并元数据changelogs,可以用自动恢复模式mfsmetarestore –a,也可以利用非自动化恢复模式,语法如下:
mfsmetarestore -m metadata.mfs.back -o metadata.mfs changelog_ml.*.mfs


MFS读写性能(简单测试结果):

写:time dd if=/dev/zero of=/usr/mfstest/test2/zhhtest500M  bs=1024k count=500

读:time dd if=/usr/mfstest/test2/zhhtest500M  of=/dev/null


1copy

2copy

1copy

2copy

1M

0m0.042s

0m0.042s

0m0.017s

0m0.017s

2M

0m0.056s

0m0.066s

0m0.030s

0m0.055s

5M

0m0.073s

0m0.079s

0m0.070s

0m0.071s

10M

0m0.119s

0m0.131s

0m0.136s

0m0.197s

20M

0m0.250s

0m0.288s

0m0.291s

0m0.376s

50M

0m0.514s

0m0.589s

 0m0.896s

0m0.886s

100M

0m0.977s

0m7.497s

0m1.677s

0m1.787s

200M

0m7.910s

0m22.270s

 0m2.683s

0m3.129s

500M

0m22.465s

0m51.735s

0m6.559s

0m6.990s

1G

0m52.346s

1m48.056s

0m17.319s

0m17.154s

2G

1m46.224s

3m46.283s

0m41.608s

0m34.435s

5G

4m41.956s

9m34.798s

2m9.200s

1m56.183s

10G

9m29.037s

19m26.237s

3m55.222s

3m24.914s

100G

95m53.500s

195m7.173s

32m4.295s

41m26.995s


总结规律:

1、读速度:ca 71M/s   写速度:ca 22M/s  9M/s   (以500M计算)

2goal的设置和读写速度的关系?貌似没有关系。


稳定

整个mfs体系中,直接断电只有master有可能无法启动。

使用mfsmetarestore -a修复才能启动,如果无法修复,使用metalogger上的备份日志进行恢复。(几次测试发现:如果mfsmetarestore -a无法修复,则使用metalogger也无法修复)。

强制使用metadata.mfs.back创建metadata.mfs,可以启动master,但丢失的数据暂无法确定(此问题已经请教MFS开发小组)。

直接断电测试过程,使用mfsmetarestore –a无法修复,使用metalogger也无法修复的情况较少发生。5次只有一次无法修复。


引用:http://bbs.chinaunix.net/thread-1643863-1-1.html

发表在 linux | 标签为 | mooseFS已关闭评论

glusterfs

下载:

http://download.gluster.org/pub/gluster/glusterfs/


Fuse支持库安装
查看发Fuse是否已经安装:

命令:

#lsmod | grep "fuse"

如果显示:

fuse                   66285  4

系统已经安装Fuse,跳过次安装步骤,进入下个软件的安装,否则继续下面的安装


文件: "fuse-2.8.4.tar.gz"

解压
#tar -xzvf fuse-2.8.4.tar.gz
#cd fuse-2.8.4 (进入目录,下述命令需要在该目录下执行)

安装编译:
#./configure --prefix=/usr (设定安装目录)
#make
#make install

挂载fuse内核模块
#modprobe fuse (关键)
#lsmod | grep "fuse" (查询fuse内核模块是否已正确挂载)

1.1.2 GlusterFs安装

检查GlusterFs是否已经安装:

命令:gluster –V 或 glusterfs -V

如果显示:

glusterfs 3.2.5 built on Mar  7 2012 16:10:28

Repository revision: git://git.gluster.com/glusterfs.git

Copyright (c) 2006-2011 Gluster Inc. <http://www.gluster.com>

GlusterFS comes with ABSOLUTELY NO WARRANTY.

You may redistribute copies of GlusterFS under the terms of the GNU General Public License.

GlusterFs已经安装,跳过此安装步骤,否则继续下面的安装


文件: " glusterfs-3.2.5.tar.gz"

解压
#tar -xzvf glusterfs-3.2.5.tar.gz
#cd glusterfs-3.2.5 (进入目录,下述命令需要在该目录下执行)

安装编译:
#./configure --prefix=/usr (设定安装目录)
#make
#make install

查看是否安装成功:

命令:gluster –V 或 glusterfs -V

如果显示:

glusterfs 3.2.5 built on Mar  7 2012 16:10:28

Repository revision: git://git.gluster.com/glusterfs.git

Copyright (c) 2006-2011 Gluster Inc. <http://www.gluster.com>

GlusterFS comes with ABSOLUTELY NO WARRANTY.

You may redistribute copies of GlusterFS under the terms of the GNU General Public License.

则安装成功

1.1.3 启动glusterd

# /etc/init.d/glusterd start

显示:

Starting glusterd:[  OK  ]

启动成功

1.2配置卷

1.2.1 前期准备

首先,依次登陆各个服务器启动glusterd;并将每个服务器对应的多个ip信息,添加到配置文件中,以d182服务器为例:(假设集群是由四个服务器节点构成)

       登陆d182服务器

       vi /etc/hosts

       把如下信息写入hosts 文件

192.168.1.182           d182

192.168.1.172             d182       

192.168.1.162       d182

192.168.1.183           d183

192.168.1.173             d183      

192.168.1.163       d183

     192.168.1.184           d184

192.168.1.174              d184      

192.168.1.164       d184

192.168.1.185       d185

192.168.1.175               d185   

192.168.1.165       d185

在服务器d183、d184、d185上都添加上诉信息。(上面的例子是每个服务器对应3个ip,共4个服务器,总计12条记录)


创建GlusterFS集群:

$ gluster peer probe SERVER

SERVER表示存储服务器的hostname。例如要创建包含四台服务器的GlusterFS集群使用命令如下:(在d182 服务器上输入)

# gluster peer probe d183

# gluster peer probe d184

# gluster peer probe d185

  注意:在构建GlusterFS集群时,需要在其中任意一台存储服务器上依次将其他存储服务器添加到集群中。

       添加完集群之后,登陆集群中的其他服务器,例:从d182登陆d183


       查看集群信息指令:

       gluster peer status


       显示信息如下:

Number of Peers: 3

       Hostname: 192.168.1.182

Uuid: f97d4478-9374-41b9-b296-fb9840ff1a42

State: Peer in Cluster (Connected)


Hostname: d184

Uuid: 503d8c85-03c5-40be-8bbe-f19419f3d985

State: Peer in Cluster (Connected)


Hostname: d185

Uuid: 3697827c-23e5-4238-9f8c-10c1a920bcdb

State: Peer in Cluster (Connected)

       显示红色字体”Connected”,为集群节点添加成功,但其中d182是以192.168.1.182这个ip加入集群的,需要换成hostname

       登陆集群中的集群中的另一个节点:

例:登陆d183服务器

       执行指令:

       gluster peer detach 192.168.1.182

       gluster peer probe d182


       集群节点添加完毕

1.2.2创建逻辑卷

指令:gluster volume create test-volume replica 2 transport  tcp server1:/exp1

server2:/exp2 server3:/exp3 server4:/exp4

test-volume:创建的逻辑卷的名字

replica 2: 冗余数

server1: 服务器名

exp1: brick的路径

查看volume 信息:# gluster volume info


1.3启动卷

启动卷命令:

# gluster volume start v8

    V8为创建的逻辑卷的名字。


1.4 挂载卷

客户端挂载存储服务器卷使用:

如果本机在节点群里面,那就使用本机的服务,如 127.0.0.1:/test-vol,如果本机不在集群节点里面,就得使用任何一个节点服务器的服务。

如: localhost:/v8

mount -t glusterfs d182:/v8 /usr/local/movies

d182表示主host name

V8表示卷名

/usr/local/movies表示客户端挂载点

验证mount是否成功:

 $ df –h

Filesystem            Size  Used Avail Use% Mounted on

/dev/sda3             128G   33G   89G  28% /

/dev/sda1             1.9G   42M  1.8G   3% /boot

tmpfs                 2.0G     0  2.0G   0% /dev/shm

glusterfs#182:/v8

                      551G  1.4G  521G   1% /usr/local/movies

出现红色字体部分表示已经挂载上存储服务器。

节点故障处理

 如果一台节点服务器down机,这个时候,我们要恢复故障,替换volume中坏掉的brick为新的brick,参考如下操作:

 #prob server
 gluster peer probe [new-server]
 #replace old to new brick
 gluster volume replace-brick vol-name [old-server]:/[old-brick]  [new-server]:/[new-brick]  start
 #检查同步的状态
 gluster volume replace-brick vol-name [old-server]:/[old-brick]  [new-server]:/[new-brick]  status
 #等待同步完成之后 提交
 gluster volume replace-brick vol-name [old-server]:/[old-brick]  [new-server]:/[new-brick]  commit force
只需在一台节点上操作,所有的服务器上该卷的brick都换成新的brick了

---------------------------------------------------------------------------------

GlusterFS分布式集群文件系统安装、配置及性能测试

前几天和天涯的刘天斯在讨论分布式文件系统,才想起电脑内还有一篇一年前写的文档,现在帖在这里,给有需要的朋友看看,因为当时是用word写的,帖在这边排版不是很好。大家凑合着看吧。

1.    版本历史

Revision    Author(s)    Date    Summary of activity
1.0             罗辉         2009-6-1    创建本文档

2.    参考文档

[1] http:// www.gluster.org
[2] http://wenzizone.cn/?p=8

3.    前言

Glusterfs是一个具有可以扩展到几个PB数量级的分布式集群文件系统。它可以把多个不同类型的存储块通过Infiniband RDMA或者TCP/IP汇聚成一个大的并行网络文件系统。
考虑到公司图片服务器后期的升级,我们对Glusterfs进行了比较详细的技术测试。

4.    测试环境

我们采用八台老的至强服务器组成了测试环境,配置为内存1-2G不等,每台有两块以上的73G SCSI硬盘。
同时每服务器配有两块网卡,连接至两个100M以太网交换机上。192.168.1.x段连接的是cisco 2950,另一个段是一个d-link交换机,服务器间的传输主要是通过cisco 2950,以保证网络的稳定性。

IP地址分别为:192.168.1.11~192.168.1.18 及 192.168.190.11~192.168.190~18。

所有服务器的操作系统都是Centos linux 5.3,安装DAG RPM Repository的更新包。DAG RPM Repository下载页面为:http://dag.wieers.com/rpm/packages/rpmforge-release/。
安装方式:

# wget http://dag.wieers.com/rpm/packages/rpmforge-release/rpmforge-release-0.3.6-1.el5.rf.i386.rpm
# rpm –ivh rpmforge-release-0.3.6-1.el5.rf.i386.rpm

5.    GlusterFS的安装

5.1.    服务器端安装

我们通过rpm编译方式来安装GlusterFS,因为做为群集文件系统,可能需要在至少10台以上的服务器上安装GlusterFS。每台去源码编译安装太费功夫,缺乏效率。在一台编译为rpm包,再复制到其它的服务器上安装是最好的选择。

GlusterFS需要fuse支持库,需先安装:
# yum -y install fuse fuse-devel httpd-devel libibverbs-devel

下载GlusterFS源码编译rpm包。
# wget http://ftp.gluster.com/pub/gluster/glusterfs/2.0/LATEST/glusterfs-2.0.0.tar.gz
# tar -xvzf glusterfs-2.0.0.tar.gz
# cp glusterfs-2.0.0.tar.gz /usr/src/redhat/SOURCES/
# rpmbuild -bb glusterfs-2.0.0/glusterfs.spec
# cp /usr/src/redhat/RPMS/i386/glusterfs* .
# rm glusterfs-debuginfo-2.0.0-1.i386.rpm
# rpm -ivh glusterfs-*.rpm
安装完成,并把编译好的rpm包复制到其它服务器上安装。

5.2.    客户端安装

客户端和服务器有一点点不同,特别需要注意的是在客户端这边,不但需要fuse库,并且需要一个fuse内核模块。好在DAG RPM Repository内已有用DKMS方式编译好的内核模块包,我们直接安装便可。
DKMS(Dynamic Kernel Module Support)是dell发起的一个项目,目的是希望能在不编译内核的情况下,动态的更新内核模块,最重要的是,通过DKMS方式编译的内核模块,由于是由DKMS管理的,在内核升级后,无需重新编译,仍旧可用。这种方式可大大方便以后的内核更新。
GlusterFS可直接用上面rpm编译后的包安装:

# yum -y install dkms dkms-fuse fuse fuse-devel httpd-devel libibverbs-devel
# rpm -ivh glusterfs-*.rpm

6.    GlusterFS的典型架构图

7.    GlusterFS常用translators(中继)

7.1.1.    storage/posix

type storage/posix
storage/posix的作用是指定一个本地目录给GlusterFS内的一个卷使用。
配置例子:
volume posix-example
type storage/posix
option directory /sda4
end-volume

7.1.2.    protocol/server (服务器)

type protocol/server
服务器中继(protocol/server)表示本节点在GlusterFS中为服务器模式。
配置例子:
volume server-example
type protocol/server
option transport-type tcp
subvolumes brick                #定义好的卷
option auth.addr.brick.allow *  #指定可访问本卷的访问者,*为所有,可对访问者做限制,如192.168.1.*
end-volume

7.1.3.    protocol/client (客户端)

type protocol/client
客户端中继(protocol/server)用于客户端连接服务器时使用。
配置例子:
volume client-example
type protocol/client
option transport-type tcp
option remote-host 192.168.1.13    #连接的服务器
option remote-subvolume brick      #连接的服务器卷名
end-volume

7.1.4.    cluster/replicate(复制)

type cluster/replicate
复制中继(cluster/replicate,前身是AFR)为GlusterFS提供了类似RAID-1的功能。
Replicate会复制文件或者文件夹到各个subvolumes里。如一个卷(volume)内有两个子卷(subvolume),那就会有两份文件或文件夹的复本。
Replicate只时还有高可用的功能,如果两个子卷中有一个子卷挂了,卷依然可以正常工作。当这个子卷重新启用时,会自动更新丢失的文件或文件夹,不过更新是通过客户端进行的。
配置例子:
volume replicate-example
type cluster/replicate
subvolumes brick3 brick4
end-volume

7.1.5.    cluster/distribute (分布式)

type cluster/distribute
分布式中继(cluster/distribute,前身是unify)为GlusterFS提供了类似RAID-0的功能。
Distribute可把两个卷或子卷组成一个大卷,实现多存储空间的聚合
配置例子:
volume distribute-example
type cluster/distribute
subvolumes repl1 repl2
end-volume

7.1.6.    features/locks (锁)

type features/locks
锁中继(features/locks)只能用于服务器端的posix中继之上,表示给这个卷提供加锁(fcntl locking)的功能。
配置例子:
volume locks-example
type features/locks
subvolumes posix-example
end-volume

7.1.7.    performance/read-ahead (预读)

type performance/read-ahead
预读中继(performance/read-ahead)属于性能调整中继的一种,用预读的方式提高读取的性能。
读取操作前就预先抓取数据。这个有利于应用频繁持续性的访问文件,当应用完成当前数据块读取的时候,下一个数据块就已经准备好了。
额外的,预读中继也可以扮演读聚合器,许多小的读操作被绑定起来,当成一个大的读请求发送给服务器。
预读处理有page-size和page-count来定义,page-size定义了,一次预读取的数据块大小,page-count定义的是被预读取的块的数量
不过官方网站上说这个中继在以太网上没有必要,一般都能跑满带宽。主要是在IB-verbs或10G的以太网上用。
配置例子:
volume readahead-example
type performance/read-ahead
option page-size  256         # 每次预读取的数据块大小
option page-count 4           # 每次预读取数据块的数量
option force-atime-update off #是否强制在每次读操作时更新文件的访问时间,不设置这个,访问时间将有些不精确,这个将影响预读转换器读取数据时的那一时刻而不是应用真实读到数据的那一时刻。
subvolumes <x>
end-volume

7.1.8.    performance/write-behind (回写)

type performance/write-behind
回写中继(performance/read-ahead)属于性能调整中继的一种,作用是在写数据时,先写入缓存内,再写入硬盘。以提高写入的性能。
回写中继改善了了写操作的延时。它会先把写操作发送到后端存储,同时返回给应用写操作完毕,而实际上写的操作还正在执行。使用后写转换器就可以像流水线一样把写请求持续发送。这个后写操作模块更适合使用在client端,以期减少应用的写延迟。
回写中继同样可以聚合写请求。如果aggregate-size选项设置了的话,当连续的写入大小累积起来达到了设定的值,就通过一个写操作写入到存储上。这个操作模式适合应用在服务器端,以为这个可以在多个文件并行被写入磁盘时降低磁头动作。
配置例子:
volume write-behind-example
type performance/write-behind
option cache-size 3MB    # 缓存大小,当累积达到这个值才进行实际的写操作
option flush-behind on   # 这个参数调整close()/flush()太多的情况,适用于大量小文件的情况
subvolumes <x>
end-volume

7.1.9.    performance/io-threads (IO线程)

type performance/io-threads
IO线程中继(performance/io-threads)属于性能调整中继的一种,作用是增加IO的并发线程,以提高IO性能。
IO线程中继试图增加服务器后台进程对文件元数据读写I/O的处理能力。由于GlusterFS服务是单线程的,使用IO线程转换器可以较大的提高性能。这个转换器最好是被用于服务器端,而且是在服务器协议转换器后面被加载。
IO线程操作会将读和写操作分成不同的线程。同一时刻存在的总线程是恒定的并且是可以配置的。
配置例子:
volume iothreads
type performance/io-threads
option thread-count 32 # 线程使用的数量
subvolumes <x>
end-volume

7.1.10.    performance/io-cache (IO缓存)

type performance/io-cache
IO缓存中继(performance/io-threads)属于性能调整中继的一种,作用是缓存住已经被读过的数据,以提高IO性能。
IO缓存中继可以缓存住已经被读过的数据。这个对于多个应用对同一个数据多次访问,并且如果读的操作远远大于写的操作的话是很有用的(比如,IO缓存很适合用于提供web服务的环境,大量的客户端只会进行简单的读取文件的操作,只有很少一部分会去写文件)。
当IO缓存中继检测到有写操作的时候,它就会把相应的文件从缓存中删除。
IO缓存中继会定期的根据文件的修改时间来验证缓存中相应文件的一致性。验证超时时间是可以配置的。
配置例子:
volume iothreads
type performance/ io-cache
option cache-size 32MB  #可以缓存的最大数据量
option cache-timeout 1  #验证超时时间,单位秒
option priority   *:0   #文件匹配列表及其设置的优先级
subvolumes <x>
end-volume

7.1.11.    其它中继

其它中继还有
cluster/nufa(非均匀文件存取)
cluster/stripe(条带,用于大文件,分块存储在不用服务器)
cluster/ha(集群)
features/filter(过滤)
features/trash(回收站)
path-converter
quota
老的还有:
cluster/unify(和distribute,可定义不同的调度器,以不同方式写入数据)

8.    GlusterFS配置

8.1.    服务器端配置

服务器为6台,IP分别是192.168.1.11~192.168.1.16。配置为:
# vi /etc/glusterfs/glusterfsd.vol
volume posix
type storage/posix
option directory /sda4
end-volume

volume locks
type features/locks
subvolumes posix
end-volume

volume brick
type performance/io-threads
option thread-count 8
subvolumes locks
end-volume

volume server
type protocol/server
option transport-type tcp
subvolumes brick
option auth.addr.brick.allow *
end-volume
保存后启动GlusterFS:
# service glusterfsd start

8.2.    客户端配置

服务器为192.168.1.17和192.168.1.18:
# vi /etc/glusterfs/glusterfs.vol
volume brick1
type protocol/client
option transport-type tcp
end-volume

volume brick2
type protocol/client
option transport-type tcp
option remote-host 192.168.1.12
option remote-subvolume brick
end-volume

volume brick3
type protocol/client
option transport-type tcp
option remote-host 192.168.1.13
option remote-subvolume brick
end-volume

volume brick4
type protocol/client
option transport-type tcp
option remote-host 192.168.1.14
option remote-subvolume brick
end-volume

volume brick5
type protocol/client
option transport-type tcp
option remote-host 192.168.1.15
option remote-subvolume brick
end-volume

volume brick6
type protocol/client
option transport-type tcp
option remote-host 192.168.1.16
option remote-subvolume brick
end-volume

volume afr1
type cluster/replicate
subvolumes brick1 brick2
end-volume

volume afr2
type cluster/replicate
subvolumes brick3 brick4
end-volume

volume afr3
type cluster/replicate
subvolumes brick5 brick6
end-volume

volume unify
type cluster/distribute
subvolumes afr1 afr2 afr3
end-volume

GlusterFS的主要配置都在客户端上,上面配置文件的意思是把6台服务器分成3个replicate卷,再用这3个replicate卷做成一个distribute,提供应用程序使用。

8.3.    GlusterFS挂载

GlusterFS挂载为在客户端上执行:
# glusterfs -f /etc/glusterfs/glusterfs.vol /gmnt/ -l /var/log/glusterfs/glusterfs.log
-f /etc/glusterfs/glusterfs.vol为指定GlusterFS的配置文件
/gmnt是挂载点
-l /var/log/glusterfs/glusterfs.log为日志
另外,GlusterFS也可以结果fstab或autofs方式开机挂载。挂载后就可以在/gmnt内读写文件了,用法与读写本地硬盘一样。

9.    GlusterFS性能测试

9.1.    单客户端测试

测试1:复制大约2.5G容量 /usr目录至GlusterFS(大部分都是小文件)
测试结果:
glusterfs    1361KB/s
本地硬盘   2533KB/s

测试2: 复制一个3.8G的文件至GlusterFS
测试结果:
glusterfs     2270KB/s
本地硬盘    10198KB/s

测试3:读取测试2复制的大文件(cat xxx.iso > /dev/null)
测试结果:
glusterfs     11.2MB/s(基本跑满100M带宽)
本地硬盘    45.6MB/s

9.2.    双客户端测试

测试1:在两个客户端上同时复制大约2.5G容量 /usr目录至GlusterFS(大部分都是小文件)
测试结果:
192.168.1.17:glusterfs   1438KB/s
192.168.1.18:glusterfs   1296KB/s

测试2: 在两个客户端上同时复制一个3.8G的文件至GlusterFS
测试结果:
192.168.1.17:glusterfs    2269KB/s
192.168.1.18:glusterfs    2320KB/s

9.3.    配置回写功能后的测试

9.3.1.    服务器配置

volume posix
type storage/posix
option directory /sda4
end-volume

volume locks
type features/locks
subvolumes posix
end-volume

volume writebehind
type performance/write-behind
option cache-size   16MB
option flush-behind on
subvolumes locks
end-volume

volume brick
type performance/io-threads
option thread-count 64
subvolumes writebehind
end-volume

volume server
type protocol/server
option transport-type tcp
option auth.addr.brick.allow * # Allow access to "brick" volume
end-volume

9.3.2.    客户端配置

volume brick1
type protocol/client
option transport-type tcp
option remote-host 192.168.1.11      # IP address of the remote brick
option remote-subvolume brick        # name of the remote volume
end-volume

volume brick2
type protocol/client
option transport-type tcp
option remote-host 192.168.1.12
option remote-subvolume brick
end-volume

volume brick3
type protocol/client
option transport-type tcp
option remote-host 192.168.1.13
option remote-subvolume brick
end-volume

volume brick4
type protocol/client
option transport-type tcp
option remote-host 192.168.1.14
option remote-subvolume brick
end-volume

volume brick5
type protocol/client
option transport-type tcp
option remote-host 192.168.1.15
option remote-subvolume brick
end-volume

volume brick6
type protocol/client
option transport-type tcp
option remote-host 192.168.1.16
option remote-subvolume brick
end-volume

volume afr1
type cluster/replicate
subvolumes brick1 brick2
end-volume

volume afr2
type cluster/replicate
subvolumes brick3 brick4
end-volume

volume afr3
type cluster/replicate
subvolumes brick5 brick6
end-volume

volume wb1
type performance/write-behind
option cache-size 2MB
option flush-behind on
subvolumes afr1
end-volume

volume wb2
type performance/write-behind
option cache-size 2MB
option flush-behind on
subvolumes afr2
end-volume

volume wb3
type performance/write-behind
option cache-size 2MB
option flush-behind on
subvolumes afr3
end-volume

volume unify
type cluster/distribute
subvolumes wb1 wb2 wb3
end-volume

9.3.3.    测试

测试:在两个客户端上同时复制大约2.5G容量 /usr目录至GlusterFS(大部分都是小文件)
测试结果:
192.168.1.17:glusterfs   979KB/s
192.168.1.18:glusterfs   1056KB/s

10.    结语

从测试结果看,小文件的写入速度只有1M多,速度过低,好在在多客户端的情况下,写入速度还算平稳。大文件的写入也只有2M。对于做图片服务器来说,只能算勉强够用。
另外在性能调优方面,在我们加上回写后,速度反而有下降。当然也有可能是配置参数不当的原因。
经测试,GlusterFS在高可用方面比较稳定的,基本能达到要求。不过由于在复制模式的更新是通过客户端进行的,当客户端和replicate内的一台服务器同时挂时,会造成数据不同步的情况。需要手动做个列表的动作(ls)才会更新。
GlusterFS作为正式运营环境使用时,还缺乏一些功能,如GlusterFS没有对整个集群的监控和管理程序等。


--------------------------------------------------------------------------
 
一些命令配置

1.在一台服务器上建立Distributed Volume

假设服务器为:192.168.113.173(Server)
假设客户端为:192.168.113.179(Client)

首先配置Server,开启gluster服务
Server# modprobe fuse
Server# /etc/init/glusterd start

服务器只有一台,直接创建Volume即可,名为single-volume
Server# gluster volume create single-volume 192.168.113.173:/home/single1

启动volume
Server# gluster volume start single-volume

查看当前所有volume状态
Server# gluster volume info

若要使用Cache,则使用
Server# gluster volume set single-volume performance.cache-size 1GB

Gluster自动生成配置文件,在/etc/glusterd/vols/single-volume/文件夹中

在客户端挂载gluster镜像,客户端直接使用Server端的配置文件,不必创建自己的配置文件了
Client# modprobe fuse
Client# /etc/init/glusterd start
Client# mount.glusterfs 192.168.113.173:/single-volume /mnt/local-volume

2.在两台服务器上建立Distributed Volume

假设服务器A为:192.168.113.173(ServerA)
假设服务器B为:192.168.113.174(ServerB)
假设客户端为:192.168.113.179(Client)

首先配置Server,开启gluster服务
ServerA# modprobe fuse
ServerA# /etc/init/glusterd start

ServerB# modprobe fuse
ServerB# /etc/init/glusterd start

服务器有两台,要先绑定在一起(假设使用ServerA做主服务器)
ServerA# gluster peer probe 192.168.113.174

创建Volume,名为cluster-volume
ServerA# gluster volume create cluster-volume 192.168.113.173:/home/cluster1 192.168.113.174:/home/cluster2

启动volume
ServerA# gluster volume start cluster-volume

查看当前所有volume状态
ServerA# gluster volume info

若要使用Cache,则使用
ServerA# gluster volume set cluster-volume performance.cache-size 1GB

Gluster自动生成配置文件,在/etc/glusterd/vols/cluster-volume/文件夹中

在客户端挂载gluster镜像,客户端直接使用Server端的配置文件,不必创建自己的配置文件了
Client# modprobe fuse
Client# /etc/init/glusterd start
Client# mount.glusterfs 192.168.113.173:/cluster-volume /mnt/local-volume

3.在两台服务器上建立Striped Volume

假设服务器A为:192.168.113.173(ServerA)
假设服务器B为:192.168.113.174(ServerB)
假设客户端为:192.168.113.179(Client)

首先配置Server,开启gluster服务
ServerA# modprobe fuse
ServerA# /etc/init/glusterd start

ServerB# modprobe fuse
ServerB# /etc/init/glusterd start

服务器有两台,要先绑定在一起(假设使用ServerA做主服务器)
ServerA# gluster peer probe 192.168.113.174

创建Volume,名为stripe-volume
ServerA# gluster volume create stripe-volume stripe 2 transport tcp 192.168.113.173:/home/stripe1 192.168.113.174:/home/stripe2

启动volume
ServerA# gluster volume start stripe-volume

查看当前所有volume状态
ServerA# gluster volume info

若要使用Cache,则使用
ServerA# gluster volume set stripe-volume performance.cache-size 1GB

Gluster自动生成配置文件,在/etc/glusterd/vols/stripe-volume/文件夹中

在客户端挂载gluster镜像,客户端直接使用Server端的配置文件,不必创建自己的配置文件了
Client# modprobe fuse
Client# /etc/init/glusterd start
Client# mount.glusterfs 192.168.113.173:/stripe-volume /mnt/local-volume

发表在 linux | 标签为 | glusterfs已关闭评论

linux epel

源的配置 

在CentOS中,很多软件是可以通过yum intall这样一条命令来安装的,Ubuntu中则是apt-get。他们会从软件库中找到合适的软件并安装。系统默认的软件库并不够全,还需要添加新的源来支持我的需求。


源的配置文件都在/etc/yum.repos.d/下。

首先第一步,我们安装yum-priorities插件。

sudo yum install yum-priorities

该插件用来设定源的优先级,可以保证官方的源优先级最高,存在相同的软件时,优先使用官方源,这样可以保证软件依赖关系正确。

接下来编辑/etc/yum.repos.d/CentOS-Base.repo

sudo vi /etc/yum.repos.d/CentOS-Base.repo

在base、update、addons、extras每一段末尾添下如下行:

priority=1

priority的优先级是从1-99,1为最高。

centosplus、contrib两段则设定为2,这样基本的源就已经设置完成了。接下来我们添加新的源。


添加EPEL源

rpm -ivh http://mirrors.ustc.edu.cn/fedora/epel/6/i386/epel-release-6-7.noarch.rpm
 若不知版本可打开目录查看: http://mirrors.ustc.edu.cn/fedora/epel/6/i386/

然后设置epel.repo中的每段priority=11


添加rpmforge源

rpm -ivh http://pkgs.repoforge.org/rpmforge-release/rpmforge-release-0.5.2-2.el6.rf.x86_64.rpm
 若不知版本可打开目录查看: http://pkgs.repoforge.org/rpmforge-release/

然后设置rpmforge.repo的每段priority=12


发表在 linux | 标签为 | linux epel已关闭评论