HTTP Cache

头部

缓存控制头部:

  1. Last-Modified:表示文档的最后修改时间,当去服务器验证时会拿这个时间去;
  2. Expires:http/1.0规范定义,表示文档在浏览器中的过期时间,当缓存的内容超过这个时间则需要重新去服务器获取最新的内容;
  3. Cache-Control:http/1.1规范定义,表示浏览器缓存控制,max-age=3153600表示文档可以在浏览器中缓存一年。
  4. ETag:发送到服务端进行内容变更验证的,而Catch-Control是用于控制缓存时间的(浏览器、代理层等)。此处我们使用了弱实体W\”6124c”,弱实体(”6124c”)只要内容语义没变即可,比如内容的gzip版和非gzip版可以使用弱实体验证;而强实体指字节必须完全一致(gzip和非gzip情况是不一样的),因此建议首先选择使用弱实体。nginx在生成etag时使用的算法是Last-Modified + Content-Length计算的。

根据规范定义Cache-Control优先级高于Expires,实际使用时可以两个都用,或仅使用Cache-Control就可以了。一般情况下Expires=当前系统时间(Date) + 缓存时间(Cache-Control: max-age)。

请求一个已浏览器过的请求时,头部变化:

1. Modified-Since请求头,其值是上次请求响应中的Last-Modified,即浏览器会拿这个时间去服务端验证内容是否发生了变更。
2. If-None-Match请求头,其值是上次请求响应中的ETag,即浏览器会拿这个时间去服务端验证内容是否发生了变更。

Last-Modified与ETag同时使用时,浏览器在验证时会同时发送If-Modified-Since和If-None-Match,按照http/1.1规范,如果同时使用If-Modified-Since和If-None-Match则服务端必须两个都验证通过后才能返回304;且nginx就是这样做的。因此实际使用时应该根据实际情况选择。

当我们按下cmd-F5强制刷新后:
浏览器在请求时不会带上If-Modified-Since,并带上Cache-Control:no-cache和Pragma:no-cache,这是为了告诉服务端说我请给我一份最新的内容。

相关状态码

  1. 304 Not Modified
    304表示服务器返回文档没有过期
  1. 200 (from cache)
    200 (from cache) 表示浏览器直接使用缓存数据

总结

  1. Last-Modified/Modified-Since 用于验证文档内容是否变更
  2. max-age/Expires 定义文档缓存时间,如在有效期内会返回 200(from cache)


发表在 web server | HTTP Cache已关闭评论

ceph – Ceph 管理工具

ceph – Ceph 管理工具

提纲

ceph auth [ add | caps | del | export | get | get-key | get-or-create | get-or-create-key | import | list | print-key | print_key ] ...
ceph compact
ceph config-key [ del | exists | get | list | put ] ...
ceph daemon <name> | <path> <command> ...
ceph daemonperf <name> | <path> [ interval [ count ] ]
ceph df {detail}
ceph fs [ ls | new | reset | rm ] ...
ceph fsid
ceph health {detail}
ceph heap [ dump | start_profiler | stop_profiler | release | stats ] ...
ceph injectargs <injectedargs> [ <injectedargs>... ]
ceph log <logtext> [ <logtext>... ]
ceph mds [ add_data_pool | cluster_down | cluster_up | compat | deactivate | dump | fail | getmap | newfs | remove_data_pool | rm | rmfailed | set | set_max_mds | set_state | setmap | stat | stop | tell ] ...
ceph mon [ add | dump | getmap | remove | stat ] ...
ceph mon_status
ceph osd [ blacklist | blocked-by | create | deep-scrub | df | down | dump | erasure-code-profile | find | getcrushmap | getmap | getmaxosd | in | lspools | map | metadata | out | pause | perf | pg-temp | primary-affinity | primary-temp | repair | reweight | reweight-by-pg | rm | scrub | set | setcrushmap | setmaxosd | stat | thrash | tree | unpause | unset ] ...
ceph osd crush [ add | add-bucket | create-or-move | dump | get-tunable | link | move | remove | rename-bucket | reweight | reweight-all | reweight-subtree | rm | rule | set | set-tunable | show-tunables | tunables | unlink ] ...
ceph osd pool [ create | delete | get | get-quota | ls | mksnap | rename | rmsnap | set | set-quota | stats ] ...
ceph osd tier [ add | add-cache | cache-mode | remove | remove-overlay | set-overlay ] ...
ceph pg [ debug | deep-scrub | dump | dump_json | dump_pools_json | dump_stuck | force_create_pg | getmap | ls | ls-by-osd | ls-by-pool | ls-by-primary | map | repair | scrub | set_full_ratio | set_nearfull_ratio | stat ] ...
ceph quorum [ enter | exit ]
ceph quorum_status
ceph report { <tags> [ <tags>... ] }
ceph scrub
ceph status
ceph sync force {–yes-i-really-mean-it} {–i-know-what-i-am-doing}
ceph tell <name (type.id)> <args> [<args>...]
ceph version

描述

ceph 是个控制工具,可用于手动部署和维护 Ceph 集群。它提供的多种工具可用于部署监视器、 OSD 、归置组、 MDS 和维护、管理整个集群。

命令

auth

管理认证密钥。用于给某个具体实体(如监视器或 OSD )增加、删除、导出或更新认证密钥。还需额外加子命令。

子命令 add 用于为特定实体增加认证信息,这些信息可从文件读入,若未在命令行指定密钥(和、或此密钥的能力)将生成随机密钥。

用法:

ceph auth add <entity> {<caps> [<caps>...]}

子命令 capsname 的能力更新为命令行中指定的。

用法:

ceph auth caps <entity> <caps> [<caps>...]

子命令 del 删除 name 的所有能力。

用法:

ceph auth del <entity>

子命令 export 把指定实体写入密钥环,若未指定则写入主密钥环。

用法:

ceph auth export {<entity>}

子命令 get 把请求到的密钥写入密钥环文件。

用法:

ceph auth get <entity>

子命令 get-key 显示所请求的密钥。

用法:

ceph auth get-key <entity>

子命令 get-or-create 用于为特定实体增加认证信息,这些信息可从文件读入,若未在命令行指定密钥(和、或此密钥的能力)将生成随机密钥。

用法:

ceph auth get-or-create <entity> {<caps> [<caps>...]}

子命令 get-or-create-key 根据命令行指定的系统、能力对,为 name 获取或创建密钥。若密钥已存在,任何指定的能力必须与当前已有能力一致。

用法:

ceph auth get-or-create-key <entity> {<caps> [<caps>...]}

子命令 import 从输入文件读入密钥环。

用法:

ceph auth import

子命令 list 罗列认证状态。

用法:

ceph auth list

子命令 print-key 显示请求的密钥。

用法:

ceph auth print-key <entity>

子命令 print_key 显示请求的密钥。

用法:

ceph auth print_key <entity>

compact

让监视器压缩其 leveldb 存储。

用法:

ceph compact

config-key

管理配置密钥。需额外指定子命令。

子命令 del 用于删除配置密钥。

用法:

ceph config-key del <key>

子命令 exists 用于检查配置密钥是否存在。

用法:

ceph config-key exists <key>

子命令 get 用于获取配置密钥。

用法:

ceph config-key get <key>

子命令 list 罗列配置密钥。

用法:

ceph config-key list

子命令 put 上传配置密钥及其内容。

用法:

ceph config-key put <key> {<val>}

df

显示集群空闲空间状态。

用法:

ceph df {detail}

fs

用于管理 cephfs 文件系统,需额外加子命令。

子命令 ls 用于罗列文件系统。

用法:

ceph fs ls

子命令 new 用指定的存储池 <metadata> 和 <data> 创建新文件系统。

用法:

ceph fs new <fs_name> <metadata> <data>

子命令 reset 仅适用于灾难恢复:重置成单 MDS 运行图。

用法:

ceph fs reset <fs_name> {--yes-i-really-mean-it}

子命令 rm 用于禁用指定文件系统。

用法:

ceph fs rm <fs_name> {--yes-i-really-mean-it}

fsid

显示集群的 FSID/UUID 。

用法:

ceph fsid

health

显示集群健康状况。

用法:

ceph health {detail}

heap

显示堆栈使用信息(编译时启用了 tcmalloc 支持才可用)

用法:

ceph heap dump|start_profiler|stop_profiler|release|stats

injectargs

向监视器注入配置参数。

用法:

ceph injectargs <injected_args> [<injected_args>...]

log

把指定文本记录到监视器日志中。

用法:

ceph log <logtext> [<logtext>...]

mds

用于元数据服务器的配置和管理,需额外指定子命令。

子命令 add_data_pool 用于增加数据存储池。

用法:

ceph mds add_data_pool <pool>

子命令 cluster_down 关闭 mds 集群。

用法:

ceph mds cluster_down

子命令 cluster_up 启动 mds 集群。

用法:

ceph mds cluster_up

子命令 compat 管理兼容功能,需额外指定子命令。

子命令 rm_compat 可删除兼容功能。

用法:

ceph mds compat rm_compat <int[0-]>

子命令 rm_incompat 可删除不兼容的功能。

用法:

ceph mds compat rm_incompat <int[0-]>

子命令 show 可查看 mds 的兼容性选项。

用法:

ceph mds compat show

子命令 deactivate 可停止 mds 。

用法:

ceph mds deactivate <who>

子命令 dump 用于转储信息, epoch 号为可选。

用法:

ceph mds dump {<int[0-]>}

子命令 fail 强制把 mds 状态设置为失效。

用法:

ceph mds fail <who>

子命令 getmap 获取 MDS 图, epoch 号可选。

用法:

ceph mds getmap {<int[0-]>}

子命令 newfs 可用 <metadata> 和 <data> 存储池新建文件系统。

用法:

ceph mds newfs <int[0-]> <int[0-]> {--yes-i-really-mean-it}

子命令 remove_data_pool 用于删除数据存储池。

用法:

ceph mds remove_data_pool <pool>

子命令 rm 用于删除不活跃的 mds 。

用法:

ceph mds rm <int[0-]> <name> (type.id)>

子命令 rmfailed 用于删除失效的 mds 。

用法:

ceph mds rmfailed <int[0-]>

子命令 set 用于设置参数,把 <var> 的值设置为 <val> 。

用法:

ceph mds set max_mds|max_file_size|allow_new_snaps|inline_data <va> {<confirm>}

子命令 set_max_mds 用于设置 MDS 的最大索引号。

用法:

ceph mds set_max_mds <int[0-]>

子命令 set_state 把 mds 状态从 <gid> 改为 <numeric-state> 。

用法:

ceph mds set_state <int[0-]> <int[0-20]>

子命令 setmap 设置 mds 图,必须提供正确的 epoch 号。

用法:

ceph mds setmap <int[0-]>

子命令 stat 显示 MDS 状态。

用法:

ceph mds stat

子命令 stop 停止指定 mds 。

用法:

ceph mds stop <who>

子命令 tell 用于向某个 mds 发送命令。

用法:

ceph mds tell <who> <args> [<args>...]

mon

用于监视器的配置和管理,需额外指定子命令。

子命令 add 新增名为 <name> 的监视器,地址为 <addr> 。

用法:

ceph mon add <name> <IPaddr[:port]>

子命令 dump 转储格式化的 monmap , epoch 号可选。

用法:

ceph mon dump {<int[0-]>}

子命令 getmap 用于获取 monmap 。

用法:

ceph mon getmap {<int[0-]>}

子命令 remove 用于删除名为 <name> 的监视器。

用法:

ceph mon remove <name>

子命令 stat 汇总监视器状态。

用法:

ceph mon stat

mon_status

报告监视器状态。

用法:

ceph mon_status

osd

用于配置和管理 OSD ,需额外指定子命令。

子命令 blacklist 用于管理客户端黑名单,需额外加子命令。

子命令 add 用于把 <addr> 加入黑名单(可指定时间,从现在起 <expire> 秒)。

用法:

ceph osd blacklist add <EntityAddr> {<float[0.0-]>}

子命令 ls 列出进黑名单的客户端。

用法:

ceph osd blacklist ls

子命令 rm 从黑名单里删除 <addr> 。

用法:

ceph osd blacklist rm <EntityAddr>

子命令 blocked-by 用于罗列哪些 OSD 在阻塞互联。

用法:

ceph osd blocked-by

子命令 create 用于新建 OSD , UUID 和 ID 是可选的。

用法:

ceph osd create {<uuid>} {<id>}

子命令 crush 用于 CRUSH 管理,需额外指定子命令。

子命令 add 可用于新增或更新 <name> 的 crushmap 位置及权重,权重改为 <weight> 、位置为 <args> 。

用法:

ceph osd crush add <osdname (id|osd.id)> <float[0.0-]> <args> [<args>...]

子命令 add-bucket 可新增没有父级(可能是 root )、类型为 <type> 、名为 <name> 的 crush 桶。

用法:

ceph osd crush add-bucket <name> <type>

子命令 create-or-move 用于创建名为 <name> 、权重为 <weight> 的条目并放置到 <args> ,若已存在则移动到指定位置 <args> 。

用法:

ceph osd crush create-or-move <osdname (id|osd.id)> <float[0.0-]>
<args> [<args>...]

子命令 dump 用于转储 crush 图。

用法:

ceph osd crush dump

子命令 get-tunable 用于获取 CRUSH 可调值 straw_calc_version 。

用法:

ceph osd crush get-tunable straw_calc_version

子命令 link 用于把已存在条目 <name> 链接到 <args> 位置下。

用法:

ceph osd crush link <name> <args> [<args>...]

子命令 move 可把已有条目 <name> 移动到 <args> 位置。

用法:

ceph osd crush move <name> <args> [<args>...]

子命令 remove 把 crush 图中(任意位置,或 <ancestor> 之下的)的 <name> 删掉。

用法:

ceph osd crush remove <name> {<ancestor>}

子命令 rename-bucket 可把桶 <srcname> 重命名为 <dstname> 。

用法:

ceph osd crush rename-bucket <srcname> <dstname>

子命令 reweight 把 crush 图中 <name> 的权重改为 <weight> 。

用法:

ceph osd crush reweight <name> <float[0.0-]>

子命令 reweight-all 重新计算树的权重,以确保权重之和没算错。

用法:

ceph osd crush reweight-all

子命令 reweight-subtree 用于把 CRUSH 图内 <name> 之下的所有叶子条目的权重改为 <weight> 。

用法:

ceph osd crush reweight-subtree <name> <weight>

子命令 rm 把 crush 图中(任意位置,或 <ancestor> 之下的)的 <name> 删掉。

用法:

ceph osd crush rm <name> {<ancestor>}

子命令 rule 用于创建 crush 规则,需额外加子命令。

子命令 create-erasure 可为纠删码存储池(用 <profile> 创建的))创建名为 <name> 的 crush 规则,默认为 default 。

用法:

ceph osd crush rule create-erasure <name> {<profile>}

子命令 create-simple 创建从 <root> 开始、名为 <name> 的 crush 规则,副本将跨 <type> 类型进行散布,选择模式为 <firstn|indep> (默认 firstn ,indep 更适合纠删码存储池)。

用法:

ceph osd crush rule create-simple <name> <root> <type> {firstn|indep}

子命令 dump 转储名为 <name> 的 crush 规则,默认全部转储。

用法:

ceph osd crush rule dump {<name>}

子命令 list 罗列 crush 规则。

用法:

ceph osd crush rule list

子命令 ls 罗列 crush 规则。

用法:

ceph osd crush rule ls

子命令 rm 删除 crush 规则 <name> 。

用法:

ceph osd crush rule rm <name>

子命令 set 单独使用,把输入文件设置为 crush 图。

用法:

ceph osd crush set

子命令 set 为 osdname 或 osd.id 更新 crush 图的位置和权重信息,把名为 <name> 的 OSD 权重设置为 <weight> 、位置设置为 <args> 。

用法:

ceph osd crush set <osdname (id|osd.id)> <float[0.0-]> <args> [<args>...]

子命令 set-tunable 把可调值 <tunable> 设置为 <value> 。唯一能设置的可调值是 straw_calc_version 。

用法:

ceph osd crush set-tunable straw_calc_version <value>

子命令 show-tunables 显示当前的 crush 可调值。

用法:

ceph osd crush show-tunables

子命令 tree 用树状视图显示各 crush 桶、及各条目。

用法:

ceph osd crush tree

子命令 tunables 设置 <profile> 中的 crush 可调值。

用法:

ceph osd crush tunables legacy|argonaut|bobtail|firefly|hammer|optimal|default

子命令 unlink 从 crush 图中解链接出 <name> (任意位置,或 <ancestor> 之下的)。

用法:

ceph osd crush unlink <name> {<ancestor>}

子命令 df 用于显示 OSD 利用率。

用法:

ceph osd df {plain|tree}

子命令 deep-scrub 可启动指定 OSD 的深度洗刷。

用法:

ceph osd deep-scrub <who>

子命令 down 把 osd(s) <id> [<id>...] 状态设置为 down 。

用法:

ceph osd down <ids> [<ids>...]

子命令 dump 打印 OSD 图汇总。

用法:

ceph osd dump {<int[0-]>}

子命令 erasure-code-profile 用于管理纠删码配置,需额外加子命令。

子命令 get 读取纠删码配置 <name> 。

用法:

ceph osd erasure-code-profile get <name>

子命令 ls 罗列所有纠删码配置。

用法:

ceph osd erasure-code-profile ls

子命令 rm 删除纠删码配置 <name> 。

用法:

ceph osd erasure-code-profile rm <name>

子命令 set 用给定的参数 [<key[=value]> ...] 创建纠删码配置 <name> 。末尾加 –force 可覆盖已有配置(慎用)。

用法:

ceph osd erasure-code-profile set <name> {<profile> [<profile>...]}

子命令 find 从 CRUSH 图中找到 osd <id> 并显示其位置。

用法:

ceph osd find <int[0-]>

子命令 getcrushmap 获取 CRUSH 图。

用法:

ceph osd getcrushmap {<int[0-]>}

子命令 getmap 获取 OSD 图。

用法:

ceph osd getmap {<int[0-]>}

子命令 getmaxosd 显示最大 OSD 惟一标识符。

用法:

ceph osd getmaxosd

子命令 in 把给出的 OSD <id> [<id>...] 标识为 in 状态。

用法:

ceph osd in <ids> [<ids>...]

子命令 lost 把 OSD 标识为永久丢失。如果没有多个副本,此命令会导致数据丢失,慎用。

用法:

ceph osd lost <int[0-]> {--yes-i-really-mean-it}

子命令 ls 显示所有 OSD 的惟一标识符。

用法:

ceph osd ls {<int[0-]>}

子命令 lspools 罗列存储池。

用法:

ceph osd lspools {<int>}

子命令 map 在 <pool> 存储池中找 <object> 对象所在的归置组号码。

用法:

ceph osd map <poolname> <objectname>

子命令 metadata 为 osd <id> 取出元数据。

用法:

ceph osd metadata {int[0-]} (default all)

子命令 out 把指定 OSD <id> [<id>...] 的状态设置为 out 。

用法:

ceph osd out <ids> [<ids>...]

子命令 pause 暂停 osd 。

用法:

ceph osd pause

子命令 perf 打印 OSD 的性能统计摘要。

用法:

ceph osd perf

子命令 pg-temp 设置 pg_temp 映射 pgid:[<id> [<id>...]] ,适用于开发者。

用法:

ceph osd pg-temp <pgid> {<id> [<id>...]}

子命令 pool 用于管理数据存储池,需额外加子命令。

子命令 create 创建存储池。

用法:

ceph osd pool create <poolname> <int[0-]> {<int[0-]>} {replicated|erasure}
{<erasure_code_profile>} {<ruleset>} {<int>}

子命令 delete 删除存储池。

用法:

ceph osd pool delete <poolname> {<poolname>} {--yes-i-really-really-mean-it}

子命令 get 获取存储池参数 <var> 。

用法:

ceph osd pool get <poolname> size|min_size|crash_replay_interval|pg_num|
pgp_num|crush_ruleset|auid|write_fadvise_dontneed

以下命令只适用于分层存储池:

ceph osd pool get <poolname> hit_set_type|hit_set_period|hit_set_count|hit_set_fpp|
target_max_objects|target_max_bytes|cache_target_dirty_ratio|cache_target_dirty_high_ratio|
cache_target_full_ratio|cache_min_flush_age|cache_min_evict_age|
min_read_recency_for_promote|hit_set_grade_decay_rate|hit_set_search_last_n

以下命令只适用于纠删码存储池:

ceph osd pool get <poolname> erasure_code_profile

子命令 get-quota 获取存储池的对象或字节数限额。

用法:

ceph osd pool get-quota <poolname>

子命令 ls 用于罗列存储池。

用法:

ceph osd pool ls {detail}

子命令 mksnap 拍下存储池 <pool> 的快照 <snap> 。

用法:

ceph osd pool mksnap <poolname> <snap>

子命令 rename 把存储池 <srcpool> 重命名为 <destpool> 。

用法:

ceph osd pool rename <poolname> <poolname>

子命令 rmsnap 删除存储池 <pool> 的快照 <snap> 。

用法:

ceph osd pool rmsnap <poolname> <snap>

子命令 set 把存储池参数 <var> 的值设置为 <val> 。

用法:

ceph osd pool set <poolname> size|min_size|crash_replay_interval|pg_num|
pgp_num|crush_ruleset|hashpspool|nodelete|nopgchange|nosizechange|
hit_set_type|hit_set_period|hit_set_count|hit_set_fpp|debug_fake_ec_pool|
target_max_bytes|target_max_objects|cache_target_dirty_ratio|
cache_target_dirty_high_ratio|
cache_target_full_ratio|cache_min_flush_age|cache_min_evict_age|auid|
min_read_recency_for_promote|write_fadvise_dontneed|hit_set_grade_decay_rate|
hit_set_search_last_n
<val> {--yes-i-really-mean-it}

子命令 set-quota 设置存储池的对象或字节数限额。

用法:

ceph osd pool set-quota <poolname> max_objects|max_bytes <val>

子命令 stats 获取所有或指定存储池的统计信息。

用法:

ceph osd pool stats {<name>}

子命令 primary-affinity 设置主 OSD 亲和性,有效值范围 0.0 <= <weight> <= 1.0

用法:

ceph osd primary-affinity <osdname (id|osd.id)> <float[0.0-1.0]>

子命令 primary-temp 设置 primary_temp 映射 pgid:<id>|-1 ,适用于开发者。

用法:

ceph osd primary-temp <pgid> <id>

子命令 repair 让指定 OSD 开始修复。

用法:

ceph osd repair <who>

子命令 reweight 把 OSD 权重改为 0.0 < <weight> < 1.0 之间的值。

用法:

osd reweight <int[0-]> <float[0.0-1.0]>

子命令 reweight-by-pg 按归置组分布情况调整 OSD 的权重(考虑的过载百分比,默认 120 )。

用法:

ceph osd reweight-by-pg {<int[100-]>} {<poolname> [<poolname...]}

子命令 reweight-by-utilization 按利用率调整 OSD 的权重,还需考虑负载比率,默认 120 。

用法:

ceph osd reweight-by-utilization {<int[100-]>}

子命令 rm 删除集群中的 OSD ,其编号为 <id> [<id>...] 。

用法:

ceph osd rm <ids> [<ids>...]

子命令 scrub 让指定 OSD 开始洗刷。

用法:

ceph osd scrub <who>

子命令 set 设置关键字 <key> 。

用法:

ceph osd set full|pause|noup|nodown|noout|noin|nobackfill|
norebalance|norecover|noscrub|nodeep-scrub|notieragent

子命令 setcrushmap 把输入文件设置为 CRUSH 图。

用法:

ceph osd setcrushmap

子命令 setmaxosd 设置最大 OSD 数值。

用法:

ceph osd setmaxosd <int[0-]>

子命令 stat 打印 OSD 图摘要。

用法:

ceph osd stat

子命令 thrash 把 OSD 元版本回滚到 <num_epochs> 。

用法:

ceph osd thrash <int[0-]>

子命令 tier 用于管理(存储池)分级,需额外加子命令。

子命令 add 把 <tierpool> (第二个)加到基础存储池 <pool> (第一个)之前。

用法:

ceph osd tier add <poolname> <poolname> {--force-nonempty}

子命令 add-cache 把尺寸为 <size> 的缓存存储池 <tierpool> (第二个)加到现有存储池 <pool> (第一个)之前。

用法:

ceph osd tier add-cache <poolname> <poolname> <int[0-]>

子命令 cache-mode 设置缓存存储池 <pool> 的缓存模式。

用法:

ceph osd tier cache-mode <poolname> none|writeback|forward|readonly|
readforward|readproxy

子命令 remove 删掉基础存储池 <pool> (第一个)的马甲存储池 <tierpool> (第二个)。

用法:

ceph osd tier remove <poolname> <poolname>

子命令 remove-overlay 删除基础存储池 <pool> 的马甲存储池。

用法:

ceph osd tier remove-overlay <poolname>

子命令 set-overlay 把 <overlaypool> 设置为基础存储池 <pool> 的马甲存储池。

用法:

ceph osd tier set-overlay <poolname> <poolname>

子命令 tree 打印 OSD 树。

用法:

ceph osd tree {<int[0-]>}

子命令 unpause 取消 osd 暂停。

用法:

ceph osd unpause

子命令 unset 取消设置的关键字 <key> 。

用法:

ceph osd unset full|pause|noup|nodown|noout|noin|nobackfill|
norebalance|norecover|noscrub|nodeep-scrub|notieragent

pg

用于管理 OSD 内的归置组,需额外加子命令。

子命令 debug 可显示归置组的调试信息。

用法:

ceph pg debug unfound_objects_exist|degraded_pgs_exist

子命令 deep-scrub 开始深度洗刷归置组 <pgid> 。

用法:

ceph pg deep-scrub <pgid>

子命令 dump 可显示归置组图的人类可读版本(显示为纯文本时只有 ‘all’ 合法)。

用法:

ceph pg dump {all|summary|sum|delta|pools|osds|pgs|pgs_brief} [{all|summary|sum|delta|pools|osds|pgs|pgs_brief...]}

子命令 dump_json 只以 json 格式显示归置组图的人类可读版本。

用法:

ceph pg dump_json {all|summary|sum|delta|pools|osds|pgs|pgs_brief} [{all|summary|sum|delta|pools|osds|pgs|pgs_brief...]}

子命令 dump_pools_json 只以 json 格式显示归置组存储池信息[译者:存疑]。

用法:

ceph pg dump_pools_json

子命令 dump_stuck 显示卡顿归置组的信息。

用法:

ceph pg dump_stuck {inactive|unclean|stale|undersized|degraded [inactive|unclean|stale|undersized|degraded...]}
{<int>}

子命令 force_create_pg 强制创建归置组 <pgid> 。

用法:

ceph pg force_create_pg <pgid>

子命令 getmap 获取二进制归置组图,保存到 -o/stdout 。

用法:

ceph pg getmap

子命令 ls 可根据指定存储池、 OSD 、状态罗列对应的归置组。

用法:

ceph pg ls {<int>} {active|clean|down|replay|splitting|
scrubbing|scrubq|degraded|inconsistent|peering|repair|
recovery|backfill_wait|incomplete|stale| remapped|
deep_scrub|backfill|backfill_toofull|recovery_wait|
undersized [active|clean|down|replay|splitting|
scrubbing|scrubq|degraded|inconsistent|peering|repair|
recovery|backfill_wait|incomplete|stale|remapped|
deep_scrub|backfill|backfill_toofull|recovery_wait|
undersized...]}

子命令 ls-by-osd 用于罗列指定 OSD 上的归置组。

用法:

ceph pg ls-by-osd <osdname (id|osd.id)> {<int>}
{active|clean|down|replay|splitting|
scrubbing|scrubq|degraded|inconsistent|peering|repair|
recovery|backfill_wait|incomplete|stale| remapped|
deep_scrub|backfill|backfill_toofull|recovery_wait|
undersized [active|clean|down|replay|splitting|
scrubbing|scrubq|degraded|inconsistent|peering|repair|
recovery|backfill_wait|incomplete|stale|remapped|
deep_scrub|backfill|backfill_toofull|recovery_wait|
undersized...]}

子命令 ls-by-pool 用于罗列存储池 [poolname | poolid] 内的归置组。

用法:

ceph pg ls-by-pool <poolstr> {<int>} {active|
clean|down|replay|splitting|
scrubbing|scrubq|degraded|inconsistent|peering|repair|
recovery|backfill_wait|incomplete|stale| remapped|
deep_scrub|backfill|backfill_toofull|recovery_wait|
undersized [active|clean|down|replay|splitting|
scrubbing|scrubq|degraded|inconsistent|peering|repair|
recovery|backfill_wait|incomplete|stale|remapped|
deep_scrub|backfill|backfill_toofull|recovery_wait|
undersized...]}

子命令 ls-by-primary 可罗列主 OSD 为 [osd] 的归置组。

用法:

ceph pg ls-by-primary <osdname (id|osd.id)> {<int>}
{active|clean|down|replay|splitting|
scrubbing|scrubq|degraded|inconsistent|peering|repair|
recovery|backfill_wait|incomplete|stale| remapped|
deep_scrub|backfill|backfill_toofull|recovery_wait|
undersized [active|clean|down|replay|splitting|
scrubbing|scrubq|degraded|inconsistent|peering|repair|
recovery|backfill_wait|incomplete|stale|remapped|
deep_scrub|backfill|backfill_toofull|recovery_wait|
undersized...]}

子命令 map 显示归置组到 OSD 的映射关系。

用法:

ceph pg map <pgid>

子命令 repair 开始修复归置组 <pgid> 。

用法:

ceph pg repair <pgid>

子命令 scrub 开始洗刷归置组 <pgid> 。

用法:

ceph pg scrub <pgid>

子命令 set_full_ratio 设置认为归置组占满的比率。

用法:

ceph pg set_full_ratio <float[0.0-1.0]>

子命令 set_nearfull_ratio 设置认为归置组将要占满的比率。

用法:

ceph pg set_nearfull_ratio <float[0.0-1.0]>

子命令 stat 显示归置组状态。

用法:

ceph pg stat

quorum

进入或退出法定人数。

用法:

ceph quorum enter|exit

quorum_status

报告监视器法定人数状态。

用法:

ceph quorum_status

report

报告集群的全部状态,标签字符串可选。 Reports full status of cluster, optional title tag strings.

用法:

ceph report {<tags> [<tags>...]}

scrub

洗刷监视器的存储。

用法:

ceph scrub

status

显示集群状态。

用法:

ceph status

sync force

强制监视器进行同步、并清除存储。

用法:

ceph sync force {--yes-i-really-mean-it} {--i-know-what-i-am-doing}

tell

发命令给指定守护进程。

用法:

ceph tell <name (type.id)> <args> [<args>...]

version

显示监视器守护进程的版本。

用法:

ceph version

选项

-i infile
指定一个输入文件,它将作为载荷与命令一起传递给监视器集群。仅用于某些特定的监视器命令。
-o outfile
把响应中监视器集群返回的载荷写入 outfile 文件。只有某些特定的监视器命令(如 psd getmap )会返回载荷。
-c ceph.conf, --conf=ceph.conf
用 ceph.conf 配置文件而非默认的 /etc/ceph/ceph.conf 来确定启动时所用的监视器地址。
--id CLIENT_ID, --user CLIENT_ID
用于认证的客户端 ID 。
--name CLIENT_NAME, -n CLIENT_NAME
用于认证的客户端名字。
--cluster CLUSTER
Ceph 集群名字。
--admin-socket ADMIN_SOCKET, --admin-socket DAEMON_NAME
提交管理套接字命令。
--admin-socket ADMIN_SOCKET_NOPE
你也许想要的是 –admin-daemon 。
-s, --status
显示集群状态。
-w, --watch
盯着集群的实时状态变更。
--watch-debug
盯着调试事件。
--watch-info
盯着一般信息事件。
--watch-sec
盯着安全事件。
--watch-warn
盯着告警事件。
--watch-error
盯着错误事件。
--version, -v
显示版本号。
--verbose
使输出更详细。
--concise
使输出简洁些。
-f {json,json-pretty,xml,xml-pretty,plain}, --format
输出格式。
--connect-timeout CLUSTER_TIMEOUT
设置连接集群的超时值。

使用范围

ceph 是 Ceph 的一部分,这是个伸缩力强、开源、分布式的存储系统


文章来源:

http://docs.ceph.org.cn/man/8/ceph/


..

发表在 storage | ceph – Ceph 管理工具已关闭评论

PHP call_user_func & call_user_func_array

对比范围

  • 直接调用
  • 变量函数调用
  • call_user_func 调用
  • call_user_func_array 调用

测试结果

call_user_func_array 所用时间为:1.1608240604401s

测试代码:

<?php error_reporting(E_ALL | E_STRICT); define('ITERATIONS', 2000000); class Bench { private $bench_name; private $start_time; private $end_time; public function start($name) { $this->bench_name = $name;
        $this->start_time = microtime(true);
    }

    public function end()
    {
        $this->end_time = microtime(true);
        echo "Call style: " . $this->bench_name . '; ' . ($this->end_time - $this->start_time) . " seconds". PHP_EOL;
    }
}

class Test
{
    public function test($a, $b, $c)
    {
        return;
    }
}


$bench = new Bench();
$test = new Test();
$arg = [1, 2, 3];
$func_name = 'test';

$bench->start('normal');
for ($i=0; $i < ITERATIONS; ++$i) { $test->test($arg[0], $arg[1], $arg[2]);
}
$bench->end();

$bench->start('var_function');
for ($i=0; $i < ITERATIONS; ++$i) { $test->$func_name($arg[0], $arg[1], $arg[2]);
}
$bench->end();

$bench->start('call_user_func');
for ($i=0; $i < ITERATIONS; ++$i) { call_user_func([$test, $func_name], $arg[0], $arg[1], $arg[2]); } $bench->end();

$bench->start('call_user_func_array');
for ($i=0; $i < ITERATIONS; ++$i) { call_user_func_array([$test, $func_name], $arg); } $bench->end();


Iterations: 100 000
Averaged over: 10
PHP 5.6.30 (cli) (built: Jan 18 2017 19:47:28)

Overall Average
Invocation Time (s) Delta (s) %
directFunction 0.0089 -0.0211 -70.19
directStatic 0.0098 -0.0202 -67.39
directLambda 0.0109 -0.0191 -63.52
directInstance 0.0116 -0.0184 -61.31
directClosure 0.0150 -0.0150 -50.15
Invoke 0.0282 -0.0018 -6.13
call_user_func 0.0300
ClosureFactory 0.0316 +0.0016 +5.20
assignedClosureFactory 0.0328 +0.0028 +9.28
call_user_func_array 0.0399 +0.0099 +33.02
InvokeCallUserFunc 0.0418 +0.0118 +39.17
directImplementation 0.0475 +0.0175 +58.28


Iterations: 100 000
Averaged over: 10
PHP 7.1.2 (cli) (built: Feb 14 2017 21:24:45)

Overall Average
Invocation Time (s) Delta (s) %
directFunction 0.0043 -0.0096 -68.92
directStatic 0.0050 -0.0089 -64.04
directInstance 0.0058 -0.0081 -58.22
directLambda 0.0063 -0.0075 -54.44
directClosure 0.0081 -0.0058 -41.57
call_user_func 0.0139
call_user_func_array 0.0147 +0.0008 +5.84
Invoke 0.0187 +0.0048 +34.61
ClosureFactory 0.0207 +0.0069 +49.43
assignedClosureFactory 0.0219 +0.0080 +57.75
directImplementation 0.0232 +0.0094 +67.53
InvokeCallUserFunc 0.0264 +0.0126 +90.67

.

资料来源:

https://segmentfault.com/q/1010000012081290


发表在 php | PHP call_user_func & call_user_func_array已关闭评论

OpenVPN 合并证书到配置文件中 (.ovpn)

编辑client.ovpn客户端配置文件:

vim client.ovpn

删除或者注释以下几行内容:
ca ca.crt  改为:#ca ca.crt
cert client.crt  改为:#cert client.crt
key client.key  改为:#key client.key
tls-auth ta.key 1  改为:#tls-auth ta.key 1

在最后面添加以下内容:
<ca>
ca.crt 文件内容
</ca>
<cert>
client.crt 文件内容
</cert>
<key>
client.key 文件内容
</key>
key-direction 1
<tls-auth>
ta.key 文件内容
</tls-auth>

复制各文件里的内容到相应的位置即可!保存退出!!


..


发表在 technologys | 标签为 , | OpenVPN 合并证书到配置文件中 (.ovpn)已关闭评论

SpringMVC 注解与绑定

系统提供的常用注解清单:

1、@RequestParam绑定单个请求参数值;

2、@PathVariable绑定URI模板变量值;

3、@CookieValue绑定Cookie数据值;

4、@RequestHeader绑定请求头数据;

5、@ModelAttribute绑定参数到命令对象;

6、@SessionAttributes绑定命令对象到session;

7、@RequestBody绑定请求的内容区数据并能进行自动类型转换等。

8、@RequestPart绑定“multipart/data”数据,除了能绑定@RequestParam能做到的请求参数外,还能绑定上传的文件等。

除上述提到的注解,我们还可以通过如HttpServletRequest等API得到请求数据。

图示:


@RequestMapping

RequestMapping是一个用来处理请求地址映射的注解,可用于类或方法上。用于类上,表示类中的所有响应请求的方法都是以该地址作为父路径。

RequestMapping注解有六个属性,下面我们把她分成三类进行说明(下面有相应示例)。

1、 value, method;

value:     指定请求的实际地址,指定的地址可以是URI Template 模式(后面将会说明);

method:  指定请求的method类型, GET、POST、PUT、DELETE等;

2、consumes,produces

consumes: 指定处理请求的提交内容类型(Content-Type),例如application/json, text/html;

produces:    指定返回的内容类型,仅当request请求头中的(Accept)类型中包含该指定类型才返回;

3、params,headers

params: 指定request中必须包含某些参数值是,才让该方法处理。

headers: 指定request中必须包含某些指定的header值,才能让该方法处理请求。


@Resource和@Autowired

@Resource和@Autowired都是做bean的注入时使用,其实@Resource并不是Spring的注解,它的包是javax.annotation.Resource,需要导入,但是Spring支持该注解的注入。


@ModelAttribute和 @SessionAttributes

代表的是:该Controller的所有方法在调用前,先执行此@ModelAttribute方法,可用于注解和方法参数中,可以把这个@ModelAttribute特性,应用在BaseController当中,所有的Controller继承BaseController,即可实现在调用Controller时,先执行@ModelAttribute方法。

@PathVariable

用于将请求URL中的模板变量映射到功能处理方法的参数上,即取出uri模板中的变量作为参数

@RequestParam

@requestParam主要用于在SpringMVC后台控制层获取参数,类似一种是request.getParameter("name"),它有三个常用参数:defaultValue = "0", required = false, value = "isApp";defaultValue 表示设置默认值,required 铜过boolean设置是否是必须要传入的参数,value 值表示接受的传入的参数类型。

@ResponseBody

作用: 该注解用于将Controller的方法返回的对象,通过适当的HttpMessageConverter转换为指定格式后,写入到Response对象的body数据区。

使用时机:返回的数据不是html标签的页面,而是其他某种格式的数据时(如json、xml等)使用;

@Component

相当于通用的注解,当不知道一些类归到哪个层时使用,但是不建议。

@Repository

用于注解dao层,在daoImpl类上面注解。


使用 ServletRequest/HttpServletRequest 和 ServletResponse/HttpServletResponse:

public String requestOrResponse (
ServletRequest servletRequest, HttpServletRequest httpServletRequest,
ServletResponse servletResponse, HttpServletResponse httpServletResponse
)


使用 InputStream/OutputStream:

public void inputOrOutBody(InputStream requestBodyIn, OutputStream responseBodyOut)
throws IOException {
responseBodyOut.write("success".getBytes());
}

requestBodyIn:获取请求的内容区字节流,等价于request.getInputStream()
responseBodyOut:获取相应的内容区字节流,等价于response.getOutputStream()


使用 Reader/Writer:

public void readerOrWriteBody(Reader reader, Writer writer)
throws IOException {
writer.write("hello");
}


使用 @RequestParam/@SessionAttributes/@CookieValue:

public void readerOrWriteBody(@RequestParam String uid, @SessionAttributes String uid){}


参考:

https://www.cnblogs.com/leskang/p/5445698.html

..


发表在 java | SpringMVC 注解与绑定已关闭评论

iptables SNAT DNAT

一、SNAT源地址转换

1、原理:在路由器后(PSOTROUTING)将内网的ip地址修改为外网网卡的ip地址。

2、应用场景:共享内部主机上网。

3、设置SNAT:网关主机进行设置。

(1)设置ip地址等基本信息。

(2)开启路由功能:

sed -i '/ip-forward/s/0/1/g'

sysctl -p

(3)编写规则:

iptables -t nat -I POSTROUTING -o 外网网卡 -s 内网网段 -j SNAT --to-source 外网ip地址  #适用于外网ip地址固定场景

iptables -t nat -I POSTROUTING -o 外网网卡 -s 内网网段 -j MASQUERADE  #适用于共享动态ip地址上网(如adsl拨号,dhcp获取外网ip)

(4)做好安全控制:使用FORWARD时机进行控制,严格设置INPUT规则。


二、DNAT目的地址转换:

1、原理:在路由前(PREROUTING)将来自外网访问网关公网ip及对应端口的目的ip及端口修改为内部服务器的ip及端口,实现发布内部服务器。

2、应用场景:发布内部主机服务。

3、设置DNAT:网关主机上设置。

(1)设置ip、开启路由、设置SNAT

(2)编写防火墙规则:

iptables -t nat -I PREROUTING -i 外网网卡 -d 外网ip tcp --dport 发布的端口 -j DNAT --to-destination 内网服务ip:端口

NAT network address translation

仅从报文请求来看,可以分为:

SNAT 源地址转换

DNAT 目标地址转换

PNAT 端口转换

NAT server:能根据需要实现SNAT DNAT PNAT

并非是用户空间的进程完成转换功能,靠的是内核中的地址转换规则

私有IP客户端访问互联网的方法

SNAT 、PROXY

SNAT:主要用于实现内网客户端访问外部主机时使用(局域网上网用)

定义在POSTROUTING链上

iptables -t nat -A postrouting -s 内部网络地址或主机地址 -j SNAT --to-source NAT服务器上的某外部地址

另外一个target

MASQUERADE地址伪装(适用于PPPOE拨号上网,假设eth1是出口)

iptables -t nat -A postrouting -s 内部网络或主机地址 -o eth1 -j MASQUERADE

DNAT:主要用于内部服务器被外网访问(发布服务)

定义在PREROUTING

iptables -t nat -A PREROUTING -d NAT服务器的某外部地址 -p 某协议 --dport 某端口 -j DNAT --to-destination 内网服务器地址[:port]

注意:NAT服务器需要打开数据转发

echo 1 > /proc/sys/net/ipv4/ip_forward

或者修改/etc/sysctl.conf net.ipv4.ip_forward = 1

实验操作

SNAT、DNAT


实验一:

SNAT

规划主机A 作为SNAT server

eth0 ip地址172.20.1.10(外部地址),eth1 192.168.1.1(内部地址)

主机B当做局域网内主机

eth0 ip地址192.168.1.2 默认路由要指向192.168.1.1

SNAT server:

[root@localhost ~]# iptables -t nat -A POSTROUTING -s 192.168.1.0/24 -j SNAT --to-source 172.20.1.10

#上面和我们实例操作相同

[root@localhost ~]# echo 1 > /proc/sys/net/ipv4/ip_forward

主机B ping外部的其它主机(172.20.1.20模拟互联网上的主机)

DNAT

[root@nat ~]# iptables -t filter -F

[root@nat ~]# iptables -t nat -F

[root@nat ~]# iptables -t nat -A PREROUTING -d 10.1.249.125 -p tcp --dport 80 -j DNAT --to-destination 192.168.2.4

Chain PREROUTING (policy ACCEPT)

target     prot opt source               destination

DNAT       tcp  --  0.0.0.0/0            10.1.249.125        tcp dpt:80 to:192.168.2.4

[root@nat ~]# netstat -tln | grep "\<80\>"  此时本机上并没有开放80端口

[root@wai ~]# curl http://10.1.249.125

hello  --> 此时我们访问为 nat 主机上的80端口  由上面可知,此服务器上并没有开放80,而是将请求送往 后端服务器


实体案例

我们有一台机器A可以上外网,配置eth0=192.168.1.1,eth1=222.13.56.192

有6台机器只有内网IP ,分别是192.168.1.102~192.168.1.108,想让这6台机器通过机器A上网

在机器A 防火墙上配置如下即可

/sbin/iptables -t nat -I POSTROUTING -s 192.168.1.101 -j SNAT --to-source 222.13.56.192

/sbin/iptables -t nat -I POSTROUTING -s 192.168.1.102 -j SNAT --to-source 222.13.56.192

/sbin/iptables -t nat -I POSTROUTING -s 192.168.1.103 -j SNAT --to-source 222.13.56.192

/sbin/iptables -t nat -I POSTROUTING -s 192.168.1.104 -j SNAT --to-source 222.13.56.192

/sbin/iptables -t nat -I POSTROUTING -s 192.168.1.105 -j SNAT --to-source 222.13.56.192

/sbin/iptables -t nat -I POSTROUTING -s 192.168.1.108 -j SNAT --to-source 222.13.56.192

在 6台机器上路由显示

route  -n

Kernel IP routing table

Destination     Gateway         Genmask         Flags Metric Ref    Use Iface

192.168.1.0     0.0.0.0         255.255.255.0   U     0      0        0 em1

169.254.0.0     0.0.0.0         255.255.0.0     U     1002   0        0 em1

0.0.0.0         192.168.1.1   0.0.0.0         UG    0      0        0 em1

发表在 article | iptables SNAT DNAT已关闭评论

API 设计指南

网络应用程序,分为前端和后端两个部分。当前的发展趋势,就是前端设备层出不穷(手机、平板、桌面电脑、其他专用设备......)。

因此,必须有一种统一的机制,方便不同的前端设备与后端进行通信。

这导致API构架的流行,甚至出现"API First"的设计思想。

RESTful API是目前比较成熟的一套互联网应用程序的API设计理论。

我以前写过一篇《理解RESTful架构》,探讨如何理解这个概念。

今天,我将介绍RESTful API的设计细节,探讨如何设计一套合理、好用的API。我的主要参考了两篇文章(12)。

一、协议

API与用户的通信协议,总是使用HTTPs协议

二、域名

应该尽量将API部署在专用域名之下。

https://api.example.com

如果确定API很简单,不会有进一步扩展,可以考虑放在主域名下。

https://example.org/api/

三、版本(Versioning)

应该将API的版本号放入URL。

https://api.example.com/v1/

另一种做法是,将版本号放在HTTP头信息中,但不如放入URL方便和直观。Github采用这种做法。

四、路径(Endpoint)

路径又称"终点"(endpoint),表示API的具体网址。

在RESTful架构中,每个网址代表一种资源(resource),所以网址中不能有动词,只能有名词,而且所用的名词往往与数据库的表格名对应。一般来说,数据库中的表都是同种记录的"集合"(collection),所以API中的名词也应该使用复数。

举例来说,有一个API提供动物园(zoo)的信息,还包括各种动物和雇员的信息,则它的路径应该设计成下面这样。

  • https://api.example.com/v1/zoos
  • https://api.example.com/v1/animals
  • https://api.example.com/v1/employees

五、HTTP动词

对于资源的具体操作类型,由HTTP动词表示。

常用的HTTP动词有下面五个(括号里是对应的SQL命令)。

  • GET(SELECT):从服务器取出资源(一项或多项)。
  • POST(CREATE):在服务器新建一个资源。
  • PUT(UPDATE):在服务器更新资源(客户端提供改变后的完整资源)。
  • PATCH(UPDATE):在服务器更新资源(客户端提供改变的属性)。
  • DELETE(DELETE):从服务器删除资源。

还有两个不常用的HTTP动词。

  • HEAD:获取资源的元数据。
  • OPTIONS:获取信息,关于资源的哪些属性是客户端可以改变的。

下面是一些例子。

  • GET /zoos:列出所有动物园
  • POST /zoos:新建一个动物园
  • GET /zoos/ID:获取某个指定动物园的信息
  • PUT /zoos/ID:更新某个指定动物园的信息(提供该动物园的全部信息)
  • PATCH /zoos/ID:更新某个指定动物园的信息(提供该动物园的部分信息)
  • DELETE /zoos/ID:删除某个动物园
  • GET /zoos/ID/animals:列出某个指定动物园的所有动物
  • DELETE /zoos/ID/animals/ID:删除某个指定动物园的指定动物

六、过滤信息(Filtering)

如果记录数量很多,服务器不可能都将它们返回给用户。API应该提供参数,过滤返回结果。

下面是一些常见的参数。

  • ?limit=10:指定返回记录的数量
  • ?offset=10:指定返回记录的开始位置。
  • ?page=2&per_page=100:指定第几页,以及每页的记录数。
  • ?sortby=name&order=asc:指定返回结果按照哪个属性排序,以及排序顺序。
  • ?animal_type_id=1:指定筛选条件

参数的设计允许存在冗余,即允许API路径和URL参数偶尔有重复。比如,GET /zoo/ID/animals 与 GET /animals?zoo_id=ID 的含义是相同的。

七、状态码(Status Codes)

服务器向用户返回的状态码和提示信息,常见的有以下一些(方括号中是该状态码对应的HTTP动词)。

  • 200 OK - [GET]:服务器成功返回用户请求的数据,该操作是幂等的(Idempotent)。
  • 201 CREATED - [POST/PUT/PATCH]:用户新建或修改数据成功。
  • 202 Accepted - [*]:表示一个请求已经进入后台排队(异步任务)
  • 204 NO CONTENT - [DELETE]:用户删除数据成功。
  • 400 INVALID REQUEST - [POST/PUT/PATCH]:用户发出的请求有错误,服务器没有进行新建或修改数据的操作,该操作是幂等的。
  • 401 Unauthorized - [*]:表示用户没有权限(令牌、用户名、密码错误)。
  • 403 Forbidden - [*] 表示用户得到授权(与401错误相对),但是访问是被禁止的。
  • 404 NOT FOUND - [*]:用户发出的请求针对的是不存在的记录,服务器没有进行操作,该操作是幂等的。
  • 406 Not Acceptable - [GET]:用户请求的格式不可得(比如用户请求JSON格式,但是只有XML格式)。
  • 410 Gone -[GET]:用户请求的资源被永久删除,且不会再得到的。
  • 422 Unprocesable entity - [POST/PUT/PATCH] 当创建一个对象时,发生一个验证错误。
  • 500 INTERNAL SERVER ERROR - [*]:服务器发生错误,用户将无法判断发出的请求是否成功。

状态码的完全列表参见这里

八、错误处理(Error handling)

如果状态码是4xx,就应该向用户返回出错信息。一般来说,返回的信息中将error作为键名,出错信息作为键值即可。

{
    error:"Invalid API key"
}

九、返回结果

针对不同操作,服务器向用户返回的结果应该符合以下规范。

  • GET /collection:返回资源对象的列表(数组)
  • GET /collection/resource:返回单个资源对象
  • POST /collection:返回新生成的资源对象
  • PUT /collection/resource:返回完整的资源对象
  • PATCH /collection/resource:返回完整的资源对象
  • DELETE /collection/resource:返回一个空文档

十、Hypermedia API

RESTful API最好做到Hypermedia,即返回结果中提供链接,连向其他API方法,使得用户不查文档,也知道下一步应该做什么。

比如,当用户向api.example.com的根目录发出请求,会得到这样一个文档。

{
 "link": {
  "rel":   "collection https://www.example.com/zoos",
  "href":  "https://api.example.com/zoos",
  "title": "List of zoos",
  "type":"application/vnd.yourformat+json"
 }
}

上面代码表示,文档中有一个link属性,用户读取这个属性就知道下一步该调用什么API了。rel表示这个API与当前网址的关系(collection关系,并给出该collection的网址),href表示API的路径,title表示API的标题,type表示返回类型。

Hypermedia API的设计被称为HATEOAS。Github的API就是这种设计,访问api.github.com会得到一个所有可用API的网址列表。

{
  "current_user_url": "https://api.github.com/user",
  "authorizations_url": "https://api.github.com/authorizations",
  // ...
}

从上面可以看到,如果想获取当前用户的信息,应该去访问api.github.com/user,然后就得到了下面结果。

{
  "message": "Requires authentication",
  "documentation_url": "https://developer.github.com/v3"
}

上面代码表示,服务器给出了提示信息,以及文档的网址。

十一、其他

(1)API的身份认证应该使用OAuth 2.0框架。

(2)服务器返回的数据格式,应该尽量使用JSON,避免使用XML。

(完)


文章摘自: http://www.ruanyifeng.com/blog/2014/05/restful_api.html

参考:

理解RESTful架构 http://www.ruanyifeng.com/blog/2011/09/restful.html

好RESTful API的设计原则  https://www.cnblogs.com/moonz-wu/p/4211626.html

http://www.informit.com/articles/article.aspx?p=1566460

..


发表在 web server | API 设计指南已关闭评论

Servlet、Filter和Listener

Java Servlet是与平台无关的服务器端组件,运行于Servlet容器中(如Tomcat),Servlet容器负责Servlet和客户端的通信以及调用Servlet的方法,Servlet和客户端的通信采用“请求/响应”的模式。Servlet可完成以下功能:

1、创建并返回基于客户请求的动态HTML页面。

2、创建可以嵌入到现有HTML页面中的HTML片段。

3、与其它服务器资源(如数据库或基于Java的应用程序)进行通信。

4、接收多个客户端的输入,并将结果广播到多个客户端上,例如,Servlet可以实现支持多个参与者的游戏服务器。

5、根据客户请求采用特定的MIME(Multipurpose Internet Mail Extensions)类型对数据过滤,例如进行图像格式转换。


Servlet的框架由两个包组成:javax.servlet和javax.servlet.http。在javax.servlet包中定义了所有Servlet类必须实现或扩展的通用接口和类。在javax.servlet.http包中定义了采用HTTP协议通信的HttpServlet类。

Servlet框架的核心是javax.servlet.Servlet接口,所有的Servlet类都必须实现这个接口。Servlet接口定义的方法如下:

1、init方法,负责初始化Servlet对象。

2、service方法,负责响应客户端的请求。

3、destroy方法,当Servlet对象退出生命周期时,负责释放占用的资源。

4、getServletConfig方法,获得ServletConfig接口,可以得到Servlet的相关参数。

5、getServletInfo方法,获得Servlet的相关信息。

在javax.servlet包中,GenericServlet类实现了Servlet接口,在javax.servlet.http包中,HttpServlet类扩展了GenericServlet

类。当用户开发自己的Servlet时,必须扩展以上两个类中的一个,如果扩展自GenericServlet类,则必须自己实现service方法,

如果扩展自HttpServlet类,则不需要自己实现service方法,因为HttpServlet类已经实现了该方法。

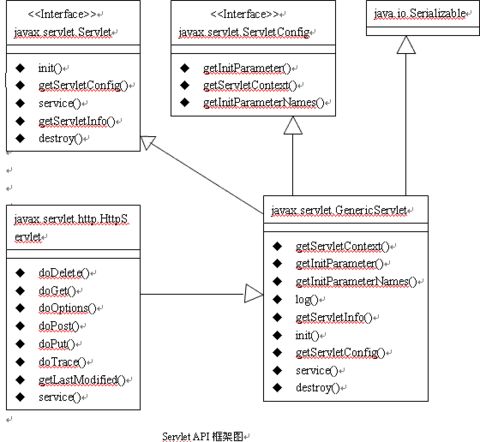
GenericServlet类的service方法是一个抽象方法,只有两个参数:ServletRequest和ServletResponse。HttpServlet类的service方法也只有两个参数:HttpServletRequest和HttpServletResponse。HttpSevletRequest接口和HttpResponse接口分别扩展自ServletRequest和ServletResponse接口,都提供了与特定协议HTTP相关的数据。

ServletRequest接口的方法如下:

getAttribute            获得属性值

getContentType      获得客户请求数据的MIME类型。

getInputStream      获得可以读取客户请求数据的输入流。

getParameter          获得参数值

getRemoteAddr      获得客户端的IP

getRemoteHost       获得客户端的主机名

getRemotePort              获得客户端的端口

setAttribute            设置属性值。


ServletResponse接口的方法如下:

getOutputStream    获得可以向客户羰发送二进制数据的输出流对象ServletOutputStream

getWriter               获得可以向客户端发送字符数据的PrintWriter对象

getCharacterEncoding    获得Servlet发送的响应数据的字符编码

getContentType      返回Servlet发送的响应数据的MIME类型

setCharacterEncoding    设置Servlet发送的响应数据的字符编码。

setContentType      设置Servlet发送的响应数据的MIME类型。


Servlet的init方法有如下两种形式:

public void init(ServletConfig config) throws ServletException

public void init() throws ServletException

在Servlet的初始化分阶段,Servlet容器会为Servlet创建一个ServletConfig对象,用来存放Servlet的初始化配置信息,如Servlet的初始参数。如果Servlet覆盖了带参数的init方法,则必须在函数体内先调用super.init(config); 以确保config参数引用了ServletConfig对象。如果Servlet覆盖了没有带参数的init方法,则不需要调用super.init(); 方法,可以通过调用getServletConfig()方法来获得ServletConfig对象。


Servlet容器会为Web应用创建一个唯一的全局的ServletContext对象,可以把它看成是一个Web应用的服务器端组件的共享内存。它有如下方法:

etAttribute(String name,Object obj) 将一个对象与一个属性名绑定,并存放到

ServletContext中

getAttribute(String name) 获得指定名称的属性值。

removeAttribute(String name) 删除指定名称的属性。

getAttributeNames() 返回所有属性名的一个Enumeration对象。

getInitParameter(String name) 获得指定名称的参数值,该参数是Web应用的初始化参数.

getInitParameterNames() 返回Web应用的所有初始化参数的名称的Enumeration对象.

getMimeType(String file) 返回文件的MIME类型.

getRealPath(String path) 返回网络路径path对应的文件系统路径.

getServerInfo() 返回Servlet容器的名称和版本


注意: 一般在HptpServlet的子类中,将doPost方法的实现合并到doGet方法中,也就是在doPost方法中简单地调用doGet方法.因为一般情况下对于Get和Post请求,它们都是一样的处理.

编译了Servlet后,将它打包成jar放到WEB-INF/lib目录下,或将Servlet的class文件放到WEB-INF/classes/目录下,再在WEB-INF/web.xml配置文件中配置这些servlet,就可以在Web应用中访问servlet了,配置如下:

<servlet>

<servlet-name>my_servlet</servlet-name>

<servlet-class>com.mycompany.ServletClass1</servlet-class>

< init-param> <!--定义servlet的初始化参数, 可以有多个init-param参数-->

< param-name>iParam< /param-name>

< param-value>2< /param-value>

< /init-param>


< load-on-startup>2< /load-on-startup> <!--定义servlet的加载顺序-->

</servlet>


<servlet-mapping>

<servlet-name>my_servlet</servlet-name>

<url-pattern>*.hello</url-pattern>

</servlet-mapping>


Session相关

在Servlet API中定义了javax.servlet.http.HttpSession接口,Servlet容器必须实现这一个接口。当一个Session开始时,Servlet容器将创建一个HttpSession对象,在HttpSession对象中可以存放客户状态的信息。Servlet容器为HttpSession对象分配一个唯一的标识符,叫做Session ID,Servlet容器把Session ID作为Cookie保存在客户的浏览器中,每次客户发出HTTP请求时,Servlet容器可以从HttpRequest对象中读取Session ID,然后根据Session ID找到相应的HttpSession对象,从而获得客户的状态信息。HttpSession接口有如下方法:

getId()    返回Session ID

invalidate()      使当前的Session失效,Servlet容器会释放HttpSession对象占用的资源。

setAttribute(String name,Object obj)     将一对name/value属性保存到HttpSession对象中。

getAttribute(String name)      返回名字为name的属性值。

getAttributeNames()      返回HttpSession对象中所有的属性名。

isNew()   判断这个Session是不是新创建的。

setMaxInactiveInterval()              设定Session可以处于不活动状态的最大时间(以秒为单位),                                              超过这个时间,Session就会自动失效,如果设置为负数,则不                                             限制Session的不活动状态时间。

getMaxInactiveInterval()       返回Session可以处于不活动状态的最大时间。

当客户第一次访问Web应用中支持Session的某个页面时,就会开始一个新的Session,接下来,当客户浏览这个Web应用的其它页面时,始终处于同一个Session中。以下情况之一,Session就会失效:

1、客户端关闭浏览器。

2、Session过期,即客户在指定的最大时间内没有与Web服务器交互。

3、服务器端调用了HttpSession的invalidate()方法。

如果客户端浏览器不支持或禁用Cookie,则Servlet容器无法从客户端浏览器中取得作为Cookie的Session ID,也就无法跟踪客户的状态,因此客户端的每次请求支持Session的JSP页面时,Servlet容器都会创建一个新的HttpSession对象。对于这种情况,需要通过HttpServletResponse的encodeURL()方法重写客户请求的URL,它把Session ID添加到URL信息中,也就是说,对于支持Session的JSP页面中的所有连接URL,都要调用encodeURL()方法来重写这些URL,例如:

对于<a href=”login.jsp”/>应该改为<a href=”<%=response.encodeURL(“login.jsp”)%>”/>

这样,即使客户禁用Cookie,也能使用Session来跟踪客户的状态信息了。


Session的持久化:

Session的持久化就是将HttpSession对象从内存中转移到文件系统或数据库中,这样做的好处是:减少系统资源的占用,如果Servlet容器突然关闭或重启,或Web应用重启,这些持久化了的HttpSession对象可以再重新加载进来,对于客户端,还是使用同一个Session。

Session的持久化是由Session Manager来管理的,Tomcat提供了两个实现类:

l         org.apache.catalina.session.StandarManager

l         org.apache.catalina.session.PersistentManager

1、StandarManager是默认的Session Manager。它的实现机制是:当Tomcat服务器关闭或重启,或Web应用被重新加载时,会将内存中所有的HttpSession对象保存到文件系统中,默认的文件路径是:%CATALINA_HOME%\work\Catalina\<applicaton-name>\SESSIONS.ser

重启Tomcat后,Tomcat服务器把SESSIONS.ser中的持久化HttpSession对象加载到内存中。

2、PersistentManager能够把HttpSession对象保存到Session Store中,它提供了比较StandarManager更灵活的管理功能,具有容错能力,控制内存中HttpSession对象的数目等。

Tomcat实现Session Store的接口为org.apache.catalina.session.Store,目前提供了两个实现这一接口的类:org.apache.catalina.session.FileStore和org.apache.catalina.session.JDBCStore。FileStore会将HttpSession对象保存到文件系统中;而JDBCStore则将HttpSession对象保存到数据库表中。

下面给出这两个类的配置:

配置FileStore:

在server.xml中,在Web应用的<Context>元素加入<Manager>元素,例如:

<Context path=”/helloapp” docBase=”helloapp” debug=”0” reloadable=”true”>

<Manager className=”org.apache.catalina.session.PersistentManager”>

debug=0;

saveOnRestart=”true”

maxActiveSessions=”-1”

minIdleSwap=”-1”

maxIdleSwap=”-1”

maxIdleBackup=”-1”

<Store className=”org.apache.catalina.session.FileStore” directory=”mydir”/>

</Manager>

</Context>


属性


作用


className


指定Session Manager的实现类名,或Session Store的实现类名


debug


设定Session Manager采用的跟踪级别,取值0到99,越小越跟踪信息越少,发布产品时,应该设置为0,以提高性能。


saveOnRestart


如果为true,则当Tomcat关闭时,所有的有效HttpSession对象都保存到Session Store中;当Tomcat重启时,加载这些HttpSession对象。


maxActiveSessions


设置处于活动状态的Session的最大数目,如果超过这一数目,Tomcat把一些超过的Sessin对象保存到Session Store中。-1表示不限制。


minIdleSwap


Session处于不活动状态的最小时间,单位为秒,超过这一时间,Tomcat有可能把这个Session对象移到Session Store中。


maxIdleSwap


Session处于不活动状态的最大时间,超过这一时间,Tomcat就一定会将这个Session对象移到Session Store中。


maxIdleBackup


Session处于不活动状态的最大时间,超过这一时间,Tomcat就就会将这个Session对象拷贝到Session Store中进行备份。


directory


指定Session Store在哪个文件系统目录下存放持久化的Session对象的信息,文件名是Session ID.session。


配置JDBCStore:

在server.xml中,在Web应用的<Context>元素加入<Manager>元素,例如:

<Context path=”/helloapp” docBase=”helloapp” debug=”0” reloadable=”true”>

<Manager className=”org.apache.catalina.session.PersistentManager”>

debug=0;

saveOnRestart=”true”

maxActiveSessions=”-1”

minIdleSwap=”-1”

maxIdleSwap=”-1”

maxIdleBackup=”-1”

<Store className=”org.apache.catalina.session.JDBCStore”

driverName=”com.mysql.jdbc.Driver”

connectionURL=”jdbc:mysql://localhost:3306/demo?user=root password=1234”

sessionTable=”tomcat_sessions”

sessionIdCol=”session_id”

sessionDataCol=”session_data”

sessionValidCol=”session_valid”

sessionMaxInactiveCol=”max_inactive”

sessionLastAccessedCol=”last_access”

sessionAppCol=”app_name”

checkInterval=”60”

debug=”0”

/>

</Manager>

</Context>

说明:上面的元素属性的含义与FileStore的相同,上面的配置假设在MySQL服务器上的demo数据库的tomcat_sessions表中存放持久化Session对象的信息,这个表的结构如下:

CREATE TABLE tomcat_sessions(

session_id VARCHAR(10) NOT NULL PRIMARY KEY,

session_data MEDIUMBLOB,

session_valid CHAR(1) NOT NULL,

max_inactive   INT NOT NULL,

last_access     BIGINT NOT NULL,

app_name       VARCHR(255),

KEY kapp_name(app_name)

);


Filter相关

Servlet过滤器是在Java Servlet规范2.3中定义的,它能够对Servlet容器的请求和响应对象进行检查和修改,它在Servlet被调用之前检查Request对象,修改Request Header和Request内容;在Servlet被调用之后检查Response对象,修改Response Header和Response内容。Servlet过滤器负责过滤的Web组件可以是Servlet、JSP或HTML文件,具有以下特点:

l         Servlet过滤器可能检查和修改ServletRequest和ServletResponse对象

l         可以指定Servlet过滤器和特定的URL关联,只有当客户请求访问此URL时,才会触发该过滤器工作

l         多个Servlet过滤器可以被串联起来,形成管道效应,协同修改请求和响应对象

l         所有支持Java Servlet规范2.3的Servlet容器,都支持Servlet过滤器


所有的Servlet过滤器类都必须实现javax.servlet.Filter接口。该接口定义了以下3个方法:

l         init(FilterConfig)     这是Servlet过滤器的初始化方法,Servlet容器创建Servlet过滤器实例后就会调用这个方法。在这个方法中可以通过FilterConfig来读取web.xml文件中Servlet过滤器的初始化参数。

l         doFilter(ServletRequest, ServletResponse, FilterChain)  这是完成实际的过滤操作的方法,当客户请求访问与过滤器关联的URL时,Servlet容器先调用该方法。FilterChain参数用来访问后续的过滤器的doFilter()方法。

l         destroy() Servlet容器在销毁过滤器实例前调用该方法,在这个方法中,可以释放过滤器占用的资源。

下面是一个过滤器的例子,它可以拒绝列在黑名单上的客户访问留言簿,而且能将服务器响应客户请求所花的时间写入日志:

//WEB-INF/classes/NoteFilter.class

import java.io.*;

import javax.servlet.*;

import javax.servlet.http.*;

public class NoteFilter implements Filter{

private FilterConfig config=null;

private String blackList=null;

public void init(FilterConfig config)throws ServletException{

this.config=config;

blackList=config.getInitParameter(“blacklist”);

}

public void destroy(){

config=null;

}

public void doFilter(ServletRequest request, ServletResponse response, FilterChain chain)

throws IOException, ServletException{

String userName=((HttpServletRequest)request).getParameter(“user_name”);

if(userName!=null)

userName=new String(userName.getBytes(“ISO-8859-1”),”GB2312”);

if(userName!=null && userName.indexOf(blackList)!=-1){

PrintWriter out=response.getWriter();

out.print(“<html><body>”);

out.print(“<h1>对不起,”+userName+”,你没有权限留言</h1>”);

out.print(“</body></html>”);

out.flush();

return;

}

long before=System.currentTimeMillis();

config.getServletContext().log(“NoteFilter:before call chain.doFilter()”);

chan.doFilter(request, response);

config.getServletContext().log(“NoteFilter:after call chain.doFilter()”);

logn after=System.currentTimeMillis();

String name=””;

if(request instanceof HttpServletRequest)

name=((HttpServletRequest)request).getRequestURL();

config.getServletContext().log(“NoteFilter:”+name+”:”+(after-before)+”ms”);

}

}


发布Servlet过滤器,必须在web.xml文件中加入<filter>和<filter-mapping>元素,如下:

<filter>

<filter-name>NoteFilter</filter>

<filter-class>NoteFilter</filter-class>

<init-param>

<param-name>blackList</param-name>

<param-value>捣蛋鬼</param-value>

</init-param>

<filter>

<filter-mapping>

<filter-name>NoteFilter</filter-name>

<url-pattern>/note</url-pattern>

</filter-mapping>


多个过滤器可以串连起来协同工作,Servlet容器将根据它们在web.xml中定义的先后顺序,依次调用它们的doFilter()方法。而这些过滤之间的关系不需要任何配置。


Listener的作用类似于load-on-startup的Servlet,在Web应用启动时被加载,在Web应用关闭时被销毁,Listener用来作为Web应用的后台服务,比load-on-startup的Servlet更早被加载到Servlet容器中。自定义的Listener类必须实现ServletContextListener接口,并实现该接口的两个方法:contextInitialized(ServletContextEvent)和contextDestroyed(ServletContextEvent),例如:

public class GetConnListener implements ServletContextListener{
public void contextInitialized(ServletContextEvent sce){
try{
ServletContext application=sce.getServletContext();
String driver=application.getInitParameter("driver");
String url=application.getInitParameter("url");
String user=application.getInitParameter("user");
String password=application.getInitParameter("password");
Class.forName(driver);
Connection conn=DriverManager.getConnection(url, user, password);
application.setAttribute("conn", conn);
}catch(Exception e){
System.out.println("Listener中获取数据库连接出现异常:"+e.getMessage());
}
}
public void contextDestroyed(ServletContextEvent sce){
ServletContext application=sce.getServletContext();
Connection conn=(Connection)application.getAtrribute("conn");
if(conn!=null){
try{
conn.close();
conn=null;
}catch(Exception e){}
}
}
}

Listener配置:

<listener>

<listener-class>lee.GetConnListener</listener-class>

</listener>


自定义JSP标签库

实现自定义标签的处理类

JSP容器编译JSP网页时,遇到自定义标签,就会调用这个标签的处理类。标签处理类必须扩展自javax.servlet.jsp.TagSupport类或javax.servlet.jsp.BodyTagSupport类。

1、TagSupport类的主要方法如下:

l         doStartTag      JSP容器遇到自定义标签的起始标志时调用该方法。

l         doEndTag       JSP容器遇到自定义标签的结束标志时调用该方法。

l         setValue(String k, Object v)   在标签处理类中设置key/value。

l         getValue(String k)          在标签处理类中获得key对应的value。

l         removeValue(String k)    在标签处理类中删除key/value。

l         setPageContext(PageContext pc)   设置PageContext对象,由JSP容器在调用doStartTag或doEndTag方法之前调用。

l         setParent(Tag t)     设置该标签的上层标签的处理类,由JSP容器在调用doStartTag或 doEndTag方法之前调用。

l         getParent()     返回该标签的上层标签的处理类。

2、TagSupport类有两个重要属性:

l         parent     该标签的上层标签的处理类。

l         pageContext    Web应用中的javax.servlet.jsp.PageContext对象,提供了保存和访问Web应用的共享数据方法:setAttribute(String name, Object value, int scope)和getAttribute(String name, int scope)。其中scope参数用来指定属性存在的范围,可选值有:PageContext.PAGE_SCOPE、PageContext.REQUEST_SCOPE、PageContext.SESSION_SCOPE和PageContext.APPLICATION_SCOPE。

注意:在TagSupport的构造函数中不能访问pageContext成员,因为此时JSP容器还没有调用setPageContext 方法对pageContext进行初始化。

3、处理标签的方法:

当JSP容器遇到自定义标签的起始标志时,就会调用该标签处理类的doStartTag()方法。doStartTag()方法返回一个整数值,用来决定程序的后续流程,有两个可选值:Tag.SKIP_BODY和Tag.EVAL_BODY_INCLUDE。Tag.SKIP_BODY表示标签之间的内容被忽略,例如:

<prefix:mytag>

Hello World!

</prefix:mytag>

如果这个标签的处理类的doStartTag()方法返回Tag.SKIP_BODY,则Hello World!字符串不会显示在网页上。Tag.EVAL_BODY_INCLUDE表示标签之间的内容会被处理。

当JSP容器遇到自定义标签的结束标志时,就会调用该标签处理类的doEndTag()方法。doEndTag()方法也返回一个整数值,表示程序的后续流程,也是有两个可选值:Tag.SKIP_PAGE和Tag.EVAL_PAGE。Tag.SKIP_PAGE表示立刻停止执行JSP页面,该标签的结束标志之后的所有页面内容全部会初忽略,任何已有的输出内容立刻返回到客户的浏览器上;Tag.EVAL_PAGE表示按正常的流程继续执行JSP页面的内容。

4、自定义标签的属性

例如:<prefix:mytag attribute1=”value1”>…</prefix:mytag>

那么在标签处理类中必须将这个属性作为类的成员变量,并且必须提供相应的getter和setter方法,例如:

private int attribute1;

public void setAttribute1(int value){ attribute1=value;}

public int getAttribute1(){return attribute1;}

以下是一个自定义标签<message>的处理类的例子:

// WEB-INF/classess/mypack/MessageTag.class

package mypack;

import javax.servlet.jsp.JspException;

import javax.servlet.jsp.JspTagException;

import javax.servlet.jsp.TagSupport;

import javax.servlet.http.HttpSession;

import java.util.Properties;

import java.io.*;

public class MessageTag extends TagSupport{

private String key=null;

public MessageTag(){}

public void setKey(String key){

this.key=key;

}

public String getKey(){

return key;

}

public int doEndTag() throws JspException{

try{

pageContext.getOut.print(key);

}catch(Exception e){

throw new JspTagException(e.getMessage());

}

return SkIP_BODY;

}

public void release(){

super.release();

}

}

创建标签库描述文件(Tag Library Descriptor, TLD)

TLD文件中的元素可分为3类:

l         <taglib>元素用来设置标签库的相关信息,它有如下属性:

tlibversion       指定标签库的版本

jspversion       指定JSP的版本

shortname      指定标签库默认的前缀名(prefix)

uri                 设置标签库的唯一访问标示符

info                标签库的说明信息

l         <tag>元素用来定义一个标签,它的属性如下:

name              标签的名字

tagclass          标签的处理类

bodycontent    标签主体(body)的内容

info                标签的说明信息

说明:bodycontent属性有3个可选值:empty、JSP和tagdependent。empty表示标签没有主体,JSP表示标签的主体中可以加入JSP代码,tagdependent表示标签的主体的内容由标签的处理类自己去处理。

l         <attribute>元素用来定义标签的属性,它有如下属性:

name              属性名

required          该属性是否必须,默认是false

rtexprvalue     该属性的值是否可能通过”<%=…%>”的方式获得,当设置为true时,该属性就可以采用如下的方式设置值:<% int num=1;%> <prefix:mytag attribute1=”<%=num%>”/>

以下是一个标签库描述文件的例子:

<!--WEB-INF/mytag.tld-->

<?xml version=”1.0” encoding=”ISO-8859-1”?>

<!DOCTYPE taglib PUBLIC “-//Sun Microsystems,Inc.//DTD JSP TagLibrary 1.1//EN”

“http://java.sun.com/j2ee/dtds/web-jsptaglibrary_1_1.dtd”>

<taglib>

<tlibversion>1.0</tlibversion>

<jspversion>1.1</jspversion>

<shortname>mytaglib</shortname>

<uri>/mytaglib</uri>


<tag>

<name>message</name>

<tagclass>mypack.MessageTag</tagclass>

<bodycontent>empty</bodycontent>

<info>produce message by key</info>


<attribute>

<name>key</name>

<required>true</required>

<rtexprvalue>true</rtexprvalue>

</attribute>

</tag>

</taglib>

在web.xml文件中加入标签库的定义

<taglib>

<!--标签库的唯一标示符,与标签库描述文件中的<uri>元素的内容相同,在JSP页面中,也要通过这个定义来使用标签库-->

<taglib-uri>/mytaglib</taglib-uri>

<!--指定标签库描述文件所在的位置-->

<taglib-location>/WEB-INF/mytaglib.tld</taglib-location>

</taglib>

在JSP页面中使用自定义的标签

例如:

<%@ taglib uri=”/mytaglib” prefix=”mm”%>

<html>

<body>

<mm:message key=”hello world!”/>

</body>

</html>


发表在 servlet | Servlet、Filter和Listener已关闭评论

Java常用Json库性能对比

Java对于处理JSON数据的序列化与反序列化目前常用的类库有Gson、FastJSON、Jackson、jettison以及json-lib。在这里我们将对这些类库在json序列化与反序列化方面的性能进行测试对比。

个例测试,仅供参考。


测试环境如下:

电脑:cpu为I3-4160,Win7 64位系统

编译环境:jdk1.8.0_65,Myeclipse2014

各类库版本:gson-2.6.2、fastjson-1.2.8、jackson -2.7.2、jettison-1.3.7(2014年后无更新)、json-lib-2.4(2012年后停止更新)


序列化的简单对象:

publicclass User {

    intid;

    String name;

    intage;

    String address;

    //get、set

}

测试结果

序列化测试结果(Object->String),耗时单位均为ms

测试次数

类库

100

1K

1W

10W

50W

100W

1000W

gson

8

25

63

230

680

1100

7790

fastjson

85

100

155

200

270

350

1850

jackson

35

48

80

150

255

360

2400

Json-lib

75

130

280

910

2725

4900

42500

jettison

70

85

110

210

400

590

4000

反序列化测试结果(String->Object),耗时单位均为ms

测试次数

类库

100

1K

1W

10W

50W

100W

1000W

gson

9

21

60

195

570

950

7760

fastjson

85

105

150

225

370

545

3800

jackson

36

50

110

210

380

570

4460

Json-lib

86

185

405

1180

2950

4850

38300

jettison

6

20

50

230

460

710

4650

测试总结:

1、从测试结果可以看出gson在小于10w的数据量处理上,耗时相对较少,但是在数据越来越大的情况下耗时会明显的增长。

2无论那种情况下,json-lib的耗时都是最多的,引用时还需要额外几个依赖包,且目前已经停止了更新,所以不推荐使用。

3、jackson在各阶段数据量都有很不错的性能,而fastjson在数据量较多的情况下也有很好性能。

4、jettison性能不错,但只提供json和其JSONObject对象相互转化的方法,转为自定义bean时需要再手动将JSONObject对象转为需要的bean。

文章来源: https://www.cnblogs.com/aurain/p/6734873.html
发表在 java | 标签为 | Java常用Json库性能对比已关闭评论

API Error Code

API 常用状态码描述

1)     HTTP状态码表

结果码参照http协议状态码制定,下表状态码表示接口必定用到,其它状态码请参考标准HTTP状态码表。

状态码 状态消息 含义
200 OK 请求成功可按业务解析结果
400 Bad request

(坏请求)

请求的数据未按要求提供
401 Unauthorized

(未授权)

客户端未授权或授权无效
403 Forbidden 服务器已经理解请求,但是拒绝执行它。

此时需要根据错误码表查询具体的错误原因

404 Not Found

(未找到)

找不到资源
500 Server Error

(服务器错误)

服务器发生故障
503 Service Unavailable

(服务器临时维护)

服务器临时维护


2)     错误编码

当接口 HTTP Status 状态码响应为 403 时,表示当前请求的业务不能按要求完成,响应不能完成此请求的错误描述。


错误码查阅 “系统级错误编码表” 与 “业务级错误编码表”。


错误返回值格式: JSON

{

"code" : "105",

"message" : " IP requests out of rate limit"

}


3)     系统级错误编码表

系统级错误编码由 1 – 999 ,保留为通用级业务响应,不允许业务模块对其进行使用。

错误码 含义
100 Too many pending tasks, system is busy

任务过多,系统繁忙

101 Job expired

任务超时

102 Illegal request

非法请求

103 Request api not found

接口不存在

104 HTTP method is not suported for this request

请求的HTTP METHOD不支持,是否选择了正确的POST/GET方式

105 IP requests out of rate limit

IP请求频次超过上限

106 User requests out of rate limit

用户对资源的请求频次超过上限

 
999  


4)     业务错误编码表

业务级错误编码为 1000 - 9999 范围,其中前两位表示模块,后两位表示具体错误。


错误代码1001 的解释说明

10 01
服务模块代码 具体错误代码

模块

10 账号
11 订单
12 送货单
13 出库单
14 物流单
15 入库单
16 结算单
17 发票


错误码 含义
1000 账号问题,具体错误原因查阅message
1001 账号被冻结
1100 订单问题,具体错误原因查阅message
1101 订单不存在
1102 订单当前状态不允许进行此操作
1200 送货单问题,具体错误原因查阅message
1300 出库单问题,具体错误原因查阅message
1400 物流单问题,具体错误原因查阅message
1500 入库单问题,具体错误原因查阅message
1600 结算单问题,具体错误原因查阅message
1700 发票问题,具体错误原因查阅message


发表在 technologys | 标签为 | API Error Code已关闭评论

MySQL 8 vs PostgreSQL 10

英文原文:https://blog.dumper.io/showdown-mysql-8-vs-postgresql-10/

中文原文:https://www.oschina.net/translate/showdown-mysql-8-vs-postgresql-10


.

MySQL 8 vs PostgreSQL 10已关闭评论

sgdisk

与fdisk创建MBR分区一样,sgdisk是一个创建GPT分区的工具,了解GPT分区可参考The difference between booting MBR and GPT with GRUB

查看所有GPT分区

# sgdisk -p /dev/sdb
Disk /dev/sdb: 16780288 sectors, 8.0 GiB
Logical sector size: 512 bytes
Disk identifier (GUID): 4D5B29E8-6E0B-45DA-8E52-A21910E74479
Partition table holds up to 128 entries
First usable sector is 34, last usable sector is 16780254
Partitions will be aligned on 2048-sector boundaries
Total free space is 4061 sectors (2.0 MiB)

Number  Start (sector)    End (sector)  Size       Code  Name
   1        10487808        16780254   3.0 GiB     FFFF  ceph data
   2            2048        10485760   5.0 GiB     FFFF  ceph journal

查看某个分区的详细的信息

#/usr/sbin/sgdisk --info=1 /dev/sdb
Partition GUID code: 89C57F98-2FE5-4DC0-89C1-F3AD0CEFF2BE (Unknown)
Partition unique GUID: C8D04950-18E6-4102-A867-B874CF94EA74
First sector: 10487808 (at 5.0 GiB)
Last sector: 16780254 (at 8.0 GiB)
Partition size: 6292447 sectors (3.0 GiB)
Attribute flags: 0000000000000000
Partition name: 'ceph data'

删除所有分区

# sgdisk --zap-all --clear --mbrtogpt /dev/sdb
GPT data structures destroyed! You may now partition the disk using fdisk or
other utilities.
The operation has completed successfully.

创建分区

sgdisk

-n 创建一个分区, -n后的参数分别是: 分区号:起始地址:终止地址
分区号如果为0,代表使用第一个可用的分区号;
起始地址和终止地址可以为0,0代表第一个可用地址和最后一个可用地址;
起始地址和终止地址可以为+/-xxx,代表偏移量,+代表在起始地址后的xxx地址,-代表在终止地址前的xxx地址;

创建一个新分区,并指定类型为 Linux system
sgdisk -n 0:0:+20G -t 0:45b0969e-9b03-4f30-b4c6-b4b80ceff106 -p /dev/sde

创建分区2,扇区从2048到10485760,type code为8300。

# sgdisk -n 2:2048:10485760 -t 2:8300 -p /dev/sdb
Disk /dev/sdb: 16780288 sectors, 8.0 GiB
Logical sector size: 512 bytes
Disk identifier (GUID): 5888A491-1245-4B40-8AEA-A6AEB2C302BB
Partition table holds up to 128 entries
First usable sector is 34, last usable sector is 16780254
Partitions will be aligned on 2048-sector boundaries
Total free space is 6296508 sectors (3.0 GiB)

Number  Start (sector)    End (sector)  Size       Code  Name
   2            2048        10485760   5.0 GiB     8300  
Warning: The kernel is still using the old partition table.
The new table will be used at the next reboot.
The operation has completed successfully.

# sgdisk -n 1:2048 -t 1:8300 -p /dev/sdb
Disk /dev/sdb: 7813837232 sectors, 3.6 TiB
Logical sector size: 512 bytes
Disk identifier (GUID): 361860D7-33F5-45E6-9A86-406FE19B1C36
Partition table holds up to 128 entries
First usable sector is 34, last usable sector is 7813837198
Partitions will be aligned on 2048-sector boundaries
Total free space is 4294969310 sectors (2.0 TiB)

Number  Start (sector)    End (sector)  Size       Code  Name
   1            2048      3518869902   1.6 TiB     8300  
The operation has completed successfully.


删除指定的分区

删除分区2。

# sgdisk --delete=2 /dev/sdb
Warning: The kernel is still using the old partition table.
The new table will be used at the next reboot.
The operation has completed successfully.

主要参考

======================================
Basic sgdisk Options
The sgdisk program provides built-in help in the form of the -? (--help) command, so if you need a reminder of an option name, typing sgdisk -? should give you a clue. Briefer help is available via the --usage option. Typically, you type sgdisk, the names of one or more options and their arguments, and the device filename for a disk device. The most important options are:

Option Argument(s) Purpose
-b or --backup filename Save a backup of the disk to the specified file.
-c or --change-name partnum:name Change the name of the specified partition.
-d or --delete partnum Delete the specified partition.
-E or --end-of-largest none Display the sector number at the end of the largest empty block of sectors on the disk.
-f or --first-in-largest none Display the sector number of the start of the largest empty block of sectors on the disk.
-F or --first-aligned-in-largest none Display the sector number of the first usable sector of the largest empty block of sectors on the disk, after partition alignment is considered.
-g or --mbrtogpt none Convert an MBR or BSD disklabel disk to GPT format.
-i or --info partnum Display detailed information on the specified partition.
-n or --new partnum:start:end Create a new partition, numbered partnum, starting at sector start and ending at sector end.
-o or --clear none Erase all GPT data structures and create a fresh GPT.
-p or --print none Display the current partition table.
-P or --pretend none Perform actions only on in-memory representation; don't save changes to disk.
-t or --typecode partnum:hexcode Change a partition's GUID type code to the one specified by hexcode. Note that hexcode is a gdisk/sgdisk internal two-byte hexadecimal code. You can obtain a list of codes with the -L option.
-v or --verify none Verify the integrity of the partition table and report the results.
-V or --version none Display the version number
-z or --zap none Zero out all GPT and MBR data structures. Use this option if you want to completely erase the GPT data structures so that the disk can be used as an MBR disk without concern that it might contain stray GPT data.

Additional options are documented in the sgdisk man page. The -E, -f, and -F options require a bit of elaboration. These options all work by finding the largest contiguous area of unallocated space on the disk and then returning the numbers of the final (-E), first (-f), and first usable (-F), free sectors in that area. The idea is to facilitate automated creation of partitions by locating where they might reasonably reside, even if there are short gaps between existing partitions. Such gaps can be created by MBR-to-GPT conversions, by sector alignment, or by some OSes' partitioning tools (Apple's Disk Utility creates 128 MiB gaps between partitions, for instance.) If you need to know where a partition will actually begin if you create it with the current partition alignment, use -F; but if you need to know where a partition could begin if alignment were set to 1 sector, use -f.

Some options take a single value as an argument, such as a filename or a partition number (partnum in the preceding table). Other options require compound arguments, with parts separated by colons (:).

Option order is important: Actions are performed in the order in which they are specified on the command line. This can have implications for the validity of certain commands. For instance, changing a partition's name and then deleting it is legal, but deleting a partition and then changing its name is not legal. sgdisk will refuse to save changes if you try the latter—but you shouldn't count on sgdisk catching such egregious errors.

Performing Basic Operations
This walkthrough demonstrates several methods of creating partitions and obtaining information on existing partitions. To begin, you may want to review the partitions that exist on a disk. As a starting point, this walkthrough uses a 7.5GiB USB flash drive with a single FAT partition as an example:

# sgdisk -p /dev/sdc

***************************************************************
Found invalid GPT and valid MBR; converting MBR to GPT format.
***************************************************************

Disk /dev/sdc: 15654912 sectors, 7.5 GiB
Logical sector size: 512 bytes
Disk identifier (GUID): 82DCA0EC-C906-0169-D834-38EAB3C3E012
Partition table holds up to 128 entries
First usable sector is 34, last usable sector is 15654878
Partitions will be aligned on 2-sector boundaries
Total free space is 3999 sectors (2.0 MiB)

Number  Start (sector)    End (sector)  Size       Code  Name
   1              62        15650907   7.5 GiB     0700  Linux/Windows data

You must know the name of the device file that's used to access the disk. For Linux, this file is likely to take the form /dev/sdx or /dev/hdx, where x is a letter. In Mac OS X, the device filename takes the form /dev/disky, where y is a number from 0 up.

sgdisk automatically converts the MBR to GPT form and displays the converted partition. Because the -p option is informational only, changes aren't saved back. The disk could have been converted to GPT by adding the -g option.

Suppose you want to replace the one existing partition with three new partitions: A 1 GiB partition for Linux, a 3 GiB shared FAT partition, and a 3.5 GiB FreeBSD partition. You might begin by deleting the existing partition and creating the Linux partition:

# sgdisk -d 1 -n 1:34:2097151 -g /dev/sdc

***************************************************************
Found invalid GPT and valid MBR; converting MBR to GPT format.
***************************************************************

The operation has completed successfully.

The -g option is necessary to save the changes, since the disk had an MBR configuration initially. At this point, it's GPT, but the program didn't print the partition table, since no -p option was included. The default type for a new partition varies from one platform to another. In Linux, it's 8300 (Linux filesystem), so the previous example didn't need to change the partition type. The next one, however, does; it uses the -t option to set the type code to 0700 (Microsoft basic data) for one partition and A503 (FreeBSD UFS) for the other:

# sgdisk -n 2:2097152:8388607 -n 3:8388608:15654878 -t 2:0700 -t 3:a503 -p /dev/sdc
Disk /dev/sdc: 15654912 sectors, 7.5 GiB
Logical sector size: 512 bytes
Disk identifier (GUID): 8C5B1844-CEAE-2370-00BD-D0E47E3C9900
Partition table holds up to 128 entries
First usable sector is 34, last usable sector is 15654878
Partitions will be aligned on 2-sector boundaries
Total free space is 0 sectors (0 bytes)

Number  Start (sector)    End (sector)  Size       Code  Name
   1              34         2097151   1024.0 MiB  8300
   2         2097152         8388607   3.0 GiB     0700
   3         8388608        15654878   3.5 GiB     A503
The operation has completed successfully.

Instead of specifying unwieldy sector numbers, you can specify partition start points and sizes using abbreviations, such as +4G as an end point to make a 4 GiB partition. Sector numbers may be rounded to multiples of 2048 (1 MiB), which is necessary to optimize performance on some types of disks.

If you want to add names to the partitions to help identify them, you can use the -c option:

# sgdisk -c 1:"Linux data" -c 2:"Shared FAT" -c 3:FreeBSD /dev/sdc
The operation has completed successfully.
# sudo sgdisk -p /dev/sdc
Disk /dev/sdc: 15654912 sectors, 7.5 GiB
Logical sector size: 512 bytes
Disk identifier (GUID): 8C5B1844-CEAE-2370-00BD-D0E47E3C9900
Partition table holds up to 128 entries
First usable sector is 34, last usable sector is 15654878
Partitions will be aligned on 2-sector boundaries
Total free space is 0 sectors (0 bytes)

Number  Start (sector)    End (sector)  Size       Code  Name
   1              34         2097151   1024.0 MiB  0700  Linux data
   2         2097152         8388607   3.0 GiB     0700  Shared FAT
   3         8388608        15654878   3.5 GiB     A503  FreeBSD

This example illustrates the fact that quotes are required around partition names if they contain spaces, but quotes need not be used for single-word partition names.

Creating Scripts for Partition Manipulation
You can use sgdisk to create a script to help automate tasks such as whole-disk cloning or the preparation of disks for OS installation, even if you don't know the target disk's size when writing the script. For instance, suppose you want to install Linux on several computers, each of which will have a BIOS Boot Partition (type code ef02) of 1 MiB, an EFI System partition (ef00) of 200 MiB, a Linux /boot partition (8300) of 200 MiB, and the remainder of the disk space devoted to a Linux LVM (8e00). The following script will accomplish this task:

#!/bin/bash
sgdisk -og $1
sgdisk -n 1:2048:4095 -c 1:"BIOS Boot Partition" -t 1:ef02 $1
sgdisk -n 2:4096:413695 -c 2:"EFI System Partition" -t 2:ef00 $1
sgdisk -n 3:413696:823295 -c 3:"Linux /boot" -t 3:8300 $1
ENDSECTOR=`sgdisk -E $1`
sgdisk -n 4:823296:$ENDSECTOR -c 4:"Linux LVM" -t 4:8e00 $1
sgdisk -p $1

This script is, of course, fairly simple. Despite this, it illustrates one important feature: By assigning the output of sgdisk -E (containing the number of the last sector in the largest free block) to a variable and then using that value later, the script adapts to disks of different sizes. (A better solution in this case is to use a sector value of 0, which refers to the default value, which is the end of the free space when creating a partition; but I wanted to illustrate this assignment method.) A more sophisticated script could use the output of sgdisk -F, as well, and perform arithmetic—say, splitting the available free space in some ratio between two or more new partitions. The output of the -p, -i, or other options could also be used, although more processing would be required to do so. This approach could be used in a disk-cloning script; partitions on the source disk could be re-created on the target disk, perhaps adapting one or more partitions' sizes as required.

Some caveats are in order. The most important is that error conditions and even varying disk contents can cause unpredictable behavior. For instance, the output of sgdisk varies depending on whether the disk contains an MBR, a GPT, or some other type of partition table. A command such as the assignment to the ENDSECTOR variable in the preceding script could fail if sgdisk encounters a type of disk you don't anticipate. Such a problem is only likely to affect the preceding script if the partition table is badly corrupt; however, if the assignment to ENDSECTOR had been the first line of the script, the script would fail on MBR disks. You should be sure to test your script thoroughly to prevent such problems.

Another issue is that each call to sgdisk takes a certain amount of time. This time increases when the program must write its changes to disk. The preceding script takes about six seconds to execute on a USB flash drive. This time could be reduced by merging the options into fewer calls to sgdisk—perhaps one for clearing the partition table and creating the first three partitions, a second for finding the end sector, and a final one for creating the LVM partition and displaying the final partition table. Making this change reduces the run time to about two seconds on my system. Of course, the USB flash drive I used for testing this effect is slow compared to a hard disk; but if you write a script with many calls to sgdisk and you find it's sluggish, consolidating those calls may make a difference.

Unlike GNU Parted and related tools, neither GPT fdisk program creates filesystems. Thus, if you want your script to take care of this task, you'll have to use a call to mkfs or a similar utility to do the job. Note, however, that the Linux kernel sometimes continues to use the old partition table after you've made changes. You must remove and re-install a removable disk or reboot the computer before the computer uses the new partition table. Thus, you should be cautious about moving from partition creation to filesystem creation in a script. Such inconsistencies are most likely to occur on disks with mounted partitions, but I've seen them even on disks with no mounted partitions from time to time.

.
=======Partition typecode===========
FDISK

Partition type (type L to list all types): L

1 EFI System C12A7328-F81F-11D2-BA4B-00A0C93EC93B
2 MBR partition scheme 024DEE41-33E7-11D3-9D69-0008C781F39F
3 Intel Fast Flash D3BFE2DE-3DAF-11DF-BA40-E3A556D89593
4 BIOS boot 21686148-6449-6E6F-744E-656564454649
5 Sony boot partition F4019732-066E-4E12-8273-346C5641494F
6 Lenovo boot partition BFBFAFE7-A34F-448A-9A5B-6213EB736C22
7 PowerPC PReP boot 9E1A2D38-C612-4316-AA26-8B49521E5A8B
8 ONIE boot 7412F7D5-A156-4B13-81DC-867174929325
9 ONIE config D4E6E2CD-4469-46F3-B5CB-1BFF57AFC149
10 Microsoft reserved E3C9E316-0B5C-4DB8-817D-F92DF00215AE
11 Microsoft basic data EBD0A0A2-B9E5-4433-87C0-68B6B72699C7
12 Microsoft LDM metadata 5808C8AA-7E8F-42E0-85D2-E1E90434CFB3
13 Microsoft LDM data AF9B60A0-1431-4F62-BC68-3311714A69AD
14 Windows recovery environment DE94BBA4-06D1-4D40-A16A-BFD50179D6AC
15 IBM General Parallel Fs 37AFFC90-EF7D-4E96-91C3-2D7AE055B174
16 Microsoft Storage Spaces E75CAF8F-F680-4CEE-AFA3-B001E56EFC2D
17 HP-UX data 75894C1E-3AEB-11D3-B7C1-7B03A0000000
18 HP-UX service E2A1E728-32E3-11D6-A682-7B03A0000000
19 Linux swap 0657FD6D-A4AB-43C4-84E5-0933C84B4F4F
20 Linux filesystem 0FC63DAF-8483-4772-8E79-3D69D8477DE4
21 Linux server data 3B8F8425-20E0-4F3B-907F-1A25A76F98E8
22 Linux root (x86) 44479540-F297-41B2-9AF7-D131D5F0458A
23 Linux root (ARM) 69DAD710-2CE4-4E3C-B16C-21A1D49ABED3
24 Linux root (x86-64) 4F68BCE3-E8CD-4DB1-96E7-FBCAF984B709
25 Linux root (ARM-64) B921B045-1DF0-41C3-AF44-4C6F280D3FAE
26 Linux root  (IA-64)  993D8D3D-F80E-4225-855A-9DAF8ED7EA97
27 Linux reserved 8DA63339-0007-60C0-C436-083AC8230908
28 Linux home 933AC7E1-2EB4-4F13-B844-0E14E2AEF915
29 Linux RAID A19D880F-05FC-4D3B-A006-743F0F84911E
30 Linux extended boot BC13C2FF-59E6-4262-A352-B275FD6F7172
31 Linux LVM E6D6D379-F507-44C2-A23C-238F2A3DF928
32 FreeBSD data 516E7CB4-6ECF-11D6-8FF8-00022D09712B
33 FreeBSD boot 83BD6B9D-7F41-11DC-BE0B-001560B84F0F
34 FreeBSD swap 516E7CB5-6ECF-11D6-8FF8-00022D09712B
35 FreeBSD UFS 516E7CB6-6ECF-11D6-8FF8-00022D09712B
36 FreeBSD ZFS 516E7CBA-6ECF-11D6-8FF8-00022D09712B
37 FreeBSD Vinum 516E7CB8-6ECF-11D6-8FF8-00022D09712B
38 Apple HFS/HFS+ 48465300-0000-11AA-AA11-00306543ECAC
39 Apple UFS 55465300-0000-11AA-AA11-00306543ECAC
40 Apple RAID 52414944-0000-11AA-AA11-00306543ECAC
41 Apple RAID offline 52414944-5F4F-11AA-AA11-00306543ECAC
42 Apple boot 426F6F74-0000-11AA-AA11-00306543ECAC
43 Apple label 4C616265-6C00-11AA-AA11-00306543ECAC
44 Apple TV recovery 5265636F-7665-11AA-AA11-00306543ECAC
45 Apple Core storage 53746F72-6167-11AA-AA11-00306543ECAC
46 Solaris boot 6A82CB45-1DD2-11B2-99A6-080020736631
47 Solaris root 6A85CF4D-1DD2-11B2-99A6-080020736631
48 Solaris /usr & Apple ZFS 6A898CC3-1DD2-11B2-99A6-080020736631
49 Solaris swap 6A87C46F-1DD2-11B2-99A6-080020736631
50 Solaris backup 6A8B642B-1DD2-11B2-99A6-080020736631
51 Solaris /var 6A8EF2E9-1DD2-11B2-99A6-080020736631
52 Solaris /home 6A90BA39-1DD2-11B2-99A6-080020736631
53 Solaris alternate sector 6A9283A5-1DD2-11B2-99A6-080020736631
54 Solaris reserved 1 6A945A3B-1DD2-11B2-99A6-080020736631
55 Solaris reserved 2 6A9630D1-1DD2-11B2-99A6-080020736631
56 Solaris reserved 3 6A980767-1DD2-11B2-99A6-080020736631
57 Solaris reserved 4 6A96237F-1DD2-11B2-99A6-080020736631
58 Solaris reserved 5 6A8D2AC7-1DD2-11B2-99A6-080020736631
59 NetBSD swap 49F48D32-B10E-11DC-B99B-0019D1879648
60 NetBSD FFS 49F48D5A-B10E-11DC-B99B-0019D1879648
61 NetBSD LFS 49F48D82-B10E-11DC-B99B-0019D1879648
62 NetBSD concatenated 2DB519C4-B10E-11DC-B99B-0019D1879648
63 NetBSD encrypted 2DB519EC-B10E-11DC-B99B-0019D1879648
64 NetBSD RAID 49F48DAA-B10E-11DC-B99B-0019D1879648
65 ChromeOS kernel FE3A2A5D-4F32-41A7-B725-ACCC3285A309
66 ChromeOS root fs 3CB8E202-3B7E-47DD-8A3C-7FF2A13CFCEC
67 ChromeOS reserved 2E0A753D-9E48-43B0-8337-B15192CB1B5E
68 MidnightBSD data 85D5E45A-237C-11E1-B4B3-E89A8F7FC3A7
69 MidnightBSD boot 85D5E45E-237C-11E1-B4B3-E89A8F7FC3A7
70 MidnightBSD swap 85D5E45B-237C-11E1-B4B3-E89A8F7FC3A7
71 MidnightBSD UFS 0394EF8B-237E-11E1-B4B3-E89A8F7FC3A7
72 MidnightBSD ZFS 85D5E45D-237C-11E1-B4B3-E89A8F7FC3A7
73 MidnightBSD Vinum 85D5E45C-237C-11E1-B4B3-E89A8F7FC3A7
74 Ceph Journal 45B0969E-9B03-4F30-B4C6-B4B80CEFF106
75 Ceph Encrypted Journal 45B0969E-9B03-4F30-B4C6-5EC00CEFF106
76 Ceph OSD 4FBD7E29-9D25-41B8-AFD0-062C0CEFF05D
77 Ceph crypt OSD 4FBD7E29-9D25-41B8-AFD0-5EC00CEFF05D
78 Ceph disk in creation 89C57F98-2FE5-4DC0-89C1-F3AD0CEFF2BE
79 Ceph crypt disk in creation 89C57F98-2FE5-4DC0-89C1-5EC00CEFF2BE
80 OpenBSD data 824CC7A0-36A8-11E3-890A-952519AD3F61
81 QNX6 file system CEF5A9AD-73BC-4601-89F3-CDEEEEE321A1
82 Plan 9 partition C91818F9-8025-47AF-89D2-F030D7000C2C
================================================

[root@node103 ~]# sgdisk -L

0700 Microsoft basic data

4200 Windows LDM data

7f00 ChromeOS kernel

8200 Linux swap

8e00 Linux LVM

a502 FreeBSD swap

a505 FreeBSD Vinum/RAID

a582 Midnight BSD swap

a585 Midnight BSD Vinum

a902 NetBSD FFS

a905 NetBSD encrypted

af00 Apple HFS/HFS+

af03 Apple label

be00 Solaris boot

bf02 Solaris swap

bf05 Solaris /home

bf08 Solaris Reserved 2

bf0b Solaris Reserved 5

ed00 Sony system partitio

ef02 BIOS boot partition

fc00 VMWare kcore crash p

  0c01 Microsoft reserved

4201 Windows LDM metadata

7f01 ChromeOS root

8300 Linux filesystem

a500 FreeBSD disklabel

a503 FreeBSD UFS

a580 Midnight BSD data

a583 Midnight BSD UFS

a800 Apple UFS

a903 NetBSD LFS

a906 NetBSD RAID

af01 Apple RAID

af04 AppleTV recovery

bf00 Solaris root

bf03 Solaris backup

bf06 Solaris alternate se

bf09 Solaris Reserved 3

c001 HP-UX data

ef00 EFI System

fb00 VMWare VMFS

fd00 Linux RAID

2700 Windows RE

7501 IBM GPFS

7f02 ChromeOS reserved

8301 Linux reserved

a501 FreeBSD boot

a504 FreeBSD ZFS

a581 Midnight BSD boot

a584 Midnight BSD ZFS

a901 NetBSD swap

a904 NetBSD concatenated

ab00 Apple boot

af02 Apple RAID offline

af05 Apple Core Storage

bf01 Solaris /usr & Mac Z

bf04 Solaris /var

bf07 Solaris Reserved 1

bf0a Solaris Reserved 4

c002 HP-UX service

ef01 MBR partition scheme

fb01 VMWare reserved


================================================

Partition type GUIDs

Operating system Partition type Globally unique identifier (GUID)[d]
(None) Unused entry 00000000-0000-0000-0000-000000000000
MBR partition scheme 024DEE41-33E7-11D3-9D69-0008C781F39F
EFI System partition C12A7328-F81F-11D2-BA4B-00A0C93EC93B
BIOS boot partition[e] 21686148-6449-6E6F-744E-656564454649
Intel Fast Flash (iFFS) partition (for Intel Rapid Start technology)[29][30] D3BFE2DE-3DAF-11DF-BA40-E3A556D89593
Sony boot partition[f] F4019732-066E-4E12-8273-346C5641494F
Lenovo boot partition[f] BFBFAFE7-A34F-448A-9A5B-6213EB736C22
Windows Microsoft Reserved Partition (MSR) E3C9E316-0B5C-4DB8-817D-F92DF00215AE
Basic data partition[g] EBD0A0A2-B9E5-4433-87C0-68B6B72699C7
Logical Disk Manager (LDM) metadata partition 5808C8AA-7E8F-42E0-85D2-E1E90434CFB3
Logical Disk Manager data partition AF9B60A0-1431-4F62-BC68-3311714A69AD
Windows Recovery Environment DE94BBA4-06D1-4D40-A16A-BFD50179D6AC
IBM General Parallel File System (GPFS) partition 37AFFC90-EF7D-4E96-91C3-2D7AE055B174
Storage Spaces partition E75CAF8F-F680-4CEE-AFA3-B001E56EFC2D
HP-UX Data partition 75894C1E-3AEB-11D3-B7C1-7B03A0000000
Service Partition E2A1E728-32E3-11D6-A682-7B03A0000000
Linux Linux filesystem data[g] 0FC63DAF-8483-4772-8E79-3D69D8477DE4
RAID partition A19D880F-05FC-4D3B-A006-743F0F84911E
Root partition (x86)[33] 44479540-F297-41B2-9AF7-D131D5F0458A
Root partition (x86-64)[33] 4F68BCE3-E8CD-4DB1-96E7-FBCAF984B709
Root partition (32-bit ARM)[33] 69DAD710-2CE4-4E3C-B16C-21A1D49ABED3
Root partition (64-bit ARM/AArch64)[33] B921B045-1DF0-41C3-AF44-4C6F280D3FAE
Swap partition 0657FD6D-A4AB-43C4-84E5-0933C84B4F4F
Logical Volume Manager (LVM) partition E6D6D379-F507-44C2-A23C-238F2A3DF928
/home partition[33] 933AC7E1-2EB4-4F13-B844-0E14E2AEF915
/srv (server data) partition[33] 3B8F8425-20E0-4F3B-907F-1A25A76F98E8
Plain dm-crypt partition[34][35][36] 7FFEC5C9-2D00-49B7-8941-3EA10A5586B7
LUKS partition[34][35][36][37] CA7D7CCB-63ED-4C53-861C-1742536059CC
Reserved 8DA63339-0007-60C0-C436-083AC8230908
FreeBSD Boot partition 83BD6B9D-7F41-11DC-BE0B-001560B84F0F
Data partition 516E7CB4-6ECF-11D6-8FF8-00022D09712B
Swap partition 516E7CB5-6ECF-11D6-8FF8-00022D09712B
Unix File System (UFS) partition 516E7CB6-6ECF-11D6-8FF8-00022D09712B
Vinum volume manager partition 516E7CB8-6ECF-11D6-8FF8-00022D09712B
ZFS partition 516E7CBA-6ECF-11D6-8FF8-00022D09712B
macOS
Darwin
Hierarchical File System Plus (HFS+) partition 48465300-0000-11AA-AA11-00306543ECAC
Apple APFS 7C3457EF-0000-11AA-AA11-00306543ECAC
Apple UFS container 55465300-0000-11AA-AA11-00306543ECAC
ZFS[h] 6A898CC3-1DD2-11B2-99A6-080020736631
Apple RAID partition 52414944-0000-11AA-AA11-00306543ECAC
Apple RAID partition, offline 52414944-5F4F-11AA-AA11-00306543ECAC
Apple Boot partition (Recovery HD) 426F6F74-0000-11AA-AA11-00306543ECAC
Apple Label 4C616265-6C00-11AA-AA11-00306543ECAC
Apple TV Recovery partition 5265636F-7665-11AA-AA11-00306543ECAC
Apple Core Storage (i.e. Lion FileVault) partition 53746F72-6167-11AA-AA11-00306543ECAC
SoftRAID_Status B6FA30DA-92D2-4A9A-96F1-871EC6486200
SoftRAID_Scratch 2E313465-19B9-463F-8126-8A7993773801
SoftRAID_Volume FA709C7E-65B1-4593-BFD5-E71D61DE9B02
SoftRAID_Cache BBBA6DF5-F46F-4A89-8F59-8765B2727503
Solaris
illumos
Boot partition 6A82CB45-1DD2-11B2-99A6-080020736631
Root partition 6A85CF4D-1DD2-11B2-99A6-080020736631
Swap partition 6A87C46F-1DD2-11B2-99A6-080020736631
Backup partition 6A8B642B-1DD2-11B2-99A6-080020736631
/usr partition[h] 6A898CC3-1DD2-11B2-99A6-080020736631
/var partition 6A8EF2E9-1DD2-11B2-99A6-080020736631
/home partition 6A90BA39-1DD2-11B2-99A6-080020736631
Alternate sector 6A9283A5-1DD2-11B2-99A6-080020736631
Reserved partition 6A945A3B-1DD2-11B2-99A6-080020736631
6A9630D1-1DD2-11B2-99A6-080020736631
6A980767-1DD2-11B2-99A6-080020736631
6A96237F-1DD2-11B2-99A6-080020736631
6A8D2AC7-1DD2-11B2-99A6-080020736631
NetBSD[38][i] Swap partition 49F48D32-B10E-11DC-B99B-0019D1879648
FFS partition 49F48D5A-B10E-11DC-B99B-0019D1879648
LFS partition 49F48D82-B10E-11DC-B99B-0019D1879648
RAID partition 49F48DAA-B10E-11DC-B99B-0019D1879648
Concatenated partition 2DB519C4-B10F-11DC-B99B-0019D1879648
Encrypted partition 2DB519EC-B10F-11DC-B99B-0019D1879648
Chrome OS[39] Chrome OS kernel FE3A2A5D-4F32-41A7-B725-ACCC3285A309
Chrome OS rootfs 3CB8E202-3B7E-47DD-8A3C-7FF2A13CFCEC
Chrome OS future use 2E0A753D-9E48-43B0-8337-B15192CB1B5E
Haiku[40] Haiku BFS 42465331-3BA3-10F1-802A-4861696B7521
MidnightBSD[41][i] Boot partition 85D5E45E-237C-11E1-B4B3-E89A8F7FC3A7
Data partition 85D5E45A-237C-11E1-B4B3-E89A8F7FC3A7
Swap partition 85D5E45B-237C-11E1-B4B3-E89A8F7FC3A7
Unix File System (UFS) partition 0394EF8B-237E-11E1-B4B3-E89A8F7FC3A7
Vinum volume manager partition 85D5E45C-237C-11E1-B4B3-E89A8F7FC3A7
ZFS partition 85D5E45D-237C-11E1-B4B3-E89A8F7FC3A7
Ceph[j] Journal 45B0969E-9B03-4F30-B4C6-B4B80CEFF106
dm-crypt journal 45B0969E-9B03-4F30-B4C6-5EC00CEFF106
OSD 4FBD7E29-9D25-41B8-AFD0-062C0CEFF05D
dm-crypt OSD 4FBD7E29-9D25-41B8-AFD0-5EC00CEFF05D
Disk in creation 89C57F98-2FE5-4DC0-89C1-F3AD0CEFF2BE
dm-crypt disk in creation 89C57F98-2FE5-4DC0-89C1-5EC00CEFF2BE
Block CAFECAFE-9B03-4F30-B4C6-B4B80CEFF106
Block DB 30CD0809-C2B2-499C-8879-2D6B78529876
Block write-ahead log 5CE17FCE-4087-4169-B7FF-056CC58473F9
Lockbox for dm-crypt keys FB3AABF9-D25F-47CC-BF5E-721D1816496B
Multipath OSD 4FBD7E29-8AE0-4982-BF9D-5A8D867AF560
Multipath journal 45B0969E-8AE0-4982-BF9D-5A8D867AF560
Multipath block CAFECAFE-8AE0-4982-BF9D-5A8D867AF560
Multipath block 7F4A666A-16F3-47A2-8445-152EF4D03F6C
Multipath block DB EC6D6385-E346-45DC-BE91-DA2A7C8B3261
Multipath block write-ahead log 01B41E1B-002A-453C-9F17-88793989FF8F
dm-crypt block CAFECAFE-9B03-4F30-B4C6-5EC00CEFF106
dm-crypt block DB 93B0052D-02D9-4D8A-A43B-33A3EE4DFBC3
dm-crypt block write-ahead log 306E8683-4FE2-4330-B7C0-00A917C16966
dm-crypt LUKS journal 45B0969E-9B03-4F30-B4C6-35865CEFF106
dm-crypt LUKS block CAFECAFE-9B03-4F30-B4C6-35865CEFF106
dm-crypt LUKS block DB 166418DA-C469-4022-ADF4-B30AFD37F176
dm-crypt LUKS block write-ahead log 86A32090-3647-40B9-BBBD-38D8C573AA86
dm-crypt LUKS OSD 4FBD7E29-9D25-41B8-AFD0-35865CEFF05D
OpenBSD Data partition 824CC7A0-36A8-11E3-890A-952519AD3F61
QNX Power-safe (QNX6) file system[43] CEF5A9AD-73BC-4601-89F3-CDEEEEE321A1
Plan 9 Plan 9 partition C91818F9-8025-47AF-89D2-F030D7000C2C
VMware ESX vmkcore (coredump partition) 9D275380-40AD-11DB-BF97-000C2911D1B8
VMFS filesystem partition AA31E02A-400F-11DB-9590-000C2911D1B8
VMware Reserved 9198EFFC-31C0-11DB-8F78-000C2911D1B8
Android-IA[44][45][46][47] Bootloader 2568845D-2332-4675-BC39-8FA5A4748D15
Bootloader2 114EAFFE-1552-4022-B26E-9B053604CF84
Boot 49A4D17F-93A3-45C1-A0DE-F50B2EBE2599
Recovery 4177C722-9E92-4AAB-8644-43502BFD5506
Misc EF32A33B-A409-486C-9141-9FFB711F6266
Metadata 20AC26BE-20B7-11E3-84C5-6CFDB94711E9
System 38F428E6-D326-425D-9140-6E0EA133647C
Cache A893EF21-E428-470A-9E55-0668FD91A2D9
Data DC76DDA9-5AC1-491C-AF42-A82591580C0D
Persistent EBC597D0-2053-4B15-8B64-E0AAC75F4DB1
Vendor C5A0AEEC-13EA-11E5-A1B1-001E67CA0C3C
Config BD59408B-4514-490D-BF12-9878D963F378
Factory 8F68CC74-C5E5-48DA-BE91-A0C8C15E9C80
Factory (alt)[48] 9FDAA6EF-4B3F-40D2-BA8D-BFF16BFB887B
Fastboot / Tertiary[49][50] 767941D0-2085-11E3-AD3B-6CFDB94711E9
OEM AC6D7924-EB71-4DF8-B48D-E267B27148FF
Android 6.0+ ARM Android Meta 19A710A2-B3CA-11E4-B026-10604B889DCF
Android EXT 193D1EA4-B3CA-11E4-B075-10604B889DCF
Open Network Install Environment (ONIE) Boot 7412F7D5-A156-4B13-81DC-867174929325
Config D4E6E2CD-4469-46F3-B5CB-1BFF57AFC149
PowerPC PReP boot 9E1A2D38-C612-4316-AA26-8B49521E5A8B
freedesktop.org OSes (Linux, etc.) Shared boot loader configuration[51] BC13C2FF-59E6-4262-A352-B275FD6F7172
Atari TOS Basic data partition (GEM, BGM, F32) 734E5AFE-F61A-11E6-BC64-92361F002671
参考:
https://www.cnblogs.com/duzhaoqi/p/7395619.html
.
发表在 linux | sgdisk已关闭评论

Linux disk / disk uuid

linux 新版本硬盘顺序会发生变化,因此改为使用UUID做为分区标识。
如: sda/sdb/sdc, 增加一块硬盘后原sdb可能会变成sde

一、uuid 与挂载点
1、使用blkid命令获取UUID

#blkid
/dev/sda1: SEC_TYPE="msdos" UUID="F159-EA55" TYPE="vfat" PARTLABEL="EFI System Partition" PARTUUID="ed7d2e13-8197-4226-8fdc-47d4aa64aebb"
/dev/sda2: LABEL="boot" UUID="f7755604-99f2-4d94-ab1a-47b14def7e26" TYPE="xfs" PARTUUID="627c028f-bf10-4705-b465-d5118d8ee67d"
/dev/sda3: UUID="Bs0vJv-cena-E9eO-2WcM-iJNQ-26Mr-fGG1pr" TYPE="LVM2_member" PARTUUID="18c50ff9-0e0d-40ac-8e2a-4f7f768347ed"
/dev/mapper/cl-root: UUID="b2f57437-ba99-4a2d-9c82-a41037aa0e38" TYPE="xfs"
/dev/mapper/cl-swap: UUID="2930b30d-3039-442d-a210-da1d7775652e" TYPE="swap"
/dev/mapper/cl-data: LABEL="data" UUID="cfc65b4e-0ca4-4b48-934e-5f668a4fb3b5" TYPE="xfs"

查看/dev目录获取UUID

#ll /dev/disk/by-uuid/

lrwxrwxrwx 1 root root 10 11月 25 19:56 2930b30d-3039-442d-a210-da1d7775652e -> ../../dm-1
lrwxrwxrwx 1 root root 10 11月 25 19:56 b2f57437-ba99-4a2d-9c82-a41037aa0e38 -> ../../dm-0
lrwxrwxrwx 1 root root 10 11月 25 19:56 cfc65b4e-0ca4-4b48-934e-5f668a4fb3b5 -> ../../dm-2
lrwxrwxrwx 1 root root 10 11月 25 19:56 F159-EA55 -> ../../sda1
lrwxrwxrwx 1 root root 10 11月 25 19:56 f7755604-99f2-4d94-ab1a-47b14def7e26 -> ../../sda2

修改/etc/fstab文件,使用uuid
# cat /etc/fstab
#
# /etc/fstab
# Created by anaconda on Mon Sep 8 16:38:29 2014
#
# Accessible filesystems, by reference, are maintained under '/dev/disk'
# See man pages fstab(5), findfs(8), mount(8) and/or blkid(8) for more info
#
/dev/mapper/cl-root / xfs defaults 1 1
UUID=f7755604-99f2-4d94-ab1a-47b14def7e26 /boot xfs defaults 1 2
UUID=F159-EA55 /boot/efi vfat umask=0077,shortname=winnt 0 0
/dev/mapper/cl-data /data xfs defaults,noatime,nobarrier 1 2
/dev/mapper/cl-swap swap swap defaults 0 0

...

发表在 linux | 标签为 | Linux disk / disk uuid已关闭评论

Hadoop 备忘录

计算引擎层

Hadoop生态和其他生态最大的不同之一就是“单一平台多种应用”的理念了。传的数据库底层只有一个引擎,只处理关系型应用,所以是“单一平台单一应用”;而NoSQL市场有上百个NoSQL软件,每一个都针对不同的应用场景且完全独立,因此是“多平台多应用”的模式。而Hadoop在底层共用一份HDFS存储,上层有很多个组件分别服务多种应用场景,如:

  • 确定性数据分析:主要是简单的数据统计任务,例如OLAP,关注快速响应,实现组件有Impala等;
  • 探索性数据分析:主要是信息关联性发现任务,例如搜索,关注非结构化全量信息收集,实现组件有Search等;
  • 预测性数据分析:主要是机器学习类任务,例如逻辑回归等,关注计算模型的先进性和计算能力,实现组件有Spark、MapReduce等;
  • 数据处理及转化:主要是ETL类任务,例如数据管道等,关注IO吞吐率和可靠性,实现组件有MapReduce等

服务层

服务层是包装底层引擎的编程API细节,对业务人员提供更高抽象的访问模型,如Pig、Hive等。

而其中最炙手可热的就是OLAP的SQL市场了。现在,Spark有70%的访问量来自于SparkSQL!

SQL on Hadoop到底哪家强?Hive、Facebook的Pheonix、Presto、SparkSQL、Cloudera推的Impala、MapR推的Drill、IBM的BigSQL、还是Pivital开源的HAWQ?


发表在 storage | 标签为 | Hadoop 备忘录已关闭评论

Centos kvm+ceph

  • Centos kvm+ceph
  • 一. centos6.5 安装kvm
  • 1. disable selinux
  • 2. 确认支持intel虚拟化
  • 3. 安装需要的包
  • 4.设置桥接网络
  • 5.运行kvm instance(此步骤仅用于测试环境是否安装成功)
  • 6.连接到kvm
  • 二. centos安装ceph(firefly版本)
  • 准备机器
  • 管理机安装
  • 安装其他节点
  • 三. kvm使用ceph
  • 创建osd pool(块设备的容器)
  • 设置账号对该pool的读写权限
  • 用qemu-img在pool中创建img
  • 验证img创建成功
  • 用kvm创建一个虚拟机

Centos kvm+ceph

centos 7无法用公用源安装ceph, 包依赖不满足
centos 6可以安装,但内核不支持rbd,需要更新内核
rpm --importhttp://elrepo.org/RPM-GPG-KEY-elrepo.org

rpm -Uvhhttp://elrepo.org/elrepo-release-6-5.el6.elrepo.noarch.rpm

yum --enablerepo=elrepo-kernel install kernel-lt-y )

一. centos6.5 安装kvm

1. disable selinux

vi /etc/selinux/config
reboot

2. 确认支持intel虚拟化

egrep '(vmx|svm)' --color=always /proc/cpuinfo
空代表不支持

3. 安装需要的包

rpm --import /etc/pki/rpm-gpg/RPM-GPG-KEY*
yum install virt-manager libvirt qemu-kvm openssh-askpass kvm python-virtinst

service libvirtd start
chkconfig libvirtd on

emulator 一般是qemu-kvm,也可能是其他。
/usr/libexec/qemu-kvm -M ? 查看支持的host系统类型 (我碰到的情况,启动虚拟机时提示host类型rhel6.5不支持,virsh edit ...将host中的rhel6.5改为pc通过)
/usr/libexec/qemu-kvm -drive format=? 查看支持的设备类型 (必须支持rbd,如果没有显示,需要安装支持的版本。源码安装git clone git://git.qemu.org/qemu.git;./configure --enable-rbd。 可能未必产生qemu-kvm,也许是qemu-system-x86_64之类的,那就需要在配置文件里将emulator换成编译好的可执行文件)

4.设置桥接网络

yum install bridge-utils
vi /etc/sysconfig/network-scripts/ifcfg-br0

DEVICE="br0"
NM_CONTROLLED="no"
ONBOOT=yes
TYPE=Bridge
BOOTPROTO=none
IPADDR=192.168.0.100
PREFIX=24
GATEWAY=192.168.0.1
DNS1=8.8.8.8
DNS2=8.8.4.4
DEFROUTE=yes
IPV4_FAILURE_FATAL=yes
IPV6INIT=no
NAME="System br0"

vi /etc/sysconfig/network-scripts/ifcfg-eth0

DEVICE="eth0"
NM_CONTROLLED="no"
ONBOOT=yes
TYPE="Ethernet"
UUID="73cb0b12-1f42-49b0-ad69-731e888276ff"
HWADDR=00:1E:90:F3:F0:02
DEFROUTE=yes
IPV4_FAILURE_FATAL=yes
IPV6INIT=no
NAME="System eth0"
BRIDGE=br0

/etc/init.d/network restart

5.运行kvm instance(此步骤仅用于测试环境是否安装成功)

virt-install --connect qemu:///system -n vm10 -r 512 --vcpus=2 --disk path=/var/lib/libvirt/images/vm10.img,size=12 -c /dev/cdrom --vnc --noautoconsole --os-type linux --os-variant debiansqueeze --accelerate --network=bridge:br0 --hvm

6.连接到kvm

如果需要安装gui
yum -y groupinstall "Desktop" "Desktop Platform" "X Window System" "Fonts"

二. centos安装ceph(firefly版本)

准备机器

一台安装管理机:admin
一台monitor:node1
两台数据机osd: node2, node3
一台使用ceph rbd的客户端: ceph-client

所有机器上都创建ceph用户,给予sudo权限,所以后续命令以ceph用户执行。
所有机器关闭 selinux
所有机器关闭Defaults requiretty(sudo visudo)
所有机器检查iptables等防火墙设置,节点间通讯使用22,6789,6800等端口,防止被拒绝

管理机安装

添加repo
sudo vim /etc/yum.repos.d/ceph.repo

[ceph-noarch]
name=Ceph noarch packages
baseurl=http://ceph.com/rpm-{ceph-release}/{distro}/noarch
enabled=1
gpgcheck=1
type=rpm-md
gpgkey=https://ceph.com/git/?p=ceph.git;a=blob_plain;f=keys/release.asc

我将baseurl替换为baseurl=http://ceph.com/rpm-firefly/el6/noarch

执行sudo yum update && sudo yum install ceph-deploy

使得admin用ssh key登陆其他机器
ssh-keygen
ssh-copy-id ceph@node1
ssh-copy-id ceph@node2
ssh-copy-id ceph@node3

安装其他节点

admin机器上
mkdir my-cluster
cd my-cluster

初始化配置:
ceph-deploy new node1
此时会在当前目录下创建配置文件ceph.conf,编辑ceph.conf,
添加osd pool default size = 2, 这是因为我们只有2个osd
添加rbd default format = 2, 将默认的rbd image格式设置为2,支持image的clone功能
添加journal dio = false,

在所有节点上安装ceph
ceph-deploy install admin node1 node2 node3

初始化监控节点
ceph-deploy mon create-initial node1

初始化osd节点
ssh node2
sudo mkdir /var/local/osd0
exit
ssh node3
sudo mkdir /var/local/osd1
exit

ceph-deploy osd prepare node2:/var/local/osd0 node3:/var/local/osd1
ceph-deploy osd activate node2:/var/local/osd0 node3:/var/local/osd1
(此处两个命令应该在数秒内结束,若长时间不响应直至300秒超时,考虑是否有防火墙因素。)

将配置拷贝到各个节点
ceph-deploy admin admin-node node1 node2 node3

sudo chmod +r /etc/ceph/ceph.client.admin.keyring
ceph health
ceph status
希望得到active_clean状态

三. kvm使用ceph

创建osd pool(块设备的容器)

ceph osd pool create libvirt-pool 128 128

设置账号对该pool的读写权限

假设我们使用的账号是libvirt(如果使用admin账号默认拥有所有权限,无需设置)
ceph auth get-or-create client.libvirt mon 'allow r' osd 'allow class-read object_prefix rbd_children, allow rwx pool=libvirt-pool'

用qemu-img在pool中创建img

qemu-img create -f rbd rbd:libvirt-pool/new-libvirt-image 10G
这一步我遇到了Unknown file format 'rbd', 这是因为低版本的qemu-img不支持rbd.
但是我的qemu-img版本号已经够了,猜测是我的包在编译时没有加rbd的选项。无奈强制安装了版本号更低的 http://ceph.com/packages/qemu-kvm/centos/x86_64/qemu-img-0.12.1.2-2.355.el6.2.cuttlefish.x86_64.rpm 才支持)

验证img创建成功

rbd -p libvirt-pool ls

用kvm创建一个虚拟机

1. 用virsh命令或virt-manager创建一个虚拟机
需要一个iso或img 在/var/lib/libvirt/images/下
我将它命名为test。 cd rom中选择一个iso,比如debian.iso.不选硬盘。

2. virsh edit test

将该vm的配置修改为使用rbd存储
找到
<devices>

在其后添加如下:
<disk type='network' device='disk'>
<source protocol='rbd' name='libvirt-pool/new-libvirt-image'>
<host name='{monitor-host}' port='6789'/>
</source>
<target dev='vda' bus='virtio'/>
</disk>

3. 创建访问ceph的账号
cat > secret.xml <<EOF
<secret ephemeral='no' private='no'>
<usage type='ceph'>
<name>client.libvirt secret</name>
</usage>
</secret>
EOF

sudo virsh secret-define --file secret.xml
<uuid of secret is output here>
保存用户libvirt的key
ceph auth get-key client.libvirt | sudo tee client.libvirt.key
保存产生的uuid

sudo virsh secret-set-value --secret {uuid of secret} --base64 $(cat client.libvirt.key) && rm client.libvirt.key secret.xml

virsh edit test

add auth
...
</source>
<auth username='libvirt'>
<secret type='ceph' uuid='9ec59067-fdbc-a6c0-03ff-df165c0587b8'/>
</auth>

4. 开启虚拟机安装os
同时 virsh edit test
将配置的boot方式从cdrom改为hd

5.安装结束重启虚拟机,会boot from vda,也就是rbd

6. 下一步可以使用rbd snap, rdb clone, virsh, guestfs制作和使用虚拟机模板


发表在 virtual machine | 标签为 | Centos kvm+ceph已关闭评论